In this tutorial, we are going to explain in step-by-step detail how to Install Jenkins on Debian 11 OS.
Jenkins is a free open source continuous integration system tool written in Java, that helps developers to keep the code up to date in one place from different local machines. It is used for code automatic deployment, testing, building applications, and kind of securement that the latest code changes are always in the software.
Installing Jenkins on Debian 11 should take up to 10 minutes. Let’s get to work!
Table of Contents
Prerequisites
- A server with Debian 11 as OS
- User privileges: root or non-root user with sudo privileges
Step 1. Update the System
Since we have a fresh installation of Debian 11, we need to update the packages to its latest versions available:
sudo apt update -y && sudo apt upgrade -y
Step 2. Install Java
Jenkins is written in Java, and that is why we need the Java installed on our system along with some dependencies:
sudo apt install openjdk-11-jdk default-jre gnupg2 apt-transport-https wget -y
To check whether Java is installed execute the following command:
java -version
You should receive the following output:
root@vps:~# java -version
openjdk version "11.0.14" 2022-01-18
OpenJDK Runtime Environment (build 11.0.14+9-post-Debian-1deb11u1)
OpenJDK 64-Bit Server VM (build 11.0.14+9-post-Debian-1deb11u1, mixed mode, sharing)
Step 3. Add Jenkins GPG key and PPA
By default the repository of Debian 11, does not contain the Jenkins, so we need to add manually the key and the PPA.
wget https://pkg.jenkins.io/debian-stable/jenkins.io.key

sudo apt-key add jenkins.io.key
Once, the GPG key is added next is to add the PPA:
echo "deb https://pkg.jenkins.io/debian-stable binary/" | tee /etc/apt/sources.list.d/jenkins.list
Update the repository before you install Jenkins:
sudo apt update -y
Once, the system is updated with the latest packages, install Jenkins.
Step 4. Install Jenkins
sudo apt-get install jenkins -y
After the installation, start and enable the Jenkins service, in order for the service to start automatically after system reboot.
sudo systemctl start jenkins && sudo systemctl enable jenkins
To check the status of the service execute the following command:
sudo systemctl status jenkins
You should receive the following output:
root@vps:~# sudo systemctl status jenkins
● jenkins.service - LSB: Start Jenkins at boot time
     Loaded: loaded (/etc/init.d/jenkins; generated)
     Active: active (exited) since Sat 2022-02-12 04:50:43 EST; 1min 35s ago
       Docs: man:systemd-sysv-generator(8)
      Tasks: 0 (limit: 4678)
     Memory: 0B
        CPU: 0
     CGroup: /system.slice/jenkins.service

Feb 12 04:50:41 test.vps systemd[1]: Starting LSB: Start Jenkins at boot time...
Feb 12 04:50:41 test.vps jenkins[37526]: Correct java version found
Feb 12 04:50:42 test.vps su[37564]: (to jenkins) root on none
Feb 12 04:50:42 test.vps su[37564]: pam_unix(su-l:session): session opened for user jenkins(uid=114) by (uid=0)
Feb 12 04:50:42 test.vps su[37564]: pam_unix(su-l:session): session closed for user jenkins
Feb 12 04:50:43 test.vps jenkins[37526]: Starting Jenkins Automation Server: jenkins.
Feb 12 04:50:43 test.vps systemd[1]: Started LSB: Start Jenkins at boot time.
Another way to check if Jenkins, is active and running is to check port 8080
netstat -tunlp | grep 8080
You should receive the following output:
root@vps:~# netstat -tunlp | grep 8080
tcp6       0      0 :::8080                 :::*                    LISTEN      37591/jenkins: /usr
Step 5. Finish Jenkins Installation
After successful installation we can finish the installation by accessing the Jenkins Web Interface:
http://YourServerIPaddress:8080
You should see the screen below:
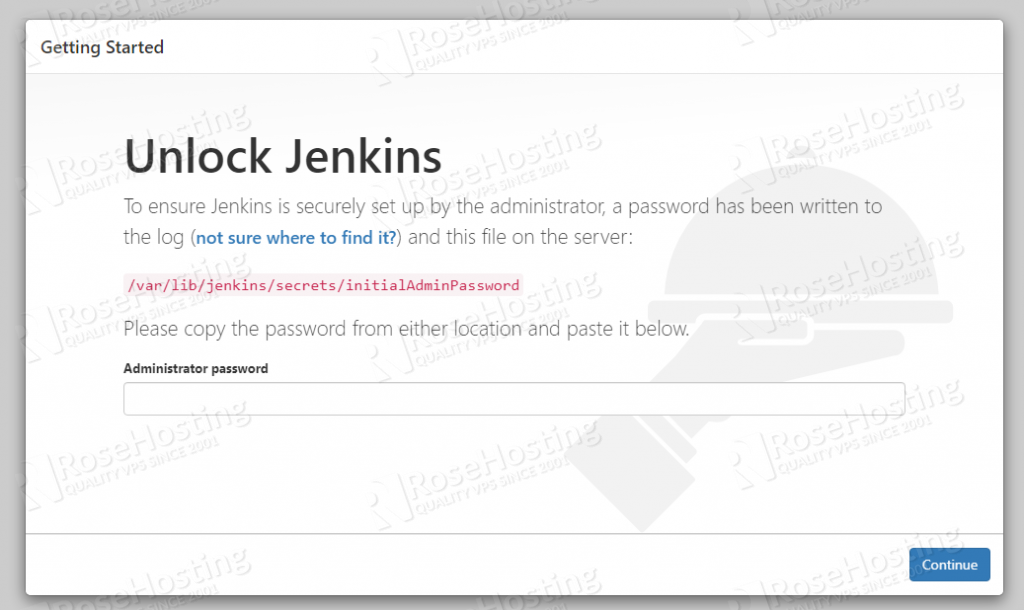
The Jenkins is asking the administrator in the order to be unlocked. To find the administrator password execute the following command:
cat /var/lib/jenkins/secrets/initialAdminPassword
The output of the administrator password will be as described below:
root@vps:~# cat /var/lib/jenkins/secrets/initialAdminPassword
e5bcfa4486dd412f988a4762a8535aa3
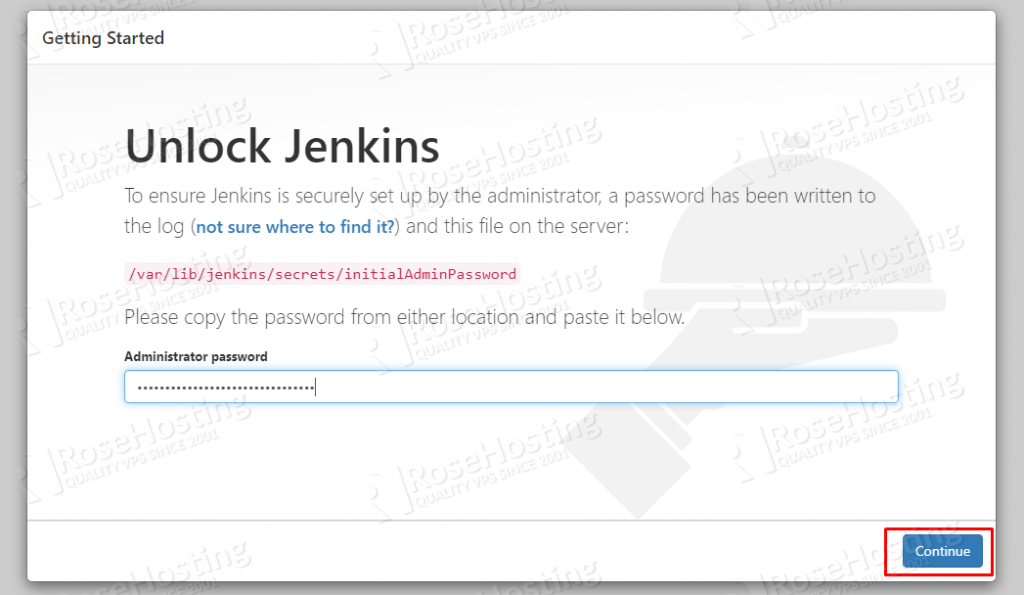
Copy the administrator password, paste in the input of the Jenkins interface and click on the “Continue” button.
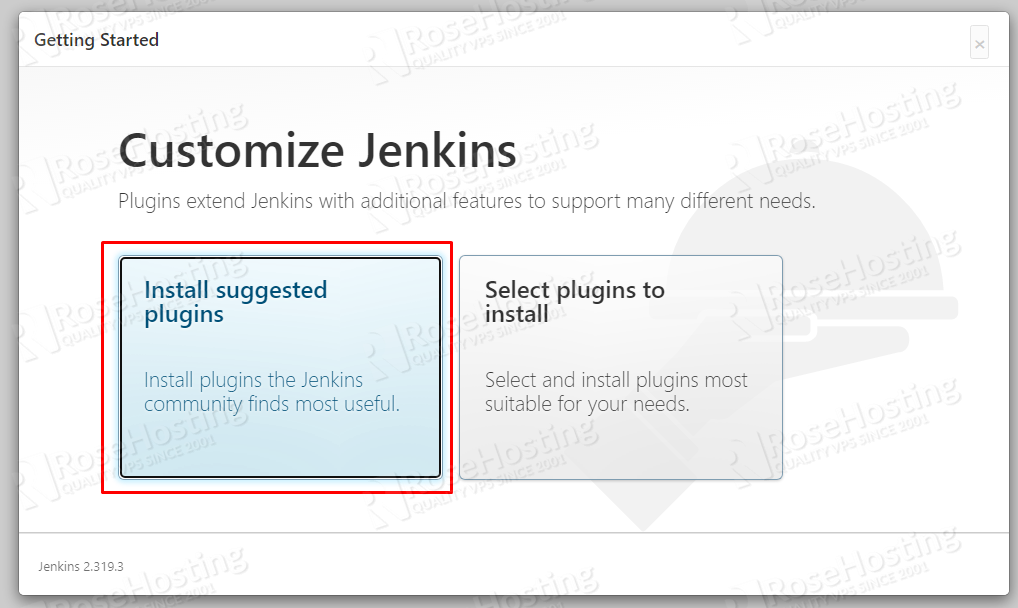
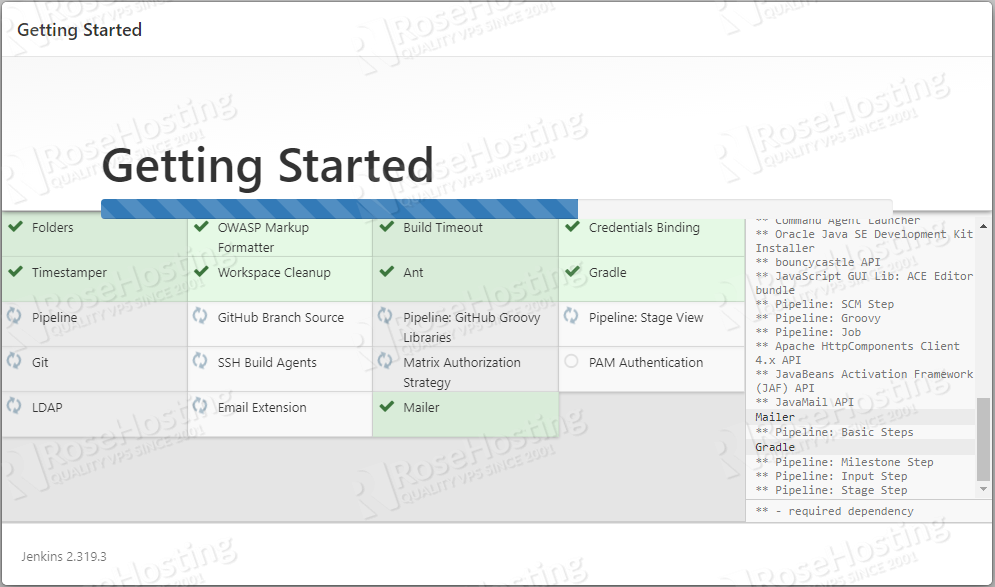
On the next screen there will be two choices, for plugin selection. We will use default suggested plugins:
There will be some configuration checks:
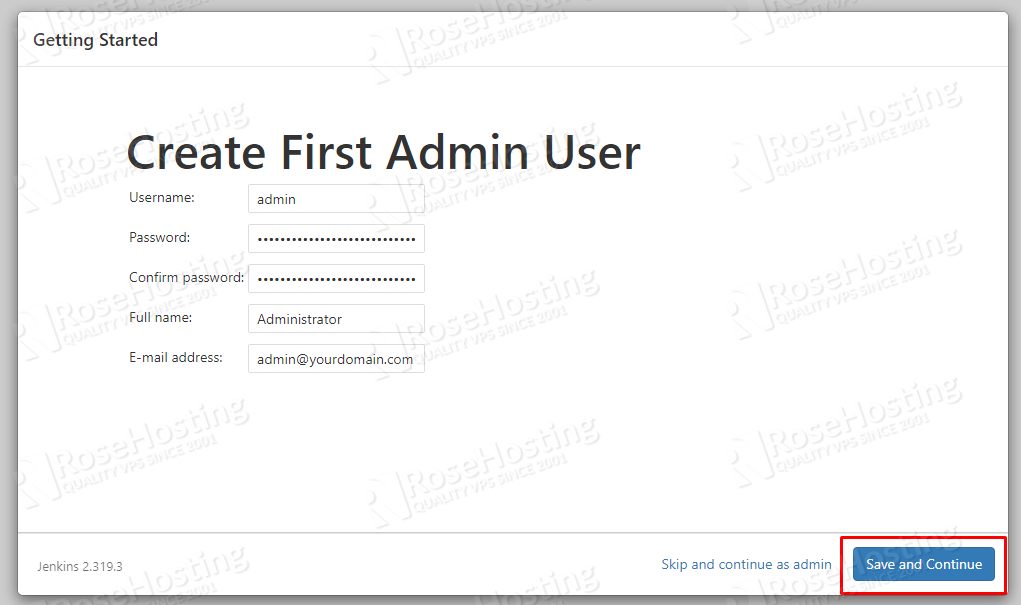
Once, the checks are passed create the first Admin user and hit on Save and Continue button:
On the next window there will be displayed your Jenkins URL containng the IP address and port 8080.
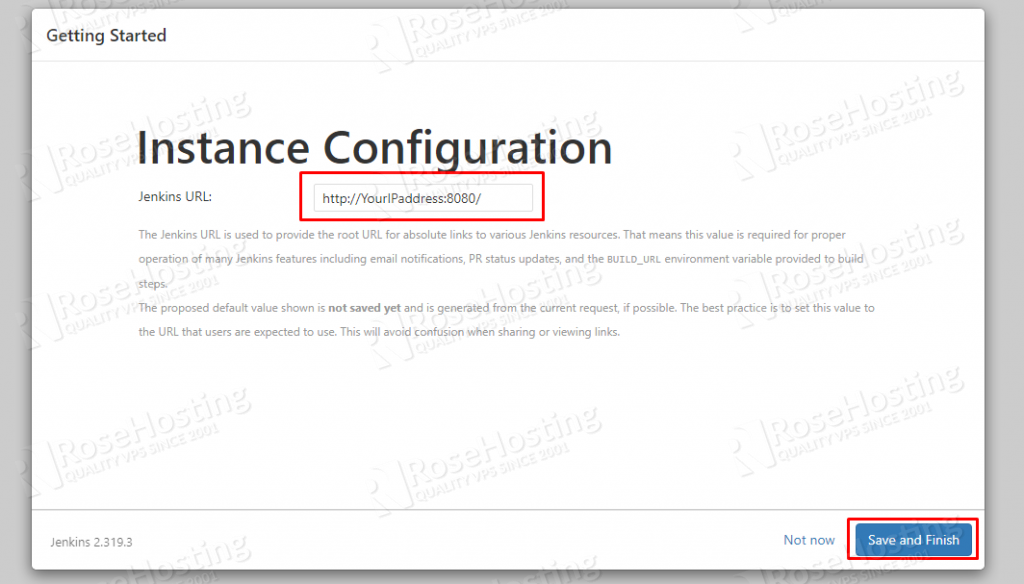
Click on the Save and Finish button.
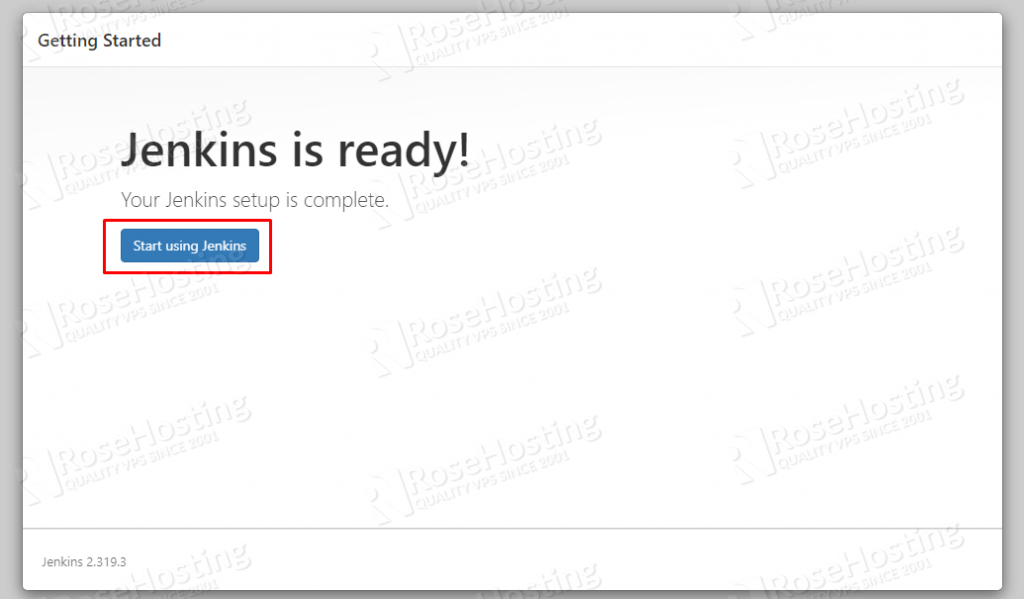
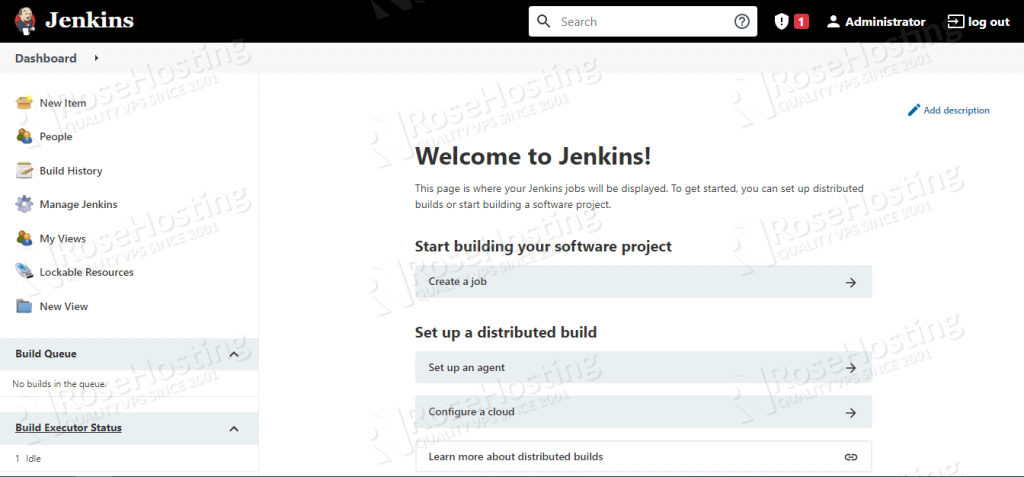
Jenkins is installed and is ready for use. When you click on the Start using Jenkins button you will be logged in to the Jenkins admin dashboard
Step 6. Setting up Apache as a Reverse Proxy
If you want to access your Jenkins installation via domain, you need to configure the Apache as a Reverse Proxy. First install the Apache Web server:
sudo apt install apache2
Start and enable the Apache service:
sudo systemctl start apache2 && sudo systemctl enable apache2
Check the status of the Apache service:
sudo systemctl status apache2
You should receive the following output:
root@vps:~# sudo systemctl status apache2
● apache2.service - The Apache HTTP Server
     Loaded: loaded (/lib/systemd/system/apache2.service; enabled; vendor preset: enabled)
     Active: active (running) since Fri 2022-02-11 19:25:48 EST; 10h ago
       Docs: https://httpd.apache.org/docs/2.4/
   Main PID: 715 (apache2)
      Tasks: 7 (limit: 4678)
     Memory: 20.0M
        CPU: 5.870s
     CGroup: /system.slice/apache2.service
Once, the Apache is installed create the jenkins.conf configuration file
cd /etc/apache2/sites-available/

sudo nano jenkins.conf
Paste the following lines of code, save and close the file.
<Virtualhost *:80>
    ServerName        yourdomain.com
    ProxyRequests     Off
    ProxyPreserveHost On
    AllowEncodedSlashes NoDecode

    <Proxy http://localhost:8080/*>
      Order deny,allow
      Allow from all
    </Proxy>

    ProxyPass         /  http://localhost:8080/ nocanon
    ProxyPassReverse  /  http://localhost:8080/
    ProxyPassReverse  /  http://yourdomain.com/
</Virtualhost>
Once, you save and close the file you need to execute the following commands:
sudo a2ensite jenkins
sudo a2enmod proxy
sudo a2enmod proxy_http
sudo a2enmod headers
sudo systemctl restart apache2
After enabling the Apache configuration and restarting the Apache service you will be able to access your Jenkins via your domain:
http://yourdomain.com
That’s all. You successfully installed and configured Jenkins on Debian 11. If you don’t know, something about the installation process and you find any difficulties feel free to contact our technical support and they will do the rest. We are available 24/7. All you need to do is to sign up for one of our SSD VPS plans and submit a support ticket.
If you liked this post on how to install Jenkins on Debian 11, please share it with your friends on the social networks using the buttons on the left or simply leave a reply below. Thanks.
tuto non fonctionnel
Hello Nino,
What is the issue you are facing on your installation? By following the same tutorial we were able to deploy Jenkins on Debian 11.