In this tutorial, we will show you how to install Jetty on a server running Debian 9. The Eclipse Jetty Web Server provides an HTTP server and Servlet container capable of serving static and dynamic content either from a standalone or embedded instantiation. It is designed to be lightweight, high-performance, embeddable, extensible, and flexible, thus making it an ideal platform for serving dynamic HTTP requests from any Java application.
REQUIREMENTS:
We will be using our Debian 9 Linux VPS template for this tutorial. You will also need a user with root access, or the root user itself.
Table of Contents
1. Connect to your Server
To connect to your server via SSH as the root user, use the following command:
ssh root@IP_ADDRESS -p PORT_NUMBER
and replace “IP_ADDRESS” and “PORT_NUMBER” with your actual server IP address and SSH port number.
Once logged in, make sure that your server is up-to-date by running the following commands:
$ apt-get update
$ apt-get upgrade
Also, install unzip and a text editor of your choice. We will use nano as our text editor:
$ apt-get install nano unzip
2. Install Java via PPA on Debian 9
We will use the PPA repository maintained by the Webupd8 Team for installing Java on Debian 9. The install script will ask you to accept the license agreement, after which it will download the Java archive file from the Oracle download page and set up everything for you.
To add the Webupd8 Team PPA repository, run the following commands on your server:
echo "deb http://ppa.launchpad.net/webupd8team/java/ubuntu xenial main" | tee /etc/apt/sources.list.d/webupd8team-java.list
echo "deb-src http://ppa.launchpad.net/webupd8team/java/ubuntu xenial main" | tee -a /etc/apt/sources.list.d/webupd8team-java.list
apt-key adv --keyserver hkp://keyserver.ubuntu.com:80 --recv-keys EEA14886
apt-get update
You can now install JDK8 with the following command:
$ apt-get install oracle-java8-installer
To check if everything is installed and set up correctly, run:
$ java -version
and you should see something similar to the following:
java version "1.8.0_191"
Java(TM) SE Runtime Environment (build 1.8.0_191-b12)
Java HotSpot(TM) 64-Bit Server VM (build 25.191-b12, mixed mode)
3. Install Jetty 9
Install some modules that are required by Jetty with the following command:
$ apt-get install authbind glassfish-jmac-api libapache-pom-java libasm-java libatinject-jsr330-api-java libcommons-dbcp-java libcommons-logging-java
libcommons-parent-java libcommons-pool-java libecj-java libjetty9-extra-java libjetty9-java libmail-java libservlet3.1-java libspring-beans-java
libspring-core-java libtaglibs-standard-impl-java libtaglibs-standard-spec-java libtomcat8-java
In this tutorial we will install Jetty 9.3 – we can get the latest version of jetty from the Jetty download page.
Download Jetty 9.3.12 package:
$ wget -c http://repo1.maven.org/maven2/org/eclipse/jetty/jetty-distribution/9.3.12.v20160915/jetty-distribution-9.3.12.v20160915.zip
Note: Release notes can be found in theVERSION.txtfile included with the distribution
Extract the Jetty package:
$ unzip jetty-distribution-9.3.12.v20160915.zip
Rename the directory to jetty and move it to /opt:
$ mv jetty-distribution-9.3.12.v20160915 jetty
$ mv jetty /opt
We will create a user and group named jetty. First create the group first:
$ sudo addgroup --quiet --system jetty
Create a user called jetty to run the Jetty web server on system start-up.
$ adduser --quiet --system --ingroup jetty --no-create-home --disabled-password jetty
Modify the /etc/passwd entry to change home and group for the jetty user.
$ usermod -c "Jetty" -d /opt/jetty -g jetty jetty
Change ownership of /opt/jetty directory to user jetty and group jetty.
$ chown -R jetty:jetty /opt/jetty
Symlink the jetty.sh script to the /etc/init.d/ directory to create a startup script file:
$ ln -s /opt/jetty/bin/jetty.sh /etc/init.d/jetty
Now, you need to create a configuration file for Jetty. Open a file:
$ nano /etc/default/jetty
Now paste the following:
JETTY_HOME=/opt/jetty
JETTY_USER=jetty
JETTY_PORT=8080
JETTY_HOST=your_server_IP
JETTY_LOGS=/opt/jetty/logs/
Don’t forget to add your server IP address in the JETTY_HOST line.
Navigate to the Jetty installation directory:
# cd /opt/jetty
Next, delete the webapps directory since there is nothing in it and copy the webapps directory from demo-base. It is a test and is demo data from Jetty.
$ rm -rf webapps/

$ cp -r demo-base/webapps/ /opt/jetty/
Finally, start the Jetty server:
$ service jetty start
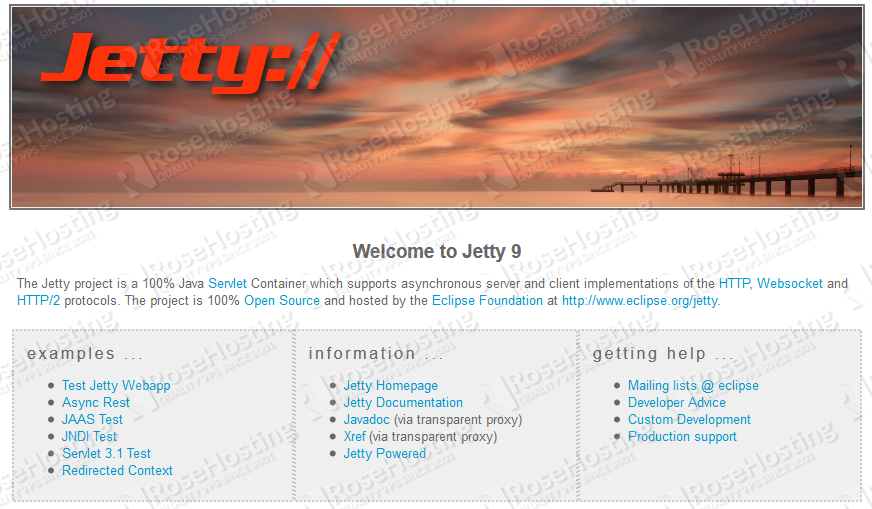
4. Access the Jetty Installation
Jetty runs on port 8080. To access your Jetty installation you will need to type the following URL in your web browser: http://your-ip-address:8080/
To deploy a WAR file, copy it into /opt/jetty/webapps and restart the server. The root URL of the web app will be http://your_IP_address:8080/war_name/ where war_name is the name of your war file.
Congratulations. You have successfully installed Jetty on your Debian 9 VPS. You can now check the Jetty documentation for more information.
Of course, you don’t have to do any of this if you use one of our Linux VPS Hosting services, in which case you can simply ask our expert Linux admins to install Jetty for you. They are available 24×7 and will take care of your request immediately.
PS. If you liked this post, please share it with your friends on the social networks using the buttons below, or simply leave a comment in the comment section. Thanks.