
Jupyter is a popular browser-based interactive notebook for programming, mathematics, and data science. It is a web application that allows us to create and share documents that contain live code, equations, visualizations, and narrative text. It supports a number of languages via plugins (“kernels”), such as Python, Ruby, Haskell, R, Scala, and Julia. In this tutorial, we will show you how to install Jupyter on Ubuntu 18.04 on one of our Linux VPS hosting services.
Some of the main features of the Jupyter Notebook web application are:
- In-browser code editing with automatic syntax highlighting, indentation, and tab completion/introspection.
- Easily execute code from your favorite web browser
- Displaying the result of computation using rich media representations, such as HTML, LaTeX, PNG, SVG, etc. For example, publication-quality figures rendered by the matplotlib library can be included inline.
- In-browser editing for rich text using the Markdown markup language, which can provide commentary for the code, is not limited to plain text.
- The ability to easily include mathematical notation within markdown cells using LaTeX, and rendered natively by MathJax.
Table of Contents
Prerequisites:
- Ubuntu 18.04 with 2GB of memory or higher
- Python 3
- Nginx
- SSH access with root privileges
1. Log in via SSH and Update the System
Log in to your Ubuntu 18.04 VPS with SSH as the root user:
# ssh root@IP_Address -p Port_number
You can check whether you have the proper Ubuntu version installed on your server with the following command:
lsb_release -a
You should get this output:
Distributor ID: Ubuntu
Description: Ubuntu 18.04.1 LTS
Release: 18.04
Codename: bionic
Then, run the following command to make sure that all installed packages on the server are updated to the latest available version:
# apt update && apt upgrade
Let’s create a sudoer to install Jupyter notebook, follow the prompts and use a strong password for the user.
# adduser jupyter
Now, let’s add the new user to the sudo group:
# usermod -aG sudo jupyter
Once added, we can log in as jupyter and do the installation:
su - jupyter
$ sudo apt install python3-pip python3-dev
2. Create a Python Virtual Environment for Jupyter
$ virtualenv jnotebook
$ source jnotebook/bin/activate
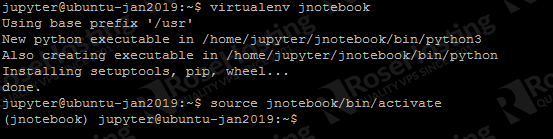
Now, you are in the Python virtual environment and you are ready to install Jupyter Notebook.
3. Install Jupyter Notebook
(jnotebook) jupyter@ubuntu-jan2019:~$ pip instal jupyter
NOTE: Pay attention to the command, even if we are using Python 3, when in the Python virtual environment, please use ‘pip’ command instead of ‘pip3’. This is because the virtual environment tool is always named pip, regardless of the Python version we use.
4. Run Jupyter Notebook
It’s done! You can now run the Jupyter Notebook. To actually start (run) it, enter the following command:
(jnotebook) jupyter@ubuntu-jan2019:~$ jupyter notebook

By default, Jupyter Notebook is configured to run on localhost and port 8888. To start it on a specific IP address, you can run this command:
(jnotebook) jupyter@ubuntu-jan2019:~$ jupyter notebook --ip='1.2.3.4'
Change 1.2.3.4 to your server’s IP address.
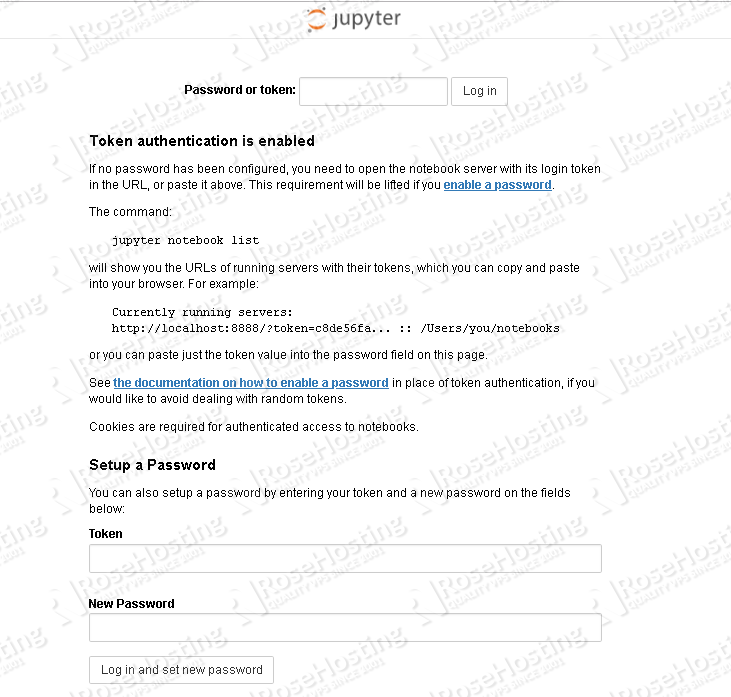
Using your favorite web browser, you can navigate to the link provided when running Jupyter.
At this point, you are accessing Jupyter Notebook using the token. As of Notebook version 5.3, we can create a password through the web interface or the command line.
Before creating a password, we need to generate the configuration file first, we can run this command:
(jnotebook) jupyter@ubuntu-jan2019:~$ jupyter notebook --generage-config
The command above will create a jupyter_notebook_config.py file. In this tutorial, the file is saved as /home/jupyter/.jupyter/jupyter_notebook_config.py
The ability to create a password during the first login might be disabled, you need to enable it by editing /home/jupyter/.jupyter/jupyter_notebook_config.py. Go to line 68 and edit “NotebookApp.allow_password_change”. Change the value from False to True, and don’t forget to uncomment the line. Then, save the file.
Now, we can run the following command to create a password, then run Jupyter Notebook again.
(jnotebook) jupyter@ubuntu-jan2019:~$ jupyter notebook password
(jnotebook) jupyter@ubuntu-jan2019:~$ jupyter notebook --ip='1.2.3.4'
5. Configure Jupyter Notebook to Run as a Service
If we run the ‘Jupyter notebook’ command in SSH, the application will be closed when we are disconnected from the SSH session.
To avoid this, we can run the command in a screen session or create a systemd file. In this tutorial, we will create a systemd file, so we can run the Jupyter notebook as a service.
$ sudo nano /etc/systemd/system/jupyter.service
Then paste the following lines to it, then save the file:
[Unit]
Description=Jupyter Notebook

[Service]
Type=simple
PIDFile=/run/jupyter.pid
ExecStart=/home/jupyter/jupyter/bin/jupyter-notebook --config=/home/jupyter/.jupyter/jupyter_notebook_config.py
User=jupyter
Group=jupyter
WorkingDirectory=/home/jupyter/jnotebook
Restart=always
RestartSec=10

[Install]
WantedBy=multi-user.target
Once saved, we need to enable and start the service.
$ sudo systemctl daemon-reload

$ sudo systemctl enable jupyter

$ sudo systemctl start jupyter
6. Install Nginx Web Server and Configure Reverse Proxy
Now, Jupyter Notebook is listening only on localhost. To be able to access it using your domain or subdomain, and without typing the port number in your web browser, we need to configure Nginx as a reverse proxy.
$ sudo nano /etc/nginx/sites-enabled/yourdomain.com.conf
Insert the following lines into the file. Change ‘yourdomain.com’ to your actual domain name that you want to use to access Jupyter Notebook:
upstream jupyter {
server 127.0.0.1:8888;
}

server {
listen 80 default;
server_name yourdomain.com;

access_log /var/log/nginx/yourdomain.com.access.log;
error_log /var/log/nginx/yourdomain.com.error.log;

location / {
     proxy_pass http://localhost:8888;
     proxy_set_header X-Forwarded-For $proxy_add_x_forwarded_for;
     proxy_set_header X-Real-IP $remote_addr;
     proxy_set_header Host $http_host;
     proxy_http_version 1.1;
     proxy_redirect off;
     proxy_buffering off;
     proxy_set_header Upgrade $http_upgrade;
     proxy_set_header Connection "upgrade";
     proxy_read_timeout 86400;
     }
}
Don’t forget to save the newly created configuration file.
Check the Nginx configuration and if everything is okay, restart it.
$ sudo nginx -t
$ sudo systemctl restart nginx
Now, we need to edit the Jupyter configuration file to enable us to access it using Nginx as a reverse proxy.
$ sudo nano /home/jupyter/.jupyter/jupyter_notebook_config.py
Go find “NotebookApp.allow_remote_access” and change the value from False to True. Don’t forget to uncomment the line.
Then, restart Jupyter:
$ sudo systemctl restart jupyter
At this point, you should be able to access Jupyter with your domain name at http://yourdomain.com. For more information about Jupyter, its features, and configuration, please check their official documentation.

Of course, you don’t have to know how to install Jupyter on Ubuntu 18.04 if you have Managed Ubuntu VPS Hosting with us. You can simply ask our support team to install Jupyter 10 on Ubuntu 18.04 for you. They are available 24/7 and will be able to help you with the installation of Jupyter 10 on Ubuntu 18.04.
In case you’ve switched to Ubuntu 20.04 already, we have the perfect tutorial on how to install Jupyter Notebook on Ubuntu 20.04.
PS. If you enjoy reading this blog post on how to install Jupyter on Ubuntu 18.04, feel free to share it on social networks using the shortcuts below, or simply leave a comment.
hello.
When i type jupyter notebook in my terminal at the end of installation this is what happen,
Traceback (most recent call last):
File “/home/marlon/jnotebook/bin/jupyter-notebook”, line 8, in
sys.exit(main())
File “/home/marlon/jnotebook/local/lib/python2.7/site-packages/jupyter_core/application.py”, line 270, in launch_instance
return super(JupyterApp, cls).launch_instance(argv=argv, **kwargs)
File “/home/marlon/jnotebook/local/lib/python2.7/site-packages/traitlets/config/application.py”, line 663, in launch_instance
app.initialize(argv)
File “”, line 2, in initialize
File “/home/marlon/jnotebook/local/lib/python2.7/site-packages/traitlets/config/application.py”, line 87, in catch_config_error
return method(app, *args, **kwargs)
File “/home/marlon/jnotebook/local/lib/python2.7/site-packages/notebook/notebookapp.py”, line 1628, in initialize
self.init_configurables()
File “/home/marlon/jnotebook/local/lib/python2.7/site-packages/notebook/notebookapp.py”, line 1319, in init_configurables
connection_dir=self.runtime_dir,
File “/home/marlon/jnotebook/local/lib/python2.7/site-packages/traitlets/traitlets.py”, line 556, in __get__
return self.get(obj, cls)
File “/home/marlon/jnotebook/local/lib/python2.7/site-packages/traitlets/traitlets.py”, line 535, in get
value = self._validate(obj, dynamic_default())
File “/home/marlon/jnotebook/local/lib/python2.7/site-packages/jupyter_core/application.py”, line 100, in _runtime_dir_default
ensure_dir_exists(rd, mode=0o700)
File “/home/marlon/jnotebook/local/lib/python2.7/site-packages/jupyter_core/utils/__init__.py”, line 13, in ensure_dir_exists
os.makedirs(path, mode=mode)
File “/home/marlon/jnotebook/lib/python2.7/os.py”, line 157, in makedirs
mkdir(name, mode)
OSError: [Errno 13] Permission denied: ‘/home/marlon/.local/share/jupyter/runtime’
It seems that you have a permission issue there. Please make sure you correct the permission