
Jira is a suite of project management software developed by an Australian company called Atlassian. It empowers collaboration across all teams from concept to customers. In this tutorial, we will show you how to install Jira on Ubuntu 22.04.
The word Jira is derived from the Japanese word ‘Gojira’, meaning Godzilla. The software is based on agile methodology. The developer, Atlassian, offers two hosting options for Jira. You can host your Jira application on their servers (Cloud), or you can also host it on your own server (Data Center). We recommend hosting it on your own server as having full access and control to your data is valuable.
Table of Contents
Prerequisites
- An Ubuntu 22.04 VPS with at least 8GB of RAM
- JVM Heap size set to at least 1GB
Step 1. Log in to server and update
Login to your Ubuntu 22.04 VPS via SSH:
ssh root@IP_Address -p Port_Number
You need to replace “IP_Address” and “Port_number” with your server’s actual IP address and SSH port number.
Once logged in, you can check whether you have the proper Ubuntu version installed on your server with the following command:
# lsb_release -a
You should get this output:
No LSB modules are available.
Distributor ID: Ubuntu
Description: Ubuntu 22.04 LTS
Release: 22.04
Codename: jammy
Once logged in, make sure that all installed packages are up to date:
# apt update
# apt upgrade
In this article, we will use ‘root’ to run the shell commands. If you want to use your regular system user with sudo privileges to run the commands, make sure to append ‘sudo’ in front of the commands.
Step 2. Install Dependencies
Before proceeding to the next step, we need to install the dependencies required by Jira. Let’s install them from the default Ubuntu repository.
# apt install fontconfig wget
Let’s continue to the next step.
Step 3. Install MySQL Server and Create a Database
Jira supports several database engine. In this step, we are going to install MySQL 8.0 from the default Ubuntu repository.
# apt install mysql-server -y
Once installed, MySQL server will be up and running. Let’s log in to MySQL shell and create a database.
# mysql
mysql> CREATE DATABASE jiradb;
mysql> CREATE USER jira@localhost IDENTIFIED BY 'm0d1fyth15';
mysql> GRANT ALL ON jiradb.* TO jira@localhost WITH GRANT OPTION;
mysql> FLUSH PRIVILEGES;
mysql> \q
Make sure to replace m0d1fyth15 with a stronger password. You should also set a root password on MySQL for better security.
Step 4. Install Jira
In this step, we are going to install Jira software using the Linux installer. We need to go to https://www.atlassian.com/software/jira/update then download it, choose Linux in the operating system dropdown list.
At the time of writing this article, Jira version 9.11.1 was the latest version available to download, so let’s download it now. You can change the link to a later version if there is one.
# wget https://www.atlassian.com/software/jira/downloads/binary/atlassian-jira-software-9.11.1-x64.bin -O atlassian-jira-software.bin
Then, let’s give it the appropriate permissions.
# chmod +x atlassian-jira-software.bin
Finally, run the installer.
./atlassian-jira-software.bin
You will be prompted for some questions, make sure to choose “Custom Install” when asked and hit ENTER for all other questions.
The installer should return with the following output.
This will install Jira Software 9.11.1 on your computer.
OK [o, Enter], Cancel [c]

Click Next to continue, or Cancel to exit Setup.

Choose the appropriate installation or upgrade option.
Please choose one of the following:
Express Install (use default settings) [1], Custom Install (recommended for advanced users) [2, Enter], Upgrade an existing Jira installation [3]
2

Select the folder where you would like Jira Software to be installed.
Where should Jira Software be installed?
[/opt/atlassian/jira]


Default location for Jira Software data
[/var/atlassian/application-data/jira]


Configure which ports Jira Software will use.
Jira requires two TCP ports that are not being used by any other
applications on this machine. The HTTP port is where you will access Jira
through your browser. The Control port is used to startup and shutdown Jira.
Use default ports (HTTP: 8080, Control: 8005) - Recommended [1, Enter], Set custom value for HTTP and Control ports [2]

Jira can be run in the background.
You may choose to run Jira as a service, which means it will start
automatically whenever the computer restarts.
Install Jira as Service?
Yes [y, Enter], No [n]


Details on where Jira Software will be installed and the settings that will be used.
Installation Directory: /opt/atlassian/jira
Home Directory: /var/atlassian/application-data/jira
HTTP Port: 8080
RMI Port: 8005
Install as service: Yes
Install [i, Enter], Exit [e]
At this point, the installation is being started, and once completed, you will see a message like this:
Please wait a few moments while Jira Software is configured.

Installation of Jira Software 9.11.1 is complete
Start Jira Software 9.11.1 now?
Yes [y, Enter], No [n]

Press ENTER to proceed, Jira software should be up and running in a moment.

Please wait a few moments while Jira Software starts up.
Launching Jira Software ...

Installation of Jira Software 9.11.1 is complete
Your installation of Jira Software 9.11.1 is now ready and can be accessed
via your browser.
Jira Software 9.11.1 can be accessed at http://localhost:8080
Finishing installation ...
That’s it, Jira has been installed and it is now accessible on port 8080.
Step 5. Install MySQL Connector
In this tutorial, we are going to use MySQL as the database engine. Let’s download MySQL Java connector to connect Java to the database server. Go to https://dev.mysql.com/downloads/connector/j/ and choose platform independent to get the download link.
# wget https://dev.mysql.com/get/Downloads/Connector-J/mysql-connector-j-8.1.0.tar.gz
Once downloaded, we need to extract it to get the .jar file
# tar -xzvf mysql-connector-j-8.1.0.tar.gz
Finally, copy the .jar file to the Jira library directory.
# cp mysql-connector-j-8.1.0/mysql-connector-j-8.1.0.jar /opt/atlassian/jira/lib
Then, we need to stop and start Jira to apply the changes we made.
/etc/init.d/jira stop
/etc/init.d/jira start
Step 6. Configure Jira
At this point, Jira has been started, and you can navigate to http://YOUR_SERVER_IP_ADDRESS:8080 to start configuring it.
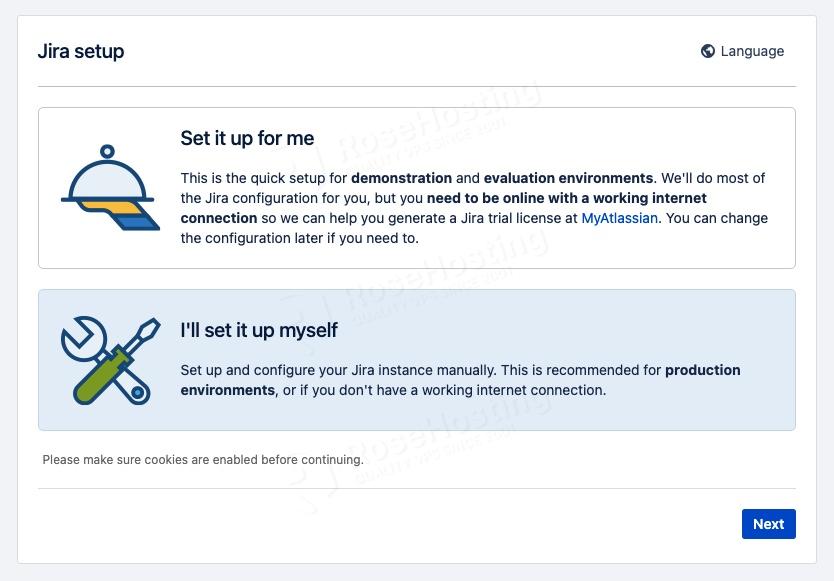
You will be brought to the initial page, click on “I’ll set it up myself” then click Next.
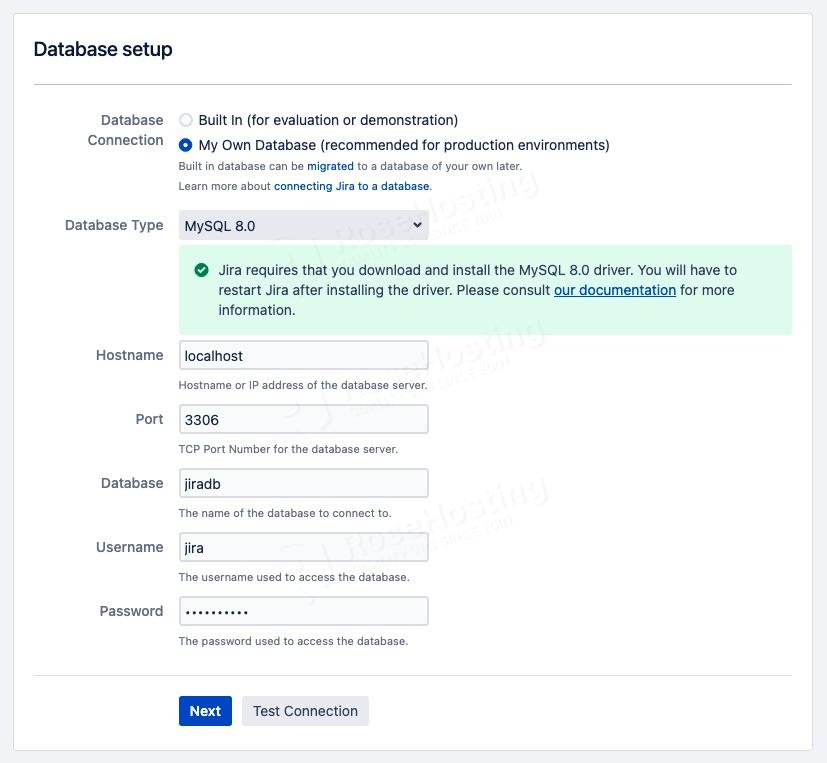
In this step, you need to choose MySQL 8.0 as the database server and fill in other blanks using the credentials we created earlier in the previous step.
You can click on Test Connection to make sure that you are connected to the database, then if everything is okay click on the Next button. The installer will configure the database and once completed you will be brought to this page.
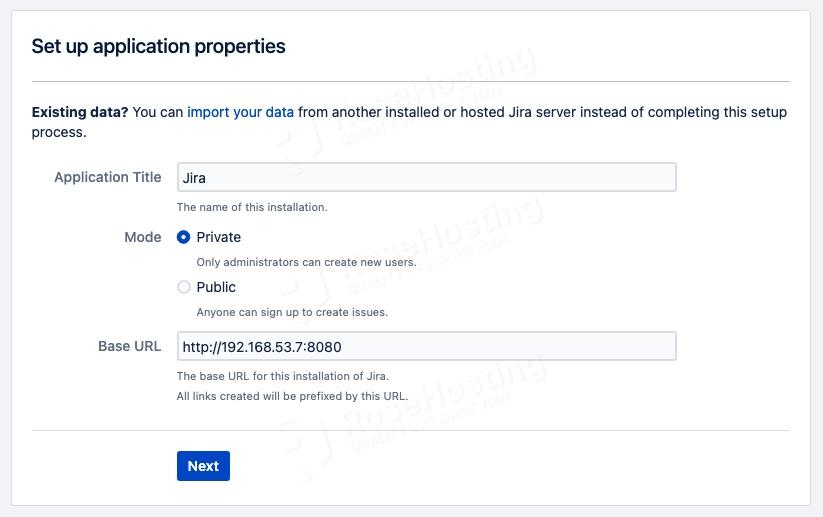
Click next to continue:
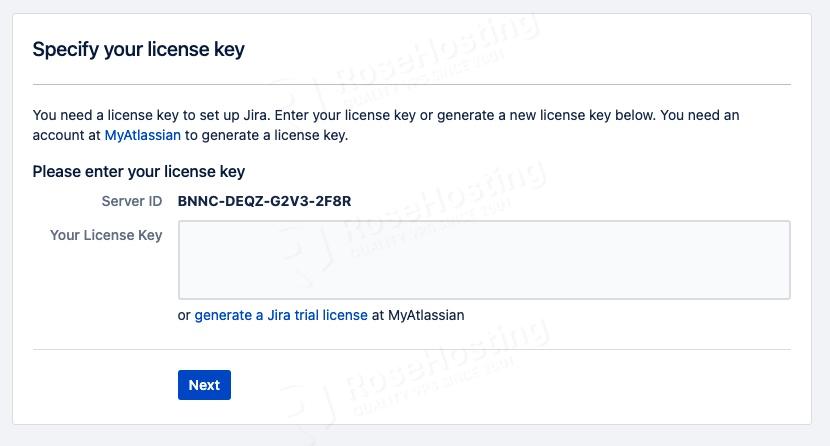
In this step, you will be asked for the license. Go to https://my.atlassian.com/license/evaluation to create a new trial license using the server ID shown in this step.
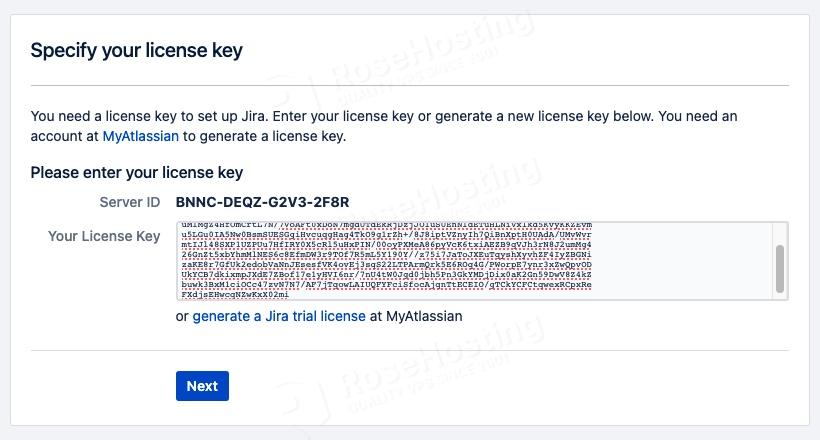
Once you fill in the license key, click on Next to proceed. Follow all other steps to finish the configuration.
Congratulations! You have successfully installed Jira at http://YOUR_SERVER_IP_ADDRESS:8080 and you can open it using any web browser you like, then build and customize it.
If you are one of our web hosting customers and use our managed Linux Hosting, you don’t have to follow this tutorial and install Jira on Ubuntu 22.04 yourself, our expert Linux admins will set up and configure a Jira VPS for you. They are available 24×7 and will take care of your request immediately, and all you need to do is submit a ticket.
PS. If you liked this post, please share it with your friends on social networks, or simply leave a reply below if this guide worked for you. Thanks.
What’s the point if you can’t buy a license for self-hosted?