Magento is an open-source ecommerce platform built in PHP. It is a market-leading player in the e-commerce world. Adobe acquired the company in 2018. Magento is designed to help businesses develop, with versions geared to small, medium, and enterprise-level organizations. The open-source platform includes built-in functionality, like integrated checkout, payment and shipping, catalog management, customer accounts, etc. This tutorial shows you how to install Magento 2 on Ubuntu 24.04.
Table of Contents
Prerequisites
- An Ubuntu 24.04 VPS with at least 4GB of RAM.
- SSH root access, or user with sudo privileges.
Conventions
# – given commands should be executed with root privileges either directly as a root user or by use of sudo command
$ – given commands should be executed as a regular user
Step 1. Login to the server
First, log in to your Ubuntu 24.04 server through SSH as the root user:
ssh root@IP_Address -p Port_number
You must replace ‘IP_Address‘ and ‘Port_number‘ with your server’s respective IP address and SSH port number. Additionally, replace ‘root’ with the username of the system user with sudo privileges.

You can check whether you have the proper Ubuntu version installed on your server with the following command:
# lsb_release -a
You should get this output:
No LSB modules are available.
Distributor ID: Ubuntu
Description: Ubuntu Noble Numbat
Release: 24.04
Codename: noble
Step 2. Add System User
Magento will be ran by a new system user called magento. Let’s create a new system user now, execute this command below.
/usr/sbin/adduser \
   --system \
   --shell /bin/bash \
   --gecos 'Magento user' \
   --group \
   --home /opt/magento \
magento
Then, let’s give the new user a password.
# passwd magento
You will be prompted to type the password for user ‘magento’ twice, the password will not be shown there in your screen. Once done, we can give the new user a sudo privilege.
# usermod -aG sudo magento
Let’s switch to the new user now. From now on, the commands will be run by the new user.
# su - magento
Step 3. Install PHP
Ubuntu 24.04 ships with PHP 8.3 and at the moment only Magento 2.4.7-beta3 supports this PHP version. Let’s install PHP 8.3 and its extensions.
$ sudo apt install php-{bcmath,common,curl,fpm,gd,intl,mbstring,mysql,soap,xml,xsl,zip,cli}
Next, we need to modify the following settings in the php.ini file:
Increase memory_limit to 512M
Set short_open_tag to On
Set upload_max_filesize to 128M
Increase max_execution_time to 3600
Let’s make the changes by executing these commands
$ sudo sed -i "s/memory_limit = .*/memory_limit = 512M/" /etc/php/8.3/fpm/php.ini
$ sudo sed -i "s/upload_max_filesize = .*/upload_max_filesize = 128M/" /etc/php/8.3/fpm/php.ini
$ sudo sed -i "s/short_open_tag = .*/short_open_tag = On/" /etc/php/8.3/fpm/php.ini
$ sudo sed -i "s/max_execution_time = .*/max_execution_time = 3600/" /etc/php/8.3/fpm/php.ini
Then, let’s create a PHP-FPM pool.
$ sudo nano /etc/php/8.3/fpm/pool.d/magento.conf
We need to insert the following into the file.
[magento]
user = magento
group = magento

listen = /run/php/magento.sock
listen.owner = magento
listen.group = magento
pm = ondemand
pm.max_children = 50
pm.start_servers = 10
pm.min_spare_servers = 5
pm.max_spare_servers = 10
Save the file and then exit from the file editor and don’t forget to restart php-fpm service
$ sudo systemctl restart php8.3-fpm
Step 4. Install Nginx
In this article, we will use Nginx as the webserver. Let’s install it now.
$ sudo apt install nginx -y
Then, we need to create an nginx server block for our Magento website.
$ sudo nano /etc/nginx/sites-enabled/magento.conf
Insert the following into the configuration file.
upstream fastcgi_backend {
server unix:/run/php/magento.sock;
}

server {
server_name yourdomain.com;
listen 80;
set $MAGE_ROOT /opt/magento/website;
set $MAGE_MODE production;

access_log /var/log/nginx/magento-access.log;
error_log /var/log/nginx/magento-error.log;

include /opt/magento/website/nginx.conf.sample;
}
Save the file, then exit.
Step 5. Install OpenSearch
Magento now supports OpenSearch as an alternative to Elasticsearch. In this step, we will install OpenSearch and modify its settings. Let’s execute the commands below to proceed.
$ sudo apt install curl gnupg2
$ curl -o- https://artifacts.opensearch.org/publickeys/opensearch.pgp | sudo gpg --dearmor --batch --yes -o /usr/share/keyrings/opensearch-keyring
$ echo "deb [signed-by=/usr/share/keyrings/opensearch-keyring] https://artifacts.opensearch.org/releases/bundle/opensearch/2.x/apt stable main" | sudo tee /etc/apt/sources.list.d/opensearch-2.x.list
$ sudo apt update
With the repository information added, we can list all available versions of OpenSearch:
$ sudo apt list -a opensearch
The command will return this output:
magento@ubuntu24:~$ sudo apt list -a opensearch
Listing… Done
opensearch/stable,now 2.12.0 amd64 [residual-config]
opensearch/stable 2.11.1 amd64 [residual-config]
opensearch/stable 2.11.0 amd64 [residual-config]
opensearch/stable 2.10.0 amd64 [residual-config]
opensearch/stable 2.9.0 amd64 [residual-config]
opensearch/stable 2.8.0 amd64 [residual-config]
opensearch/stable 2.7.0 amd64 [residual-config]
opensearch/stable 2.6.0 amd64 [residual-config]
opensearch/stable 2.5.0 amd64 [residual-config]
Now, let’s install OpenSearch 2.11.1 by running this command below
$ sudo apt install opensearch=2.11.1
By default, OpenSearch uses SSL, but Magento doesn’t use it. So, we need to disable the SSL plugin in OpenSearch for successful Magento installation:
$ sudo nano /etc/opensearch/opensearch.yml
And add this to the end of yml file:
plugins.security.disabled: true
Save the file, then exit, and finally, we can enable the service and start it now.
$ sudo systemctl enable --now opensearch
Once it’s up and running, we can run this command to verify.
$ curl -X GET localhost:9200
The command will return an output similar to this:
{
  "name" : "ubuntu24.rosehosting.com",
  "cluster_name" : "opensearch",
  "cluster_uuid" : "zYOQTFzMQxmhhP29-u9eHA",
  "version" : {
    "distribution" : "opensearch",
    "number" : "2.11.1",
    "build_type" : "deb",
    "build_hash" : "6b1986e964d440be9137eba1413015c31c5a7752",
    "build_date" : "2023-11-29T21:43:44.221253956Z",
    "build_snapshot" : false,
    "lucene_version" : "9.7.0",
    "minimum_wire_compatibility_version" : "7.10.0",
    "minimum_index_compatibility_version" : "7.0.0"
  },
  "tagline" : "The OpenSearch Project: https://opensearch.org/"
}
Step 6. Install MySQL Server
Ubuntu 24.04 ships with MySQL 8.0 and MariaDB 10.11. At the moment of this writing, only MariaDB version 10.6 and lower is supported by Magento. So, we need to install MySQL server instead of MariaDB. If you install MariaDB 10.11, then you will get a message like this when installing Magento:
Current version of RDBMS is not supported. Used Version: 10.11.6-MariaDB-2. Supported versions: MySQL-8, MySQL-5.7, MariaDB-(10.2-10.6)
$ sudo apt install mysql-server
Once installed, we can create a new database and its user for our Magento website.
$ sudo mysql
mysql> CREATE USER 'magento'@'localhost' IDENTIFIED BY 'm0d1fyth15';
mysql> CREATE DATABASE magentodb;
mysql> GRANT ALL PRIVILEGES ON magentodb.* TO 'magento'@'localhost';
mysql> FLUSH PRIVILEGES;
mysql> \q
Step 7. Install Composer
In this step, we are going to install Composer. The installation is fairly straightforward.
$ curl -sS https://getcomposer.org/installer -o composer-setup.php
$ sudo php composer-setup.php --install-dir=/usr/local/bin --filename=composer
That’s it. To check the version of the installed Composer, you can run this command:
$ composer -V
Step 8. Download and Install Magento
Go to the official Magento website and create an account or log in if you already have one. Please note that, according to their website, we can only install Magento 2.4.7-beta3 on Ubuntu 24.04 at the moment.
$ composer create-project --repository-url=https://repo.magento.com/ magento/project-community-edition=2.4.7-beta3 /opt/magento/website
After all required files are downloaded, we can install them by running this command below.
$ cd /opt/magento/website
$ bin/magento setup:install \
--base-url=http://yourdomain.com \
--db-host=localhost \
--db-name=magentodb \
--db-user=magento \
--db-password=m0d1fyth15 \
--admin-firstname=Magento \
--admin-lastname=Admin \
--admin-email=admin@yourdomain.com \
--admin-user=admin \
--admin-password=m0d1fyth15 \
--language=en_US \
--currency=USD \
--timezone=America/Chicago \
--use-rewrites=1 \
--search-engine=opensearch
At the end of the installation, you will see an output similar to this:
[SUCCESS]: Magento installation complete.
[SUCCESS]: Magento Admin URI: /admin_0ty6lcq
Nothing to import.
Before logging in to the backend, we can disable the Two Factor Authentication first and enable it again later. We need to run these commands to disable the 2FA modules.
$ php bin/magento module:disable Magento_AdminAdobeImsTwoFactorAuth
$ php bin/magento module:disable Magento_TwoFactorAuth
$ php bin/magento setup:di:compile
$ php bin/magento cache:clean
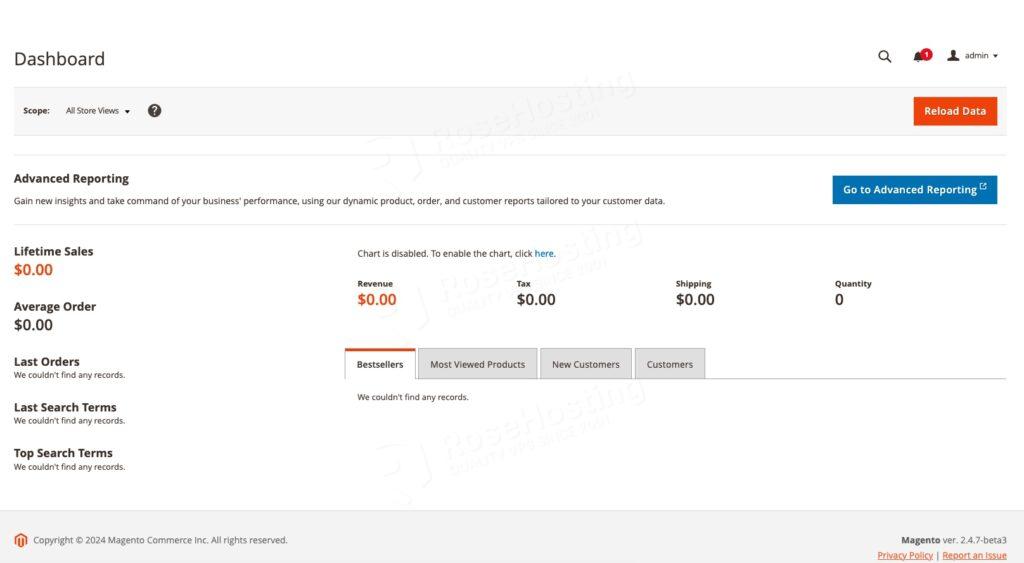
At this point, Magento is installed, and we can navigate to the backend at http://yourdomain.com/admin_0ty6lcq using our favorite web browser. Please note that you must use your own link to access the backend.
Once logged in, we can see the Magento dashboard.
Step 9. Setup Cron jobs
Magento requires its cron jobs to run to automate its important system functions. Let’s execute the command below to create Magento cronjobs under user magento.
$ php bin/magento cron:install
Congratulation! You have successfully installed Magento on Ubuntu 24.04.
Of course, you don’t have to install Magento 2.4.7-beta3 on your Ubuntu 24.04 server if you have a server with us. In that case, you can simply ask our expert Linux hosting admins to set all of this up for you quickly and easily. They are available 24×7 and will respond to your request immediately. Our admins will also help you with more complex Magento installation, like using Varnish, Elasticsearch, and other customizations.
PS. If you liked this post, please share it with your friends on social networks or leave a comment in the comments section. Thank you.
Hello,
I just spent about an hour trying to figure this out, so please PLEASE *PLEASE* correct Step 3 about creating /etc/php/8.3/fpm/pool.d/magento.conf
It needs to be updated because it is missing the fact that the poolname must be included at the top of the CONF file or the php8.3-fpm service will refuse to start.
Also, PLEASE specify that the poolname must be in square brackets, because the pages online which make reference to the line needing to be there do not, which would ordinarily suggest that the text is meant to be wholly replaced e.g. [put your settings here] in which case the square-brackets are not to be included, but here they SHOULD be included.
Please and thank you!
Andrew Horsford
Thanks for noticing, we have now included the PHP pool name in the configuration file.
I’m installing Magento on Ubuntu server that’s on a virtual box.
i would like to know how can i access the magento website created from the host machine.
network setting in the VM is already set to bridged mode.
when i try to access the ip address of the VM i get the default “Welcome to nginx!” page.
trying the /admin_l1c0ypz spits the “404 Not Found” page.
the host machine is also a linux machine.
Please check the Nginx configuration file where the virtual host is defined. Since you are installing it on virtual machine, the domain name should be localhost or 127.0.0.1
Hello,
why don’t you use/install OpenSearch 2.12.0?
Thank you.
Best, SoEgal
At the time of writing this article, this was the current version of OpenSearch available.
re the nginx welcome message. you need to create a smiling to the newly created nginx block and remove the default one form the /etc/nginx/sites-enabled
Please change the title to How to Install Magento 2.4.7 on Ubuntu 24.04
More suitable for my search, Thank you.
I made all the steps on 24.04 just changed 2.4.7-beta3 to 2.4.7. But I get after installation 404 not found nginx error.
Any advice ?
Make sure that you have set your domain correctly in steps 4 and 8.
I made the same , all the steps on 24.04 just changed 2.4.7-beta3 to 2.4.7. But I get after installation 404 not found nginx error.
steps 4 and 8 are right domains
Did you check the nginx error log specified in the nginx vhost configuration for you domain name?
Thank you for creating this tutorial, it really helped me install magento.
However, I am having problems, where i am getting a 502 bad gateway error on my url, which I set to localhost
localhost/admin_u63op
logs don’t show any errors
Please help.
The webserver nginx should be connected to the PHP-FPM service. When the PHP-FPM service is not running, it will return an error 502 message. So, make sure to double check your PHP-FPM configuration.