
In this tutorial we will guide you through the steps of installing Open Classifieds on an Ubuntu 18.04 VPS with all its requirements and necessary components, such as Apache web server, PHP and MySQL database server.
![]() Open Classifieds is a free, powerful, open-source web platform that allows users to easily create and build classifieds, advertisement and listings sites. Let’s begin with the installation.
Open Classifieds is a free, powerful, open-source web platform that allows users to easily create and build classifieds, advertisement and listings sites. Let’s begin with the installation.
Table of Contents
Prerequisites
- An Ubuntu 18.04 VPS
- System user with root privileges, or the root user itself
- Apache web server with mod_rewrite
- PHP version 5.5 or newer with the GD, Mcrypt, Gettext and CURL extensions enabled
- MySQL database server
Step 1: Install Apache Web Server
Open Classifieds needs a web server to serve its content, so for this purpose we will install and use Apache web server which is the one of the most popular web servers in the World. To install Apache on your server, run the following command:
apt -y install apache2
Once the installation is completed, start the web server and enable it to automatically start after a server reboot:
apt start apache2
apt enable apache2
To verify that the web server is properly installed and running on your server, you can check its status with this:
systemctl status apache2
The output will look like this:
apache2.service - The Apache HTTP Server
   Loaded: loaded (/lib/systemd/system/apache2.service; enabled; vendor preset: enabled)
  Drop-In: /lib/systemd/system/apache2.service.d
           ââapache2-systemd.conf
   Active: active (running) since Sat 2019-06-08 09:50:55 CDT; 46min ago
  Process: 735 ExecStart=/usr/sbin/apachectl start (code=exited, status=0/SUCCESS)
 Main PID: 867 (apache2)
    Tasks: 6 (limit: 2321)
   CGroup: /system.slice/apache2.service
           ââ867 /usr/sbin/apache2 -k start
           ââ882 /usr/sbin/apache2 -k start
           ââ883 /usr/sbin/apache2 -k start
Step 2: Install PHP
Now that Apache is set up, we need to install PHP 7.2 (the default PHP version that comes with Ubuntu 18.04’s default repositories) as well as some PHP extensions required by Open Classifieds:
apt install php7.2 php7.2-gd libapache2-mod-php7.2 php7.2-cli php7.2-common php7.2-gd php7.2-json php7.2-opcache
We also have to install the ‘Mcrypt’ PHP extension, but it cannot be installed with the apt package manager, so we will have to install it with ‘pecl’:
apt-get install libmcrypt-dev php-dev gcc autoconf make pkg-config libc-dev
pecl install mcrypt-1.0.1
echo "extension=mcrypt.so" | sudo tee -a /etc/php/7.2/apache2/conf.d/mcrypt.ini
Open Classifieds uses the short tag ‘short cut’ syntax, so in order to enable short_open_tag directive in PHP, edit the php.ini configuration file and add/modify the following line:
nano /etc/php/7.2/apache2/php.ini

short_open_tag = On
Restart Apache for the changes to take effect.
systemctl restart apache2
Step 3: Install and Configure MySQL Server
Open Classifieds uses an empty database to store its information, so we will install and use the MySQL database server.
apt -y install mysql-server
Once it is installed, start the database server and enable it to automatically start upon a reboot
apt start mysql
apt enable mysql
To strengthen the security of the MySQL database server and set a password for the MySQL root user, you can run the ‘mysql_secure_installation’ post installation script. Run the script anduse the following options:
mysql_secure_installation
Remove anonymous users? (Press y|Y for Yes, any other key for No) : Y
Disallow root login remotely? (Press y|Y for Yes, any other key for No) : Y
Remove test database and access to it? (Press y|Y for Yes, any other key for No) : Y
Reload privilege tables now? (Press y|Y for Yes, any other key for No) : Y
Step 4: Create MySQL Database and User
Login to the MySQL server command line interface as the root user and create a new MySQL database for Open Classifieds. From there, you will also need to assign a MySQL user to it with full permissions:
mysql -u root -p

mysql> CREATE DATABASE classifiedsdb;
mysql> GRANT ALL PRIVILEGES ON classifiedsdb.* TO 'classifieds'@'localhost' IDENTIFIED BY 'PASSWORD' WITH GRANT OPTION;
mysql> FLUSH PRIVILEGES;
mysql> quit
Don’t forget to replace ‘PASSWORD‘ with an actual, strong password.
Step 5: Download Open Classifieds
Go to Open Classifieds’s official website and download the latest stable release of the software to your server. Once it is downloaded, unpack the downloaded ZIP archive to the document root directory of your server
unzip openclassifieds2.x.x.x.zip -d /var/www/html
Rename the directory to something simpler (this is optional, however it makes it easier to type and memorize where your files are):
cd /var/www/html && mv openclassifieds2.x.x.x openclassifieds
Set the Apache user to be the owner of all Open Classifieds files:
chown -R www-data:www-data openclassifieds
Step 6: Create an Apache Virtual Host
In order to be able to access Open Classifieds with your domain name, we have to create Apache virtual host directive for the specific domain. We will use ‘domain.com‘ as an example domain for the purposes of this tutorial, so make sure to change it to your unique domain name. Create a configuration file with the following content:
nano  /etc/apache2/sites-available/openclassifieds.conf

<VirtualHost *:80>
ServerAdmin admin@domain.com
DocumentRoot /var/www/html/openclassifieds/
ServerName domain.com
ServerAlias www.domain.com

Options FollowSymLinks
AllowOverride All

ErrorLog /var/log/apache2/domain.com-error_log
CustomLog /var/log/apache2/domain.com-access_log common
</VirtualHost>
Save the file and run the following command to enable to enable the newly created Apache virtual host:
a2ensite openclassifieds.conf
Restart the web server for the changes to take effect.
systemctl restart apache2
Step 7: Complete the Open Classifieds Installation
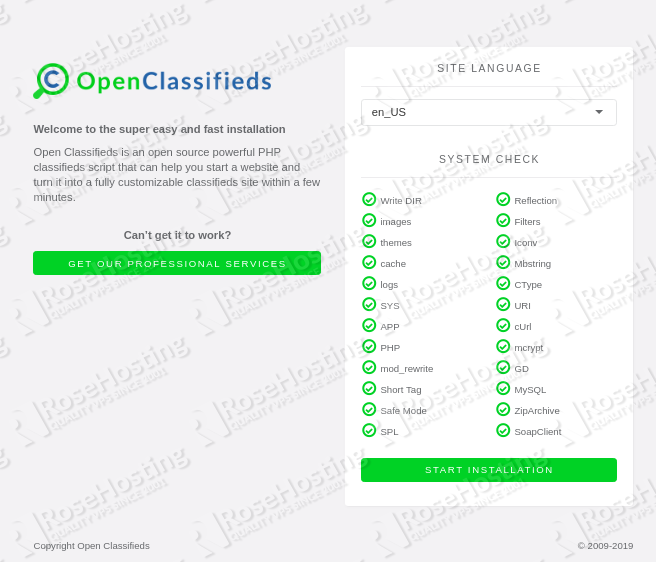
If you closely followed the steps in this tutorial, all necessary components for running Open Classifieds are installed and configured on your server. Now, open your favorite web browser and navigate to http://domain.com. From there, follow the on-screen instructions to complete the installation. First, the installation wizard will check if your server meets all the requirements. From here, click the ‘Start installation’ button and follow the steps.
Once the installation is completed, it is recommended to remove the ‘install’ directory for security reasons.
rm -rf install/
That’s all there is to it – Open Classifieds is now installed and fully functional on your Ubuntu 18.04 VPS. For more details on how to use this platform, please check their official documentation.
![]() Of course you don’t have to do any of this if you use one of our Ubuntu VPS Hosting services, in which case you can simply ask our expert Linux admins to install Open Classifieds for you. They are available 24×7 and will take care of your request immediately.
Of course you don’t have to do any of this if you use one of our Ubuntu VPS Hosting services, in which case you can simply ask our expert Linux admins to install Open Classifieds for you. They are available 24×7 and will take care of your request immediately.
PS. If you liked this post please share it with your friends on the social networks using the buttons on the left or simply leave a reply below. Thanks.