
Open Web Analytics (OWA) is an open-source analytic platform, written in PHP. The main purpose of this application is to analyze and monitor how people use your web pages or applications, which then provides you with analytics data for your website. This application can provide you with a complete analysis of a website or app to let you know exactly how your web pages work, and what needs to be improved on. OWA web analytics is used when you want full control over the analysis of your web pages without using third-party services, such as Google Analytics, Hotjar, OmniConvert, etc. This application also comes with built-in support for tracking websites running on the most popular content management frameworks, such as on our WordPress Hosting and MediaWiki Hosting. In this article, we will show you how to install Open Web Analytics (OWA) on an Ubuntu 18.04 Server.
Table of Contents
1. Connect to your server
Before we begin, you need to connect to your server via SSH as the root user. To do this, use the following command:
ssh root@IP_Address -p port_number
Of course, you will need to replace IP_Address and port_number with your actual server IP address and SSH port number.
Once logged in, make sure that your server is up-to-date by running the following commands:
sudo apt update
sudo apt upgrade
2. Install MariaDB Database Server and Create a Database for OWA
Since a database server is one of the prerequisites needed to run Open Web Analytics, we will install MariaDB, which is a great open-source database server. Type the following command to install MariaDB onto your server:
sudo apt install mariadb-server mariadb-client
Once MariaDB is installed on your server, you can use the commands below to stop, start, and enable the MariaDB service.
sudo systemctl stop mariadb.service
sudo systemctl start mariadb.service
sudo systemctl enable mariadb.service
The next command is optional. You can run the command if you want to secure your MariaDB server by disallowing remote root access, removing the test database, and setting a root password.
sudo mysql_secure_installation
When prompted, answer the questions below by following this guide.
Enter current password for root (enter for none): Since no password is currently set, just press Enter once.
Set root password? [Y/n]: Y
New password: Enter your password
Re-enter new password: Repeat your password
Remove anonymous users? [Y/n]: Y
Disallow root login remotely? [Y/n]: Y
Remove test database and access to it? [Y/n]: Y
Reload privilege tables now? [Y/n]: Y
Restart the MariaDB server, so the changes will take effect.
sudo systemctl restart mariadb.service
You should now be able to log in to your MariaDB server with the command:
sudo mysql -u root -p
Then type the password you created above to sign in. Once you are in the MariaDB shell, you can use the following command and create a database called owa_db for the OWA application.
CREATE DATABASE owa_db;
Then create a database user called owa_user and replace Str0n9Pas$worD with your own password.
CREATE USER 'owa_user'@'localhost' IDENTIFIED BY 'Str0n9Pas$worD';
To grant the user owa_user with full access to the database owa_db, run this command:
GRANT ALL ON owa_db.* TO 'owa_user'@'localhost' IDENTIFIED BY 'Str0n9Pas$worD' WITH GRANT OPTION;
Again, remember to change Str0n9Pas$worD with the password that you used in the previous command.
Now you can use the flush privileges command to reload the grant tables – after that is done, you can then exit from the MariaDB shell.
FLUSH PRIVILEGES;
EXIT;
3. Install Apache2 HTTP Server on Ubuntu
In order to run OWA, you need a web server that will serve the webpages. Apache2 is among the most popular web servers in use, and in this tutorial, Apache2 is our choice of web server.
Execute the following command to install Apache2:
sudo apt install apache2
Use the commands below to start, stop, and enable the Apache service:
sudo systemctl stop apache2.service
sudo systemctl start apache2.service
sudo systemctl enable apache2.service
To confirm that Apache2 is installed properly, you can open your preferred web browser and type your server’s IP address or your domain (we assume that it is already pointed to your server) and you should be able to view the default welcome page of the Apache2 web server.
4. Install PHP 7.2 and Related Modules
OWA requires PHP 5.2.x or higher – so, in this tutorial, we chose to use PHP version 7.2. However, PHP 7.2 may not be available in the pre-installed Ubuntu repositories – therefore, if you want to install and use this version of PHP, you will need to get it from a third-party repository. By running the commands below, you will add Ondřej Surý’s PPA, which has the version of PHP that we need:
sudo apt-get install software-properties-common
sudo add-apt-repository ppa:ondrej/php
Then, update and upgrade the PHP packages to PHP 7.2
sudo apt update
If you want to install PHP 7.2 together with the modules that are required for running the OWA, then run this command:
sudo apt install php7.2 libapache2-mod-php7.2 php7.2-common php7.2-curl php7.2-mbstring php7.2-xmlrpc php7.2-mysql php7.2-gd php7.2-xml php7.2-cli
5. Download and Install Open Web Analytics
Use the commands below to change the directory to /opt and download Open Web Analytics.
cd /opt
wget https://github.com/padams/Open-Web-Analytics/archive/1.6.2.zip
Unzip the contents and move the files to the /var/www/html/owa directory:
unzip 1.6.2.zip
sudo mv Open-Web-Analytics-1.6.2 /var/www/html/owa
Change the permissions:
sudo chown -R www-data:www-data /var/www/html/owa/
sudo chmod 755 /var/www/html/owa/
6. Configure a Virtual Host for the OWA Site
Once we installed Apache, we can continue and create a virtual host for the domain name that we want to use. In the following command, we will use nano as our editor – however, if nano isn’t your preferred text editor, you can use any editor of your choice and create a new configuration file called owa.conf.
sudo nano /etc/apache2/sites-available/owa.conf
Paste the Apache configuration from below into the file, and replace your_domain_name.com with your actual domain name:
<VirtualHost *:80>
ServerAdmin admin@your_domain_name.com
DocumentRoot /var/www/html/owa
ServerName your_domain_name.com <Directory /var/www/html/owa/> Options FollowSymlinks AllowOverride All Require all granted </Directory> ErrorLog ${APACHE_LOG_DIR}/error.log CustomLog ${APACHE_LOG_DIR}/access.log combined </VirtualHost>
Once you are finished with editing the file, save and close it.
Now that you have configured the virtual host, you can disable the default Apache virtual host, and enable the OWA virtual host.
Disable the default Apache virtual host with this command:
sudo a2dissite 000-default
then, enable the OWA virtual host:
sudo a2ensite owa.conf
also, you need to make sure that the mod rewrite is enabled:
sudo a2enmod rewrite
Restart Apache so that the changes will take effect:
sudo systemctl restart apache2.service
7. OWA installation wizard
In this part of the tutorial, we will install OWA via a web browser. Open your preferred web browser and type your domain:
http://your_domain_name.com/You should be able to see the ‘Welcome to the Installer’ page:
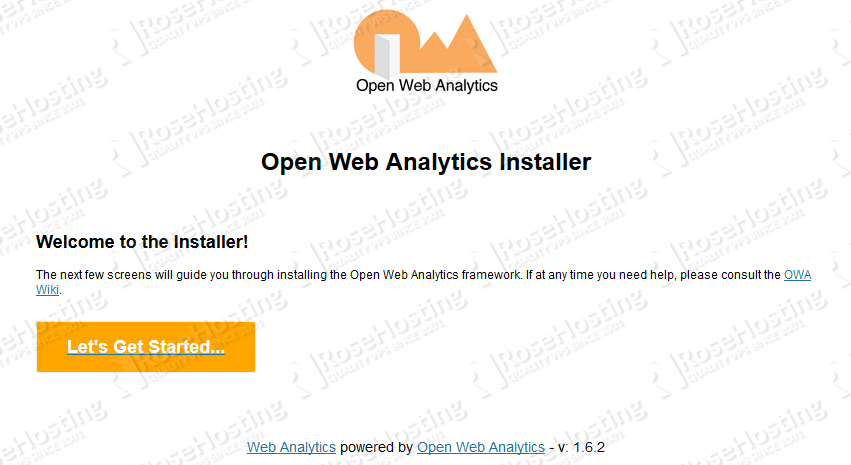
Click on the 'Let's Get Started...' button so that you can continue with the OWA installation. On the next page, insert the database connection info and create an admin account, so you can manage the application through the back-end.
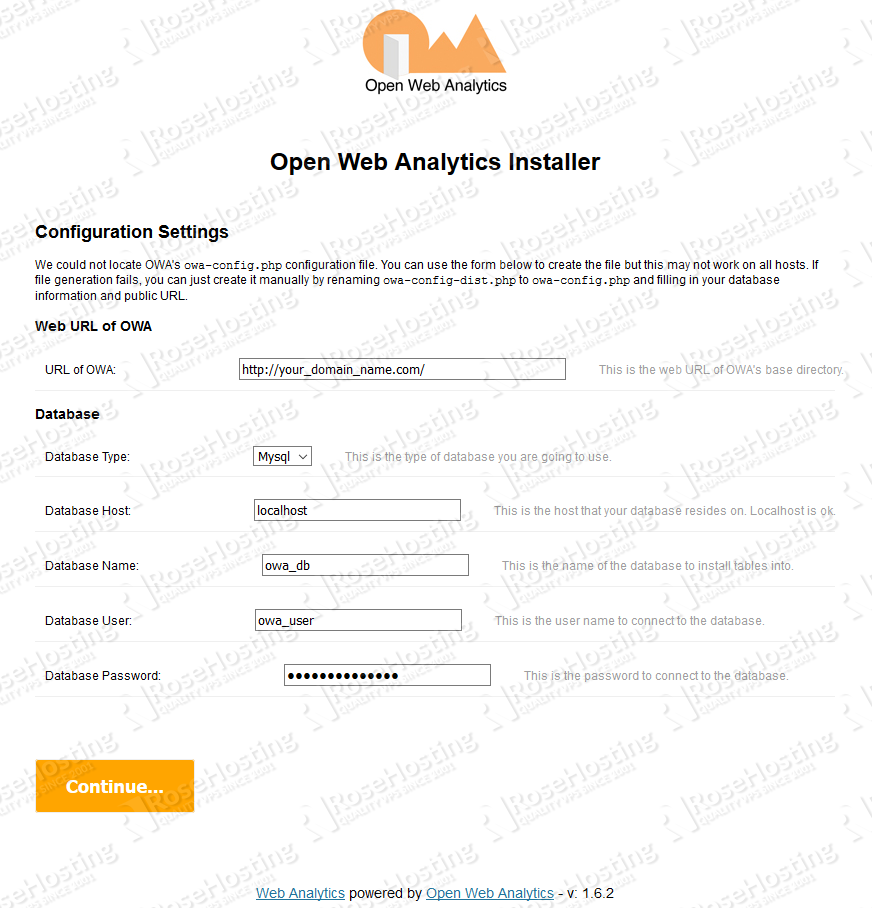
When you are finished with entering the necessary information, click on the 'Continue...' button. The next page will allow you to create a superuser account that can manage the platform.
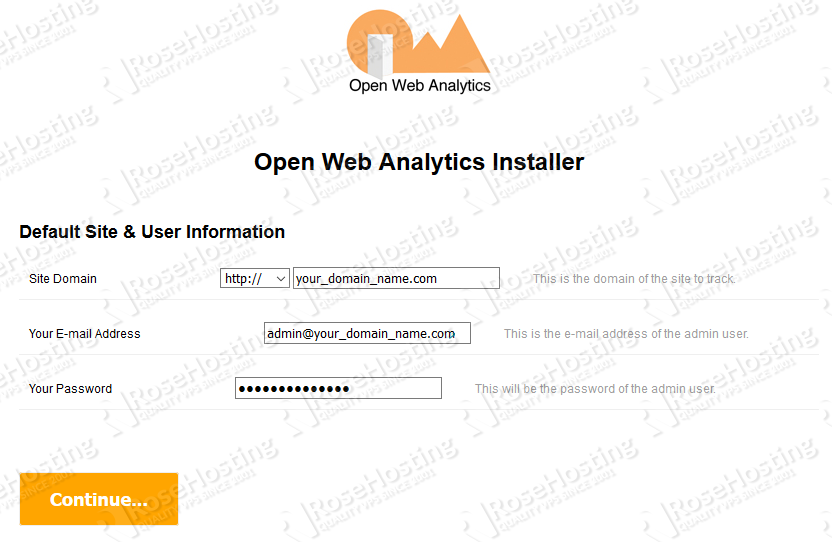
Congratulations! You have successfully installed Open Web Analytics on your server. You can now log in using the username and password you created, and generate the tracker.
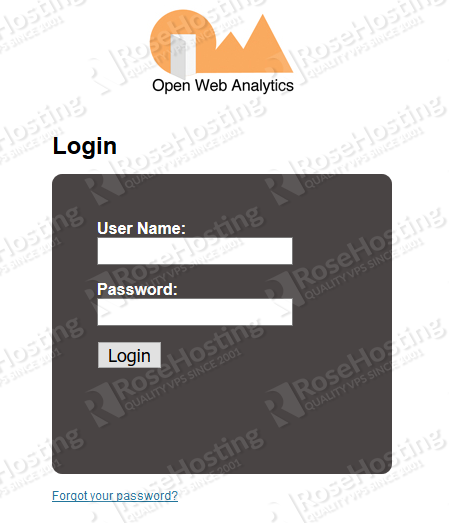
Once logged in, you can see the tracking code that you’ll need to add to the web page that you want to track.
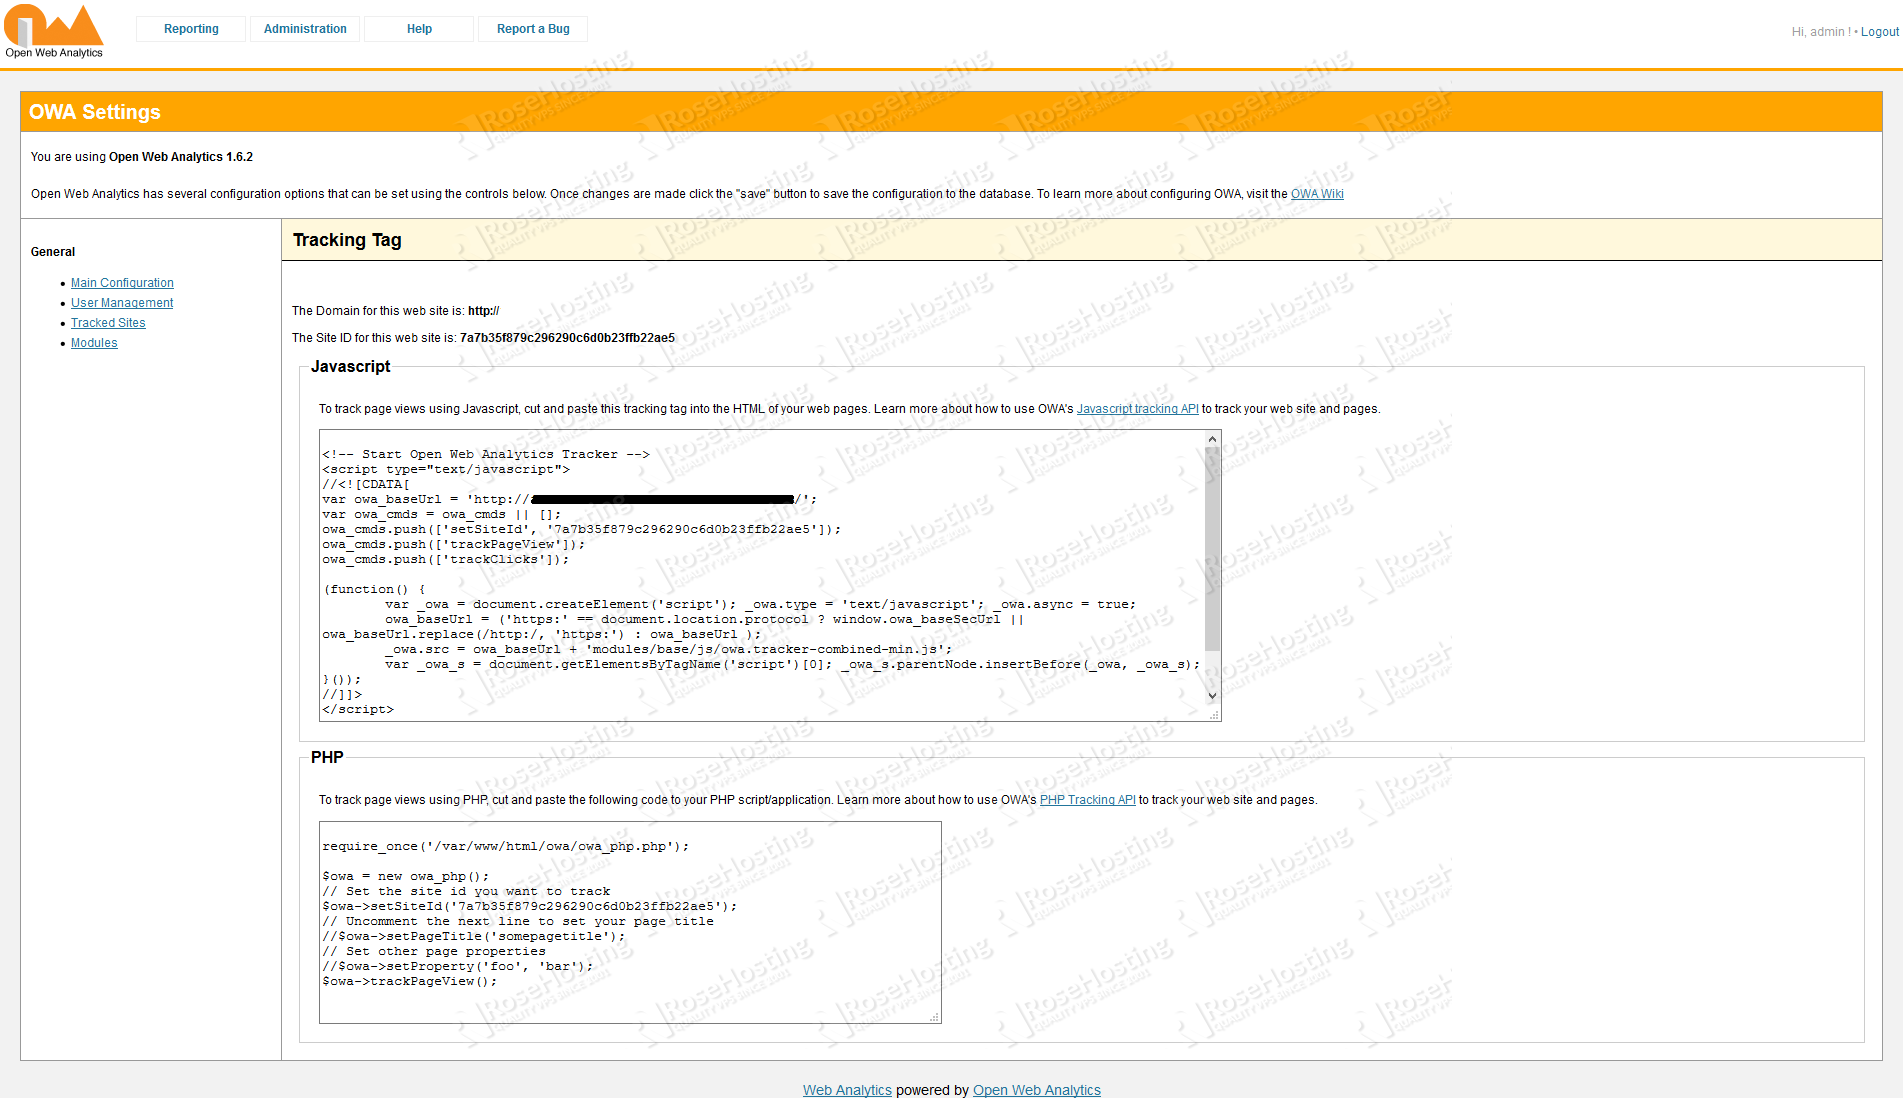
In order for OWA to function properly, you need to add the code to each page of your website. You can find the list of web sites that are being tracked at http://your_domain_name.com/index.php
In this article, we showed you how to install Apache2, PHP 7.2, the MariaDB Database Server, then we created the OWA database and installed the Open Web Analytics application. Now, you can begin exploring this useful application.
Of course, if you are one of our Ubuntu Hosting customers, you don’t have to install Open Web Analytics on your Ubuntu 18.04 VPS – simply ask our admins, sit back, and relax. Our admins will install and configure Open Web Analytics on Ubuntu 18.04 for you immediately.
PS. If you liked this post on how to install Open Web Analytics on an Ubuntu 18.04 VPS, please share it with your friends on the social networks using the share buttons below, or simply leave a comment in the comments section. Thanks.
While the general guidance here is correct, new readers should be very careful to get the latest tar package. I used the wget address above and modified the version to the latest number. That downloaded an archive successfully. I unzipped it and configured my instance following the instructions above.
The result didn’t capture data.
I should have downloaded it with a gui and got owa_1.7.0_packaged.tar.
Note the ….packaged .tar . When I replaced the previous owa folder and updated my tracking script in the webpage of interest, I had data as soon as I made a test visit to my tracked site.
The address at github of the tarball to use has changed significantly.
The rest of the instructions are helpful.