
A Virtual Private Network is a tool that lets you browse the internet with some degree of anonymity. While OpenVPN is an open-source network connection protocol used to facilitate a secure tunnel between two points in a network. OpenVPN is both a VPN protocol and software that uses VPN techniques to secure connections. It is one of the most popular and well-known VPN protocols among VPN users. In this tutorial, we will show you how to install OpenVPN on Ubuntu 22.04 server.
Table of Contents
Prerequisites
- An Ubuntu server 22.04
- SSH root access or regular user with root privileges
Step 1. Log in to the server
First, log in to your Ubuntu 22.04 VPS through SSH as the root user:
ssh root@IP_Address -p Port_number
Replace “root” with a user that has sudo privileges or root if necessary. Additionally, replace “IP_Address” and “Port_Number” with your server’s respective IP address and SSH port number. Next, let’s make sure that we’re on Ubuntu 22.04. You can execute the following command.
# lsb_release -a
You should get this as the output:
No LSB modules are available.
Distributor ID: Ubuntu
Description: Ubuntu 22.04.1 LTS
Release: 22.04
Codename: jammy
Step 2. Update the system
Before starting, we need to make sure that all Ubuntu 22.04 packages installed on the server are up to date. You can do this by executing the following commands:
# apt update -y
Step 3. Install OpenVPN Server
Installing an OpenVPN server on Ubuntu from its default repository is fairly easy. But, configuring the service to run properly through the command line interface is a little tricky, especially for those who do not have enough experience in maintaining an Ubuntu server. In this step, we will show you how to install the OpenVPN server using a bash script.
To start this, we need to download the bash script from GitHub.
# cd /opt
# wget https://raw.githubusercontent.com/Nyr/openvpn-install/master/openvpn-install.sh -O openvpn-install.sh
The installation script is downloaded and saved as /opt/openvpn-install.sh. Let’s make the file executable then run it.
# chmod +x openvpn-install.sh
# ./openvpn-install.sh
Now, the OpenVPN installation will start, and you will be prompted with a few questions.

Welcome to this OpenVPN road warrior installer!

Which protocol should OpenVPN use?
1) UDP (recommended)
2) TCP
Protocol [1]: 1
You can choose the protocol you like, but UDP protocol is preferred. OpenVPN works best over UDP protocol; you can check their developer’s statement
What port should OpenVPN listen to?
Port [1194]:
In this step, you can type a different port to use or hit ENTER to use the default port, 1194.
Select a DNS server for the clients:
1) Current system resolvers
2) Google
3) 1.1.1.1
4) OpenDNS
5) Quad9
6) AdGuard
DNS server [1]:
Now, you can choose the DNS resolver to use; this is another optional choice.
Enter a name for the first client:
Name [client]: userone
The installation script will prompt you to create an OpenVPN username, and choose any name of your liking.
OpenVPN installation is ready to begin.
Press any key to continue...
You can press any key on your keyboard to start installing OpenVPN. The script will install the OpenVPN server, generate a certificate, create a VPN user you specified earlier, and configure the firewall. If you need to modify your OpenVPN server configuration, you can find the configuration file at /etc/openvpn/server/server.conf
The installation has been completed. You can also check the service by running this command below.
# systemctl status openvpn
Step 4. Connect to OpenVPN Server
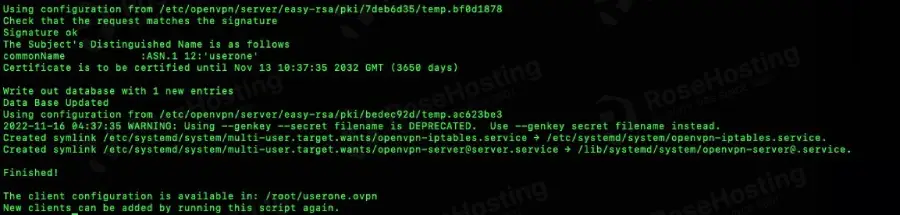
After the OpenVPN server installation is finished, you will see a message similar to this:
The client configuration is available in: /root/userone.ovpn
New clients can be added by running this script again.
As you can see, the script created a configuration file for user ‘userone’. You can download this .ovpn file and use it to connect to your OpenVPN server using an OpenVPN client like OpenVPN Connect or Tunnelblick.
On the OpenVPN server, you can check the log at /run/openvpn-server/status-server.log. In that log file, you will see the IP addresses that are connected to your OpenVPN server.
root@ovpn:~# tail -f /run/openvpn-server/status-server.log
TITLE,OpenVPN 2.5.5 x86_64-pc-linux-gnu [SSL (OpenSSL)] [LZO] [LZ4] [EPOLL] [PKCS11] [MH/PKTINFO] [AEAD] built on Jul 14 2022
TIME,2022-11-16 05:07:18,1668596838
HEADER,CLIENT_LIST,Common Name,Real Address,Virtual Address,Virtual IPv6 Address,Bytes Received,Bytes Sent,Connected Since,Connected Since (time_t),Username,Client ID,Peer ID,Data Channel Cipher
HEADER,ROUTING_TABLE,Virtual Address,Common Name,Real Address,Last Ref,Last Ref (time_t)
GLOBAL_STATS,Max bcast/mcast queue length,0
END
Common Name,Real Address,Last Ref,Last Ref (time_t)
GLOBAL_STATS,Max bcast/mcast queue length,0
END
,123.123.123.123:61215,2022-11-16 05:09:16,1668596956
GLOBAL_STATS,Max bcast/mcast queue length,1
END
As seen in the log file, the IP address 123.123.123.123 was successfully connected to your OpenVPN server.
That’s it! You have successfully installed OpenVPN Server on your Ubuntu 22.04 machine. You can run the script again to create another VPN user. If you run the installation script after the OpenVPN server is installed, you will see the message and these options.
OpenVPN is already installed.

Select an option:
1) Add a new client
2) Revoke an existing client
3) Remove OpenVPN
4) Exit
Option:
Of course, you don’t have to install OpenVPN on Ubuntu 22.04 if you use one of our Ubuntu VPS Hosting services, in which case you can simply ask our expert Linux admins to install OpenVPN on Ubuntu 22.04 for you. They are available 24×7 and will take care of your request immediately.
PS. If you liked this post on installing OpenVPN on Ubuntu 22.04, please share it with your friends on social networks or simply leave a comment in the comments section. Thanks.