 OwnCloud is free and open source file sharing and collaboration software which provides access to your files through a web interface or WebDAV.
This install guide assumes that Apache, MySQL and PHP are already installed and configured on your Linux virtual server.
At the time of writing this tutorial, ownCloud 6.0.2 is the latest stable version available and it requires:
- SSH access to your server
- PHP >= 5.3.3 (PHP 5.4 or later is recommended) with the following PHP extensions enabled: XML (Expat), curl, PDO, GD Graphics Library version 2.0.x+, ctype, JSON, iconv, intl, mcrypt, openssl, bz2, zlib and zip.
- Apache Web Server >= 2.0 compiled with mod_rewrite module
- MySQL >= 5.0.x installed on your Linux virtual server (MySQL 5.5 or later is recommended).
Download ownCloud 6.0.2 available at http://download.owncloud.org/ to the server and extract the downloaded archive using the following commands:
cd /root
wget http://download.owncloud.org/community/owncloud-6.0.2.tar.bz2
tar -xvf owncloud-6.0.2.tar.bz2
mv owncloud /var/www/html/owncloud/
Create a new MySQL database for ownCloud on your server:
mysql -u root -p
mysql> CREATE DATABASE ownclouddb;
mysql> GRANT ALL PRIVILEGES ON ownclouddb.* TO 'ownclouduser'@'localhost' IDENTIFIED BY 'your-password' WITH GRANT OPTION;
mysql> FLUSH PRIVILEGES;
mysql> quit
Create a new virtual host directive in Apache. For example, edit your Apache configuration file (/etc/httpd/conf/httpd.conf by default) and uncomment the following line:
#NameVirtualHost *:80
then, add the following lines at the end:
<VirtualHost *:80>
ServerAdmin admin@yourdomain.com
DocumentRoot /var/www/html/owncloud/
ServerName www.yourdomain.com
<Directory /var/www/html/owncloud/>
    Options Indexes FollowSymLinks MultiViews
    AllowOverride All
    Order allow,deny
    allow from all
</Directory>
ErrorLog logs/yourdomain.com-error_log
CustomLog logs/yourdomain.com-access_log common
</VirtualHost>
Before we finish with the setup it is recommended to install some PHP cache engine so it can do some caching and will certainly speed things up. So, install PHP APC cache by executing:
RPM based virtual server:
yum install php-pecl-apc -y

Debian based virtual server:
apt-get install php5-apc
Restart the Apache web server for the changes to take effect.
On CentOS/Fedora based virtual server, execute the following command:
chown apache:apache -R /var/www/html/owncloud/
On Ubuntu or any Debian based virtual server, execute:
chown www-data:www-data -R /var/www/html/owncloud/
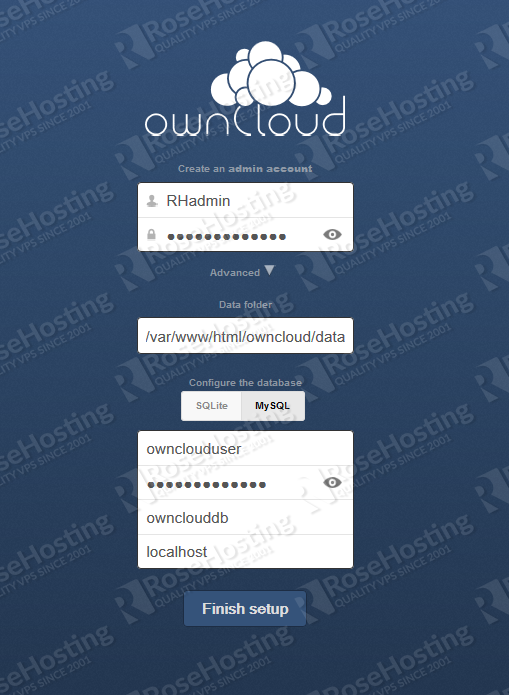
Open your favorite web browser, navigate to http://your-domain.com/ and follow the easy instructions. Enter username and password for the administrator user account, click on the ‘Advanced options’ hyperlink and enter the data directory (or leave the default setting), then enter database username, database password, database name, host (localhost) and click ‘Finish setup’.
That is it. The ownCloud installation is now complete.
Of course, you don’t have to do any of this if you use one of our Linux VPS Hosting services, in which case you can simply ask our expert Linux admins to install ownCloud for you. They are available 24×7 and will take care of your request immediately. For updates, you may refer to this guide on how to Install ownCloud on CentOS 6.
PS. If you liked this post please share it with your friends on the social networks using the buttons on the left or simply leave a reply below. Thanks.