
In this article, we will show you how to install phpPgAdmin on an Ubuntu 18.04 VPS.
PhpPgAdmin is an open source web administration interface written in PHP. It is used to manage PostgreSQL databases through  a web interface. This guide should work on other Debian based servers as well, but it was tested and written for an Ubuntu 18.04 VPS.
Table of Contents
Prerequisites
- For the purposes of this tutorial, we will use an Ubuntu 18.04 virtual server.
- PostgreSQL version 8.4 or higher.
- Apache2 web server.
- PHP 5 or higher installed on the server.
- Full SSH root access (or a user with sudo privileges) is also required.
Step 1: Log in via SSH and Update the System
Log in to your server via SSH, as shown in our example:
ssh root@IP_Address -p Port_number
Make sure to replace “IP_Address” and “Port_number” with your server’s actual IP address and SSH port number.
Once logged in, make sure that the server OS’ packages are up-to-date. We can do this by running the following commands:
apt-get update && apt-get upgrade
This will update the package index as well as update the software packages currently installed on the server to their latest versions that are available in the Ubuntu repositories (defined in /etc/apt/sources.list).
Step 2: Apache Web Server Installation
Apache is the web server of choice for this tutorial. It’s one of the most popular web servers in the world, and that’s what will be serving our web interface. Let’s install it now.
First, check if Apache is already installed and running on the server:
dpkg -l | grep -i apache2
ps aux | grep apache2
If it is not installed, run the following command to install the Apache web server:
apt-get install apache2
Enable Apache service to start automatically upon server boot with:
systemctl enable apache2
We can also check the status of the Apache service with the following command:
systemctl status apache2
Output:
● apache2.service – The Apache HTTP Server
Loaded: loaded (/lib/systemd/system/apache2.service; enabled; vendor preset: enabled)
Drop-In: /lib/systemd/system/apache2.service.d
└─apache2-systemd.conf
Active: active (running) since Fri 2019-06-14 10:13:06 CDT; 1min 4s ago
Main PID: 9723 (apache2)
Tasks: 6 (limit: 2321)
CGroup: /system.slice/apache2.service
├─9723 /usr/sbin/apache2 -k start
├─9726 /usr/sbin/apache2 -k start
├─9727 /usr/sbin/apache2 -k start
├─9728 /usr/sbin/apache2 -k start
├─9729 /usr/sbin/apache2 -k start
└─9730 /usr/sbin/apache2 -k start
We can now install PostgreSQL.
Step 3: Install PostgreSQL
Run the following command to install PostgreSQL 10.8, the latest version available in the official Ubuntu repositories, along with some required PostgreSQL packages:
sudo apt-get install postgresql postgresql-client postgresql-client-common postgresql-common postgresql-contrib
Once this is done, set a password for the PostgreSQL superuser account (postgres), using the following commands:
sudo -u postgres psql
psql (10.8 (Ubuntu 10.8-0ubuntu0.18.04.1))
Type "help" for help.
postgres=# psql
postgres-# \password postgres      (Enter a new password twice)
postgres-# \q
Edit the PostgreSQL configuration file (pg_hba.conf) and enable md5 passwords for local connections:
vi /etc/postgresql/10/main/pg_hba.conf
Replace the following text:
local   all             postgres                                peer
local   all             all                                     peer
With this text instead:
local   all             postgres                                md5
local   all             all                                     md5
Restart the PostgreSQL service by executing this line:
service postgresql restart
It is now time to install phpPgAdmin.
Step 4: Install phpPgAdmin
There are two ways to install phpPgAdmin . We can use a debian package, or we can install phpPgAdmin from a source file. Since phpPgAdmin is available in the base Ubuntu repository, it can be easily installed using the following command instead of compiling from source, which saves us a lot of time:
apt-get install phppgadmin
In order to check the phppgadmin version installed using this method, run the following command:
dpkg -l | grep phppgadmin
The output should be similar to this:
ii phppgadmin 5.1+ds-3 all web-based administration tool for PostgreSQL
Edit the Apache configuration file for phpPgAdmin:
vi /etc/apache2/conf-enabled/phppgadmin.conf
The configuration file should contain the following lines:
Alias /phppgadmin /usr/share/phppgadmin

<Directory /usr/share/phppgadmin>

<IfModule mod_dir.c>
DirectoryIndex index.php
</IfModule>
AllowOverride None

# Only allow connections from localhost:
Require local

<IfModule mod_php.c>
php_flag magic_quotes_gpc Off
php_flag track_vars On
#php_value include_path .
</IfModule>
<IfModule !mod_php.c>
<IfModule mod_actions.c>
<IfModule mod_cgi.c>
AddType application/x-httpd-php .php
Action application/x-httpd-php /cgi-bin/php
</IfModule>
<IfModule mod_cgid.c>
AddType application/x-httpd-php .php
Action application/x-httpd-php /cgi-bin/php
</IfModule>
</IfModule>
</IfModule>

</Directory>
phpPgAdmin is not accessible from a remote location, meaning that it is only accessible from localhost.
To change this and allow phpPgAdmin to be accessible from everywhere, edit the Apache configuration for phpPgAdmin (phppgadmin.conf) and enable access to the phpPgAdmin web interface from remote locations. Open the file using your preferred text editor:
vi /etc/apache2/conf-enabled/phppgadmin.conf
Then delete the following lines:
# Only allow connections from localhost:
Require local
Then save and close the file.
Restart the Apache service:
systemctl restart apache2.service
We can now configure phpPgAdmin to allow users like the postgres user to log in to the phpPgAdmin web interface remotely.
Edit the phpPgAdmin configuration file (/etc/phppgadmin/config.inc.php) and replace:
$conf['extra_login_security'] = true;
with:
$conf['extra_login_security'] = false;
Save and quit the file, then open http://your-server-IP/phppgadmin in your preferred web browser.
In order to log in to phpPgAdmin, we need to click on the ‘Servers’ button, then click on the ‘PostgreSQL’ link and enter postgres as username and the password of the postgres user we set previously in this tutorial.
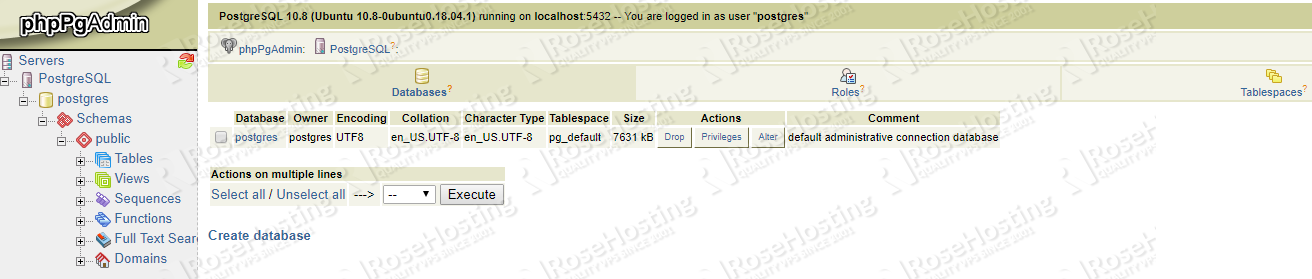
That is it. We successfully installed and configured phpPgAdmin on Ubuntu 18.04.
![]() Of course, you don’t have to set up and configure phpPgAdmin on Ubuntu 18.04 if you use one of our Managed Ubuntu Hosting solutions, in which case you can simply ask our expert Linux admins to install and configure phpPgAdmin on Ubuntu 18.04 for you. They are available 24×7 and will take care of your request immediately.
Of course, you don’t have to set up and configure phpPgAdmin on Ubuntu 18.04 if you use one of our Managed Ubuntu Hosting solutions, in which case you can simply ask our expert Linux admins to install and configure phpPgAdmin on Ubuntu 18.04 for you. They are available 24×7 and will take care of your request immediately.
PS. If you liked this post on how to install phpPgAdmin on an Ubuntu 18.04 VPS, please share it with your friends on the social networks by using the share shortcuts below, or simply leave a comment down in the comments section. Thanks.