Snipe-IT is an open-source IT asset management tool built on Laravel. With their web-based friendly interface, it enables its users to track their hardware and software assets. In this tutorial, we will show you how to install Snipe-IT on Ubuntu 22.04.
Snipe-IT offers useful features to keep track of your assets. It also provides a RESTful interface for third-party integrations such as LDAP, Active Directory, and Slack. Let’s start with the installation.
Table of Contents
Prerequisites
- Ubuntu 22.04 VPS
- SSH root access or a regular system user with sudo privileges
Step 1. Login to the VPS and Update the System
First of all, we need to log in to our Ubuntu 22.04 VPS through SSH:
ssh root@IP_Address -p Port_number
Substitute the user “root” with a user who possesses sudo privileges or root access, as required. Afterwards, substitute “IP_Address” and “Port_Number” with the corresponding IP address and SSH port number of your server. Finally, let’s ensure that we are operating on Ubuntu 22.04. You can verify this by executing the command provided below.
# lsb_release -a
You should get this as the output:
No LSB modules are available.
Distributor ID: Ubuntu
Description: Ubuntu 22.04 LTS
Release: 22.04
Codename: jammy
Then, run the following command to make sure that all installed packages on the server are updated to their latest available versions:
# apt update -y
Step 2. Install PHP
According to the Snipe-IT documentation page, it requires a PHP version between 7.4 and 8.1.2. And, at the time of this writing, Ubuntu 22.04 ships with PHP 8.1.2. In this step, we are going to install PHP 8.1 along with the required extensions. Since the installation is using the default repository, we can simply run this command below.
# apt install php8.1-{bcmath,common,ctype,curl,fileinfo,fpm,gd,iconv,intl,mbstring,mysql,soap,xml,xsl,zip,cli}
That’s it, PHP and its extensions are installed.
Step 3. Install Composer
To manage Snipe-IT components and their dependencies, we use Composer. On Ubuntu 22.04, the latest version of Composer in the default repository is version 2.2.6. We are going to install it from the Composer website to get the latest stable version.
# curl -sS https://getcomposer.org/installer -o composer-setup.php
# php composer-setup.php --install-dir=/usr/local/bin --filename=composer
To check the Composer version, you can run the following command:
# composer -V
The command above will print an output like this:
Composer version 2.6.2 2023-09-03 14:09:15
As you can see, we have installed the more recent version of the composer
Step 4. Install MariaDB and Create a Database
Snipe-IT is based on the Laravel 8 framework. Although Laravel supports MySQL/MariaDB, PostgreSQL, SQLite, and MSSQL, Snipe-IT only supports MySQL/MariaDB. In this step, we are going to install the MariaDB server from the default repository. To install the MariaDB server, execute this command:
# apt install mariadb-server
MariaDB has been successfully installed, and it is running; now we can proceed with creating a new database and a user for our Bagisto website.
# mysql
mysql> CREATE DATABASE snipeit;
mysql> GRANT ALL ON snipeit.* TO snipeit@localhost identified by 'm0d1fyth15';
mysql> FLUSH PRIVILEGES;
mysql> \q
Please ensure that you generate a more robust database password by substituting the existing password “m0d1fyth15” in the aforementioned command with a stronger one.
Step 5. Download Snipe-IT
Navigate to your web server’s root directory using the command below.
# cd /var/www/html
Then, clone the Snipe-IT GitHub repository and save the contents in the snipe-it directory using the command below.
# git clone https://github.com/snipe/snipe-it snipe-it
If the command returns an error about git, you need to install git first and then rerun the command.
# apt install git -y
Next, go to the Snipe-IT directory created using the command below.
# cd snipe-it
In this directory, we need to copy the example .env.example configuration file to .env and modify the content.
# cp .env.example .env
Open the config file using nano or another file editor and enter your database information we created in the previous step.
# nano .env
Under basic app settings, enter your app URL and timezone e.g.
APP_URL=http://snipeit.yourdomain.com
APP_TIMEZONE='America/New_York'
Then under database settings, enter your database credentials e.g.
DB_DATABASE=snipeit
DB_USERNAME=snipeit
DB_PASSWORD=m0d1fyth15
Save the file, then exit from the file editor.
Set the ownership and permissions for the Snipe-IT data directory.
# chown -R www-data: /var/www/html/snipe-it
# chmod -R 755 /var/www/html/snipe-it
Next, update Snipe-IT dependencies.
# composer update --no-plugins --no-scripts
After updating Composer, we need to install all application dependencies by executing the following command.
# composer install --no-dev --prefer-source --no-plugins --no-scripts
In the /var/www/snipe-it/.env configuration file you created previously, generate the Laravel APP Key-value using the command below.
# php artisan key:generate
the command above will generate a key and write it as APP_KEY value in your .env file.
Let’s proceed to the next step.
Step 6. Install and Configure Nginx
Laravel supports multiple web servers like Apache, Nginx, or Litespeed. In this step, we are going to install and configure nginx. Let’s install it first then continue to the next step.
# apt install nginx
Once installed, nginx will automatically start, and it’s already configured to run upon reboot. So, we can continue and create a new nginx server block for our Snipe-IT website.
# nano /etc/nginx/conf.d/snipeit.conf
Insert the following into the file, and make sure to replace snipeit.yourdomain.com with your actual domain or subdomain name pointing to your server IP address.
server {
        listen 80;
        server_name snipeit.yourdomain.com;
        root /var/www/html/snipe-it/public;

        index index.php;

        location / {
                try_files $uri $uri/ /index.php?$query_string;

        }

        location ~ \.php$ {
		include fastcgi.conf;
                include snippets/fastcgi-php.conf;
                fastcgi_pass unix:/run/php/php8.1-fpm.sock;
		fastcgi_split_path_info ^(.+\.php)(/.+)$;
        	fastcgi_param SCRIPT_FILENAME $document_root$fastcgi_script_name;
        	include fastcgi_params;
        }

}
Save the file, then exit. We need to restart nginx to apply the changes we made.
# systemctl restart nginx
Step 7. Install Snipe-IT
At this point, we can navigate to http://snipeit.yourdomain.com and proceed with the installation through the web browser.
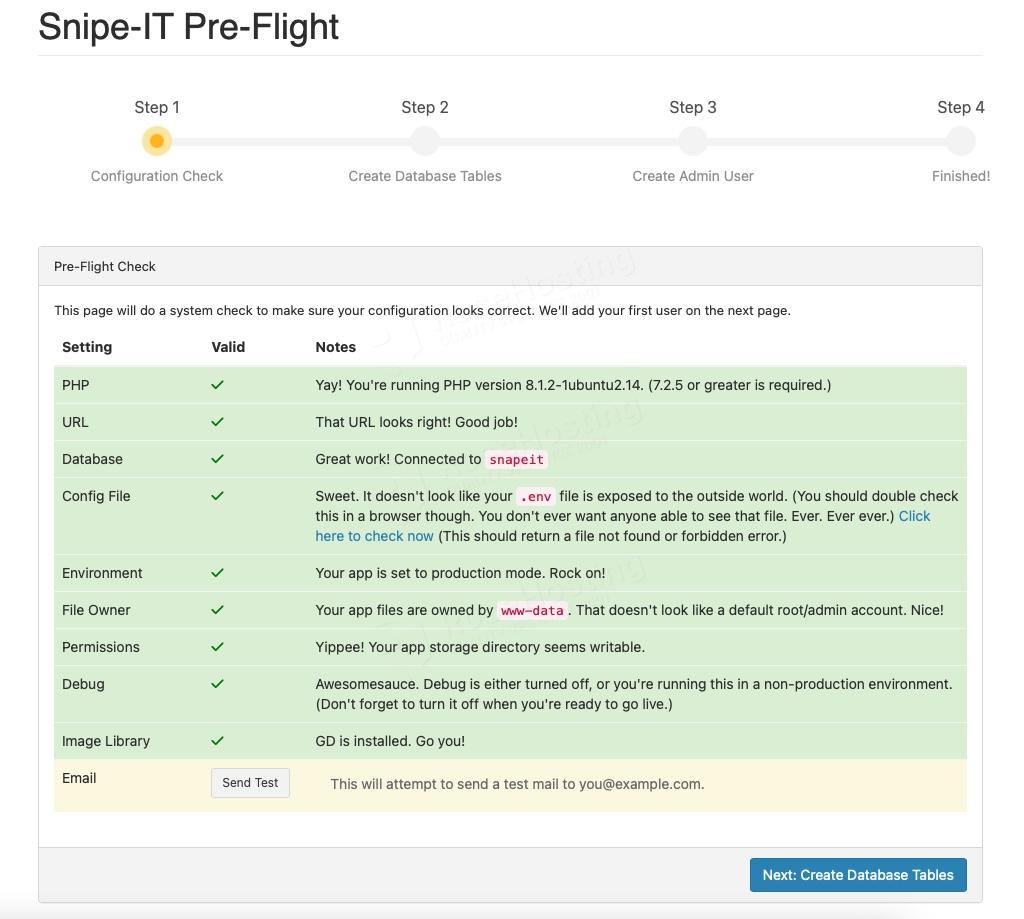
Click on Next: Create Database Tables to continue.

Database tables have been created; now click on Next: Create User to continue.
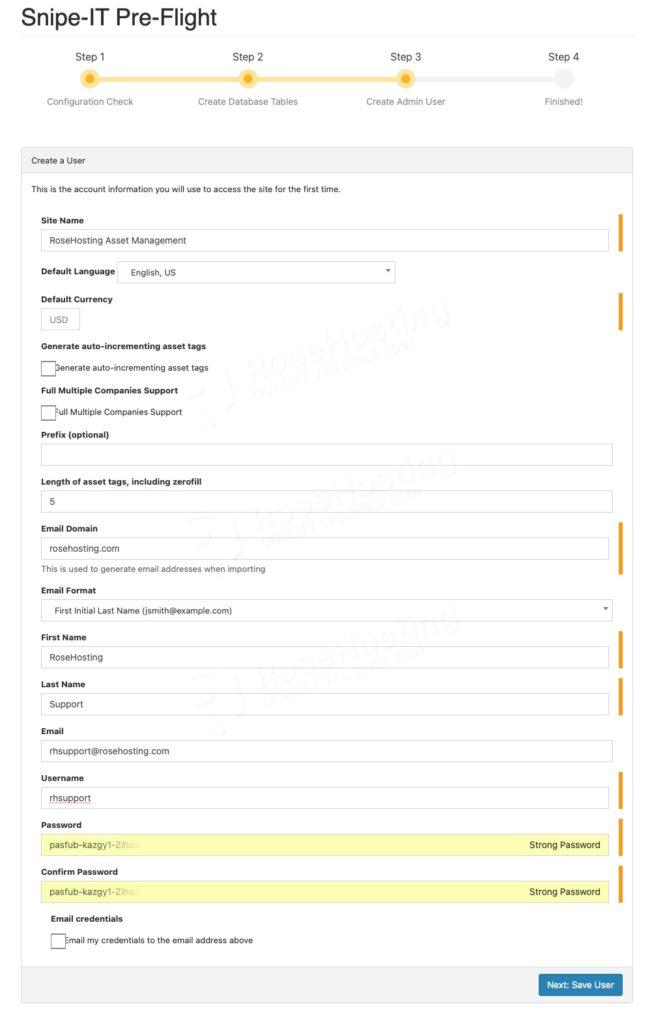
Click on Next: Save User
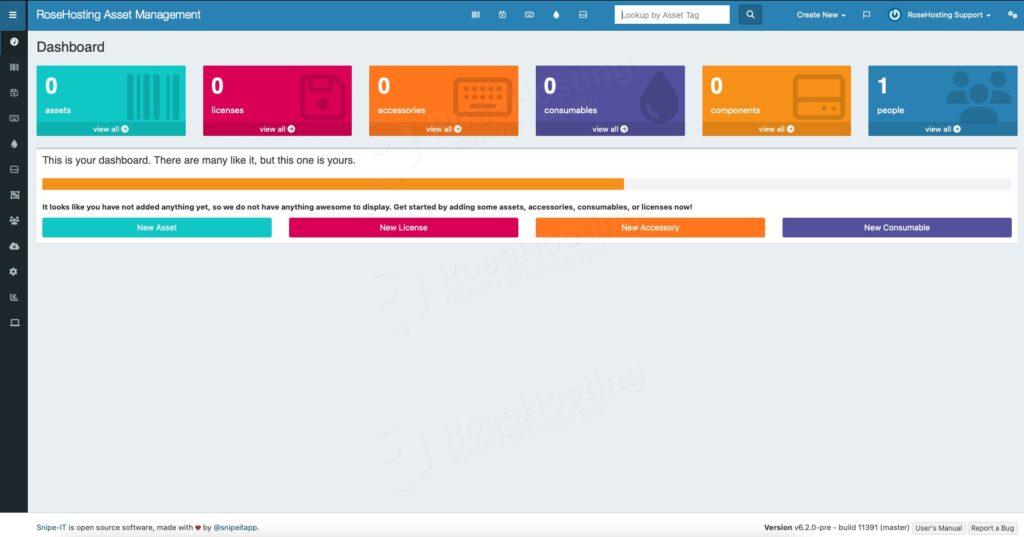
That’s it! You have successfully installed Snipe-IT. It is time for you to configure your Snipe-IT website by customizing it in the dashboard. For more information about Snipe-IT, please refer to their website.
If you are one of our web hosting customers and use our optimized Linux Hosting, you don’t have to install Snipe-IT On Ubuntu 22.04 yourself; our expert Linux admins will setup and optimize your Ubuntu 22.04 VPS and all of the websites it hosts for you. They are available 24×7 and will take care of your request immediately.
PS. If you liked this post on how to install Snipe-IT On Ubuntu 22.04, please share it with your friends on social networks or simply leave a reply below. Thanks.
After completing the whole setup nginx still points to its default page
You can check the snipeit.conf file, if the document root points to the correct directory.
me too
Hi,
Thank you for the superb article. It really helped alot.
Only problem now, that the new (as of now) version v6.4.0 can’t be installed as it says:
ERROR: This script should not be run as root/admin. Exiting.
When using the default command: php upgrade.php
Do you have any idea on how to solve it?
You can log in to your server as another system user, not root, then install it using that user.
Hello,
after Installation i have a problem, that all Search Fileds not working.
Any sugessions ?
I’ve got only the “Wait” (circle with points going around)
Did you check the log files?