
TYPO3 is a popular open-source CMS (Content Management System) for managing large-scale websites, especially among large companies or projects requiring complex features. Built with high flexibility and scalability, TYPO3 allows users to manage various types of content, complex page structures, and many additional features more easily. This CMS can handle large projects with complex technical requirements, such as internal system integration, high-level security, and multi-site management. In this article, we will show you how to install TYPO3 on AlmaLinux 10.
Table of Contents
Prerequisites
- An AlmaLinux 10 server
- SSH root access or a regular system user with sudo privileges
Conventions
# – given commands should be executed with root privileges either directly as a root user or by use of sudo command
$ – given commands should be executed as a regular user
Step 1: Update the System
First, you will need to log in to your AlmaLinux 10 VPS via SSH:
ssh root@IP_Address -p Port_numberYou will need to substitute ‘IP_Address’ and ‘Port_number’ with your server’s corresponding IP address and SSH port number. Furthermore, substitute ‘root’ with the username of the system user with sudo privileges.

You can verify whether you have the correct AlmaLinux version installed on your server with the subsequent command:
# cat /etc/almalinux-release You will see this message:
AlmaLinux release 10.2 (Lavender Lion)Step 2. Install PHP
TYPO3 supports PHP 8.3, and AlmaLinux 10 ships with PHP 8.3. So, we can install PHP directly using the default AlmaLinux repository.
# dnf install php php-{bz2,ctype,curl,fpm,gd,intl,json,fileinfo,libxml,mbstring,mysqlnd,openssl,posix,session,simplexml,xmlreader,xmlwriter,zip,zlib}Once the installation is completed, the PHP-FPM service is running but is not enabled upon server reboot. You can check and verify the installed PHP version with this command.
# php -vIt will return an output like this:
PHP 8.3.31 (cli) (built: May  5 2026 13:35:55) (NTS gcc x86_64)
Copyright (c) The PHP Group
Zend Engine v4.3.31, Copyright (c) Zend Technologies
    with Zend OPcache v8.3.31, Copyright (c), by Zend Technologies
Next, we need to modify the following settings in the /etc/php.ini file:
memory_limit = 512M
max_execution_time = 240
max_input_vars = 1500
pcre.jit = 1
post_max_size = 10M
upload_max_filesize = 10M
Those are the recommended values shown in the TYPO3 documentation page at https://docs.typo3.org/m/typo3/reference-coreapi/main/en-us/Administration/Installation/SystemRequirements/Index.html#php-requirements-and-configuration
You can set them higher than the ones we provided here. To edit the file, run this command:
# nano /etc/php.iniSave the file, then exit from the editor. Now, let’s enable and start PHP-FPM.
# systemctl enable --now php-fpmStep 3. Install MariaDB Server
TYPO3 supports MySQL, MariaDB, PostgreSQL, and SQLite as the database server. In this step, we will install MariaDB from the default AlmaLinux repository. To install the MariaDB server, execute the command below:
# dnf install mariadb-serverLet’s execute the command below to start MariaDB and let it start automatically upon server reboot.
# systemctl enable --now mariadbAt this point, we can proceed to create a new database and user for our SuiteCRM website.
# mariadb After logging in to the MySQL shell, we can run these.
mysql> CREATE USER 'typo3'@'localhost' IDENTIFIED BY 'm0d1fyth15';
mysql> CREATE DATABASE typo3 CHARACTER SET utf8mb4 COLLATE utf8mb4_general_ci;
mysql> GRANT ALL PRIVILEGES ON typo3.* TO 'typo3'@'localhost';
mysql> FLUSH PRIVILEGES;
mysql> \q
Step 4. Download TYPO3
To install TYPO3, we need to download the installation file first. Let’s download it now.
# wget https://get.typo3.org/14.3.4/tar.gz -O typo3.tar.gzTo get the more recent version, you can check their download page at https://get.typo3.org/
Once downloaded, we can extract the file.
# tar -xzvf typo3.tar.gz -C /var/www/html/typo3/ --strip-components=1Now, we need to change the permissions.
# chown -R apache: /var/www/html/typo3Step 5. Install and Configure Nginx
TYPO3 CMS supports Apache, Nginx, and IIS. In this article, we will use Nginx as the web server. Let’s install it now.
# dnf install nginx -yThen, we need to create an nginx server block for our TYPO3 website.
# nano /etc/nginx/conf.d/typo3.confInsert the following into the file.
upstream typo3 {
server unix:/run/php-fpm/www.sock;
}

map $http_accept $webp_suffix {
    default   "";
    "~*webp"  ".webp";
}

map $typo3_index_exists $typo3_index {
    default   "/index.php";
    1         "/typo3/index.php";
}

server {
    listen 80;
    root /var/www/html/typo3/;


    index index.php index.htm index.html;

    location ~ /(?:fileadmin|uploads)/.*\.pdf$ {
        add_header Content-Security-Policy "default-src 'self' 'unsafe-inline'; script-src 'none'; object-src 'self'; plugin-types application/pdf;";
    }

    location ~ /(?:fileadmin|uploads)/.*(?<!\.pdf)$ {
        add_header Content-Security-Policy "default-src 'self'; script-src 'none'; style-src 'none'; object-src 'none';";
        try_files $uri$webp_suffix $uri =404;
    }

    location / {
        absolute_redirect off;
        try_files $uri $uri/ /index.php$is_args$args;
    }

    location = /favicon.ico {
        access_log off;
        log_not_found off;
    }

    location = /robots.txt {
        access_log off;
        log_not_found off;
    }

    location = /typo3 {
        rewrite ^ /typo3/;
    }

    set $typo3_index_exists 0;
    if (-f $document_root/typo3/index.php) {
        set $typo3_index_exists 1;
    }

    location /typo3/ {
        absolute_redirect off;
        try_files $uri $typo3_index$is_args$args;
    }

    location ~ \.php$ {
        try_files $uri =404;
        fastcgi_split_path_info ^(.+\.php)(/.+)$;
        fastcgi_pass typo3;
        fastcgi_buffers 16 16k;
        fastcgi_buffer_size 32k;
        fastcgi_param SCRIPT_FILENAME $document_root$fastcgi_script_name;
        fastcgi_param SCRIPT_NAME $fastcgi_script_name;
        fastcgi_index index.php;
        include fastcgi_params;
        fastcgi_intercept_errors off;
        # fastcgi_read_timeout should match max_execution_time in php.ini
        fastcgi_read_timeout 10m;
        fastcgi_param SERVER_NAME $host;
        # Pass the X-Accel-* headers to facilitate testing.
        fastcgi_pass_header "X-Accel-Buffering";
        fastcgi_pass_header "X-Accel-Charset";
        fastcgi_pass_header "X-Accel-Expires";
        fastcgi_pass_header "X-Accel-Limit-Rate";
        fastcgi_pass_header "X-Accel-Redirect";
    }

    location ~ \.js\.gzip$ {
        add_header Content-Encoding gzip;
        gzip off;
        types { text/javascript gzip; }
    }
    location ~ \.css\.gzip$ {
        add_header Content-Encoding gzip;
        gzip off;
        types { text/css gzip; }
    }

    location ~* /\.(?!well-known\/) {
        deny all;
    }

    location ~* (?:\.(?:bak|conf|dist|fla|in[ci]|log|psd|sh|sql|sw[op])|~)$ {
        deny all;
    }

    location ~* composer\.(?:json|lock) {
        deny all;
    }

    location ~* flexform[^.]*\.xml {
        deny all;
    }

    location ~* locallang[^.]*\.(?:xml|xlf)$ {
        deny all;
    }

    location ~* ext_conf_template\.txt|ext_typoscript_constants\.(?:txt|typoscript)|ext_typoscript_setup\.(?:txt|typoscript) {
        deny all;
    }

    location ~* /.*\.(?:bak|co?nf|cfg|ya?ml|ts|typoscript|dist|fla|in[ci]|log|sh|sql)$ {
        deny all;
    }

    location ~ _(?:recycler|temp)_/ {
        deny all;
    }

    location ~ fileadmin/(?:templates)/.*\.(?:txt|ts|typoscript)$ {
        deny all;
    }

    location ~ ^(?:vendor|typo3_src|typo3temp/var) {
        deny all;
    }

    location ~ (?:typo3conf/ext|typo3/sysext|typo3/ext)/[^/]+/(?:Configuration|Resources/Private|Tests?|Documentation|docs?)/ {
        deny all;
    }

    if (!-e $request_filename) {
        rewrite ^/(.+)\.(\d+)\.(php|js|css|png|jpg|gif|svg|gzip)$ /$1.$3 last;
    }
}
Make sure to replace typo3.yourdomain.com with your actual domain or subdomain name. Save the file then exit and start nginx.
# systemctl enable --now nginxStep 6. Install TYPO3 CMS
After installing nginx and creating an nginx server block or virtual host, we should be able to access http://typo3.yourdomain.com. Let’s open it and start the installation.
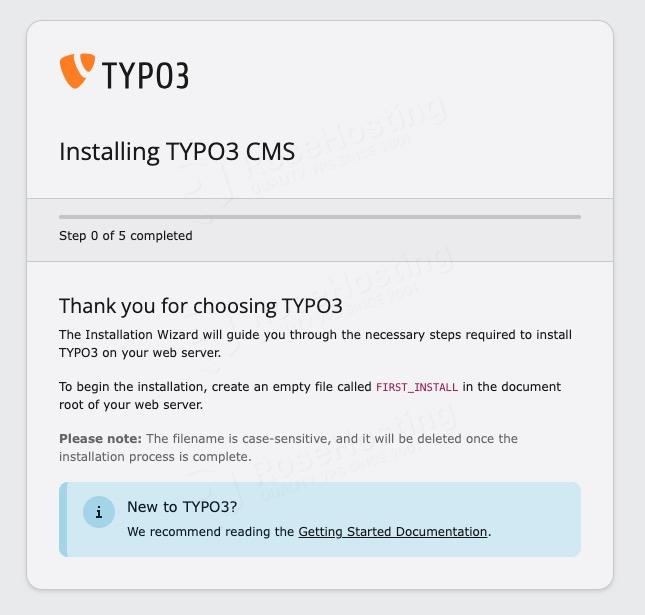
As seen in the picture, we need to create an empty file called FIRST_INSTALL in the document root.
# touch /var/www/html/typo3/FIRST_INSTALLNow, let’s refresh our web browser; you should see this.
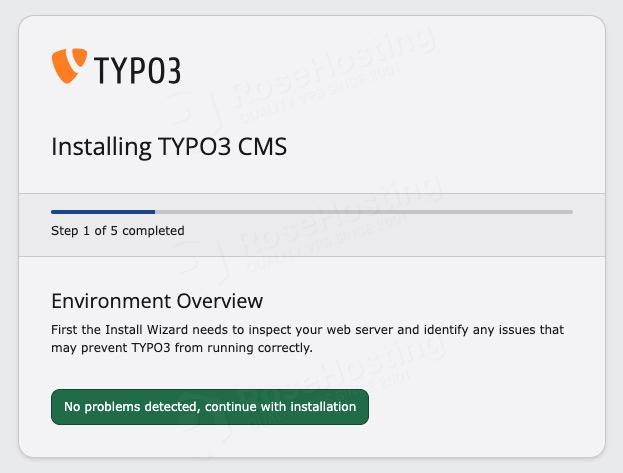
Click on the green button ‘No problems detected, continue with installation’
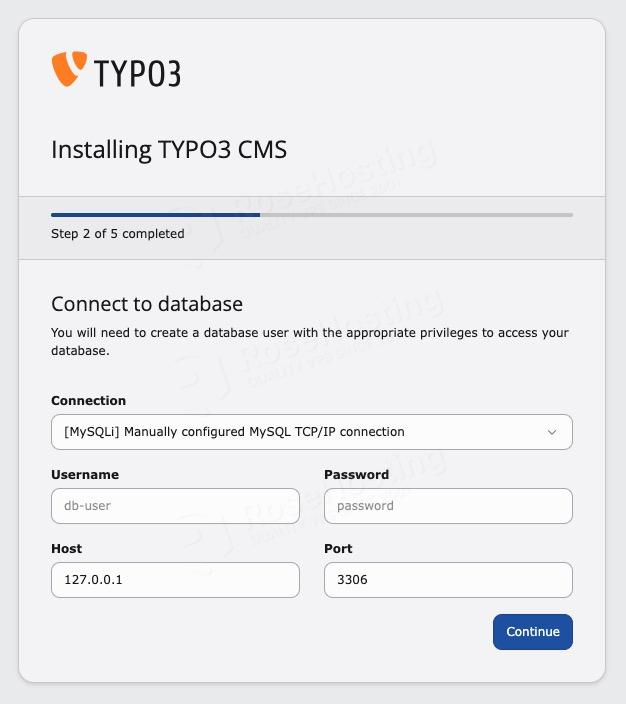
In this step, fill in the database details we created in step 3 above.
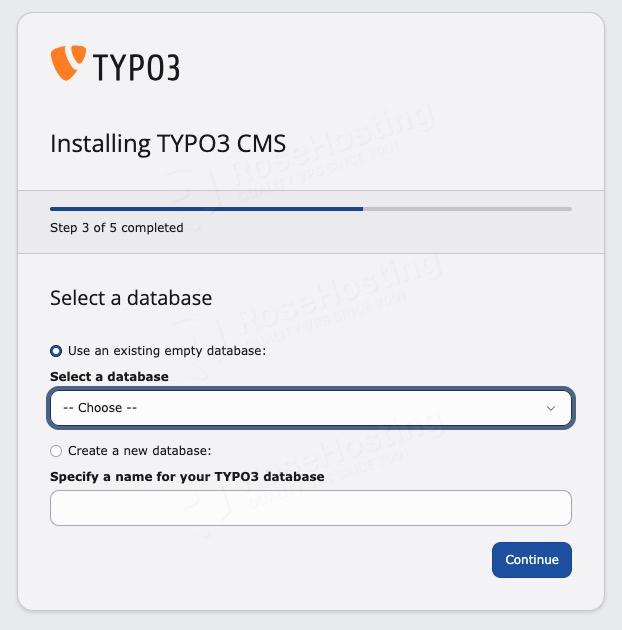
In this step, we can choose the database we already created, then click on the Continue button.
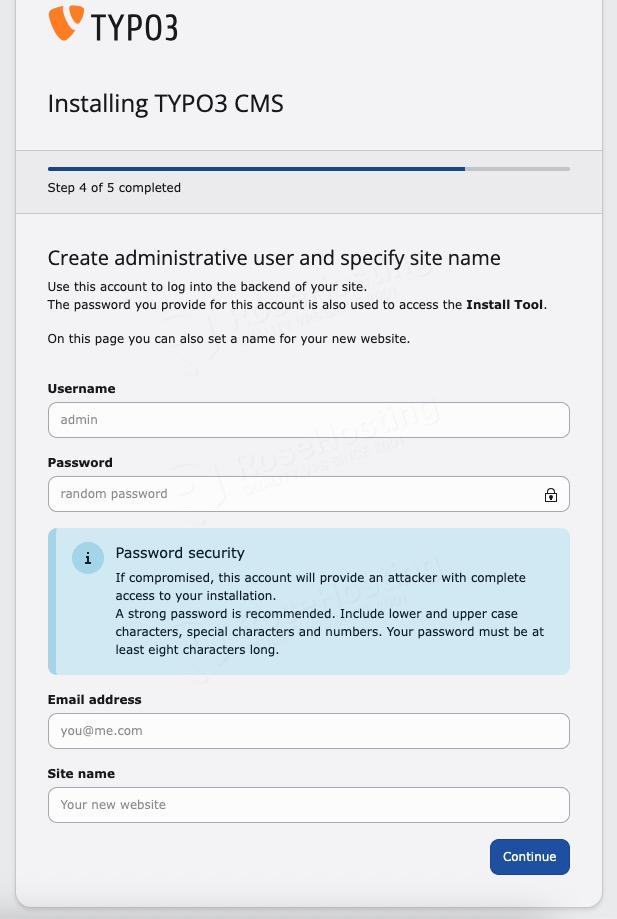
Now, we can create an administrative user. Fill them all in and make sure to use a strong password.
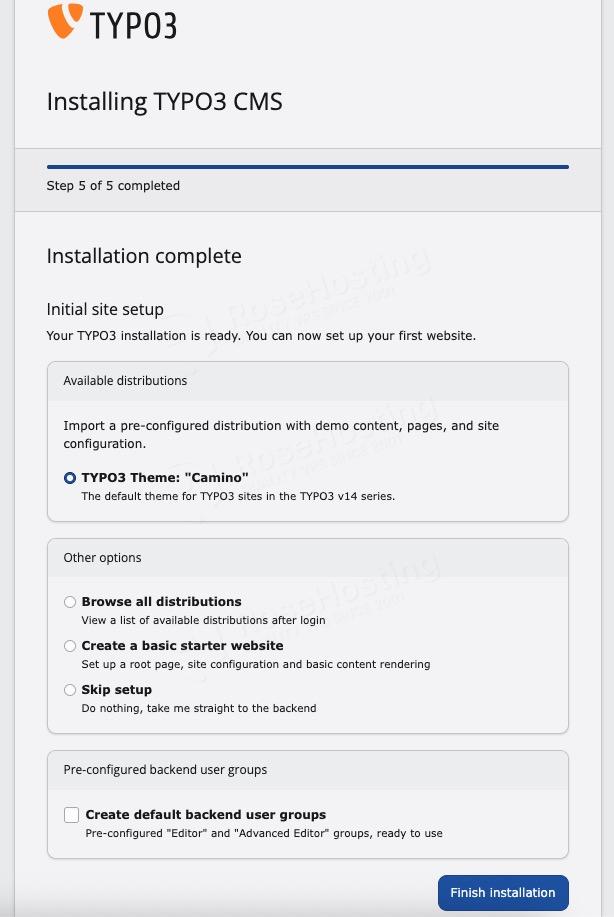
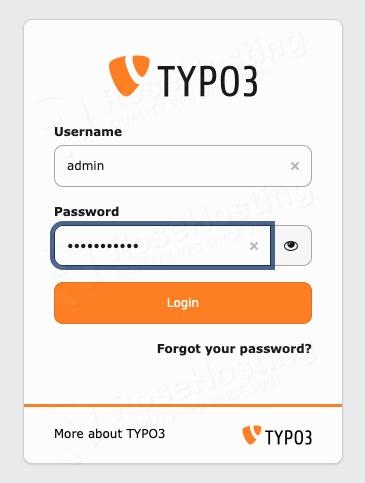
Click on Finish Installation. Once the admin user is created, you should be able to log in now.
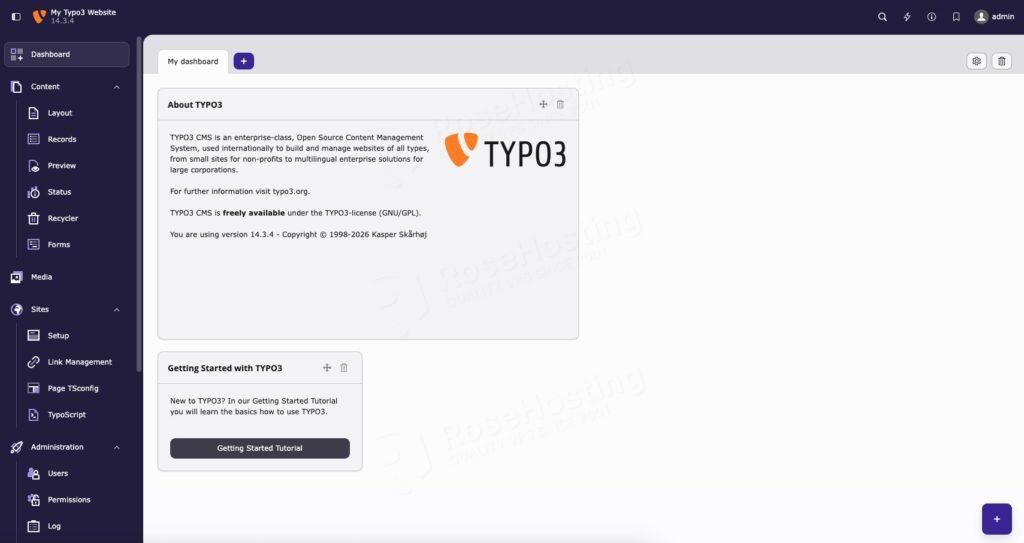
Finally, you will be brought to the TYPO3 dashboard
You Have Managed to Install TYPO3 CMS on AlmaLinux 10
You can now start working on your new TYPO3 website.
Of course, you don’t have to install TYPO3 CMS on AlmaLinux 10 yourself if you use one of our AlmaLinuxVPS Hosting services, in which case you can simply ask our expert Linux admins to install TYPO3 CMS on AlmaLinux 10 for you. Our experienced administrators are available 24×7 and will address your request immediately. Managing TYPO3 CMS instances is not just about the installation; we can help you optimize your TYPO3 CMS server if you have an active service with us.
If you liked this post on how to install TYPO3 CMS on AlmaLinux 10, please share it with your friends or leave a comment in the comments section.