In this tutorial, we will show you how to set up Nginx High Availability cluster using Pacemaker on CentOS 7. To have an Nginx server that can operate continuously without failure for a long time, we need to configure the server with active-passive Nginx instances. Pacemaker is an open source cluster manager software that achieves maximum high availability of your services. It’s an advanced and scalable High Availability cluster manager distributed by ClusterLabs, it manages all cluster services and use the messaging and membership capabilities of the underlying cluster engine.
Table of Contents
1. Prerequisites
To follow this tutorial, you need to have:
- 2 or more servers
- CentOS 7 Operating System
- root access to each of the servers
2. Login and Update CentOS
ssh root@IP_Address -p7022
yum update
yum upgrade
Edit /etc/hosts file on both server with any terminal text editor of your liking
nano /etc/hosts
Add the following lines to /etc/hosts file
192.168.0.22    webserver-01
192.168.0.23    webserver-02
3. Install Epel Repository and Nginx
Extra Packages for Enterprise Linux (EPEL) repository is needed in order to install Nginx. Run the following commands on both servers.
yum install epel-release -y

yum install nginx -y
systemctl enable nginx
systemctl start nginx
4. Change default Nginx index page
Once finished, we need to make changes to the default Nginx index page on both server.
Run the following command on server one
echo ‘
webserver-01
’ > /usr/share/nginx/html/index.html
Run the following command on server two
echo ‘
webserver-02
’ > /usr/share/nginx/html/index.html
5. Install and configure Pacemaker
In this section, we will install the Pacemaker stack. You have to complete this step on both servers.
yum install corosync pacemaker pcs -y
After the installation has been completed, enable all services to launch automatically at system boot using the systemctl commands below.
systemctl enable pacemaker
systemctl enable corosync
systemctl enable pcsd
6. Synchronize the configuration
The installation will create a ‘hacluster’ system user. We also need to run pcsd in order to synchronize the configuration
systemctl start pcsd
7. Create a password
Next, create a new password for ‘hacluster’ user that had been automatically created during the previous installation, we need to use the same password for all servers
passwd hacluster
8. Create Clusters
Next, run this command below
pcs cluster auth webserver-01 webserver-02

At this point, we are ready to set up the cluster.
pcs cluster setup –name rosecluster webserver-01 webserver-02
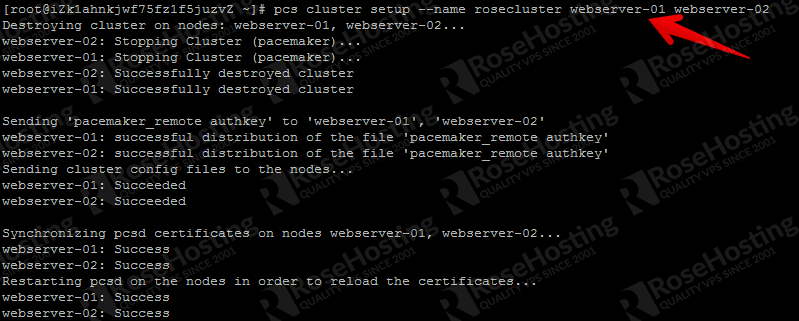
rosecluster is the cluster name, while webserver-01 and webserver-02 are the servers that will be the parts of rosecluster.
Enable it on boot and start it now.
pcs cluster enable –all
pcs cluster start –all

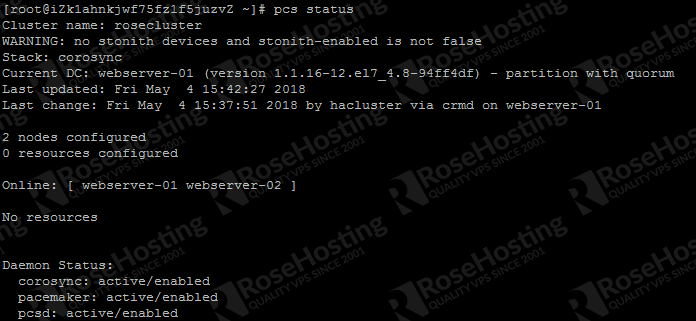
We can check the cluster status with this command:
pcs status
9. Disable STONITH
STONITH or Shoot The Other Node In The Head is the fencing implementation on Pacemaker. If you’re in production, it’s better to enable STONITH. Since we’re not using the fencing device, we will disable the STONITH.
When running pcs status command, you will see a warning in the output saying that no STONITH devices are configured and STONITH is not disabled:
WARNING: no stonith devices and stonith-enabled is not false
Disable STONITH with the following pcs command.
pcs property set stonith-enabled=false
10. Ignore the Quorum Policy
In this tutorial, we will configure Pacemaker to ignore quorum:
pcs property set no-quorum-policy=ignore
Check the property list and make sure stonith and the quorum policy are disabled.
pcs property list

11. Add Resources
Floating IP is the IP address that can be instantly migrated from one server to another in the same network, it is used to support failover in a high-availability cluster. In this tutorial, the floating IP address for the Pacemaker High-Availability will be ‘192.168.0.100’. For now, we are going to add two resources, the Floating IP address resource with the name ‘v_ip’ and a new resource for the Nginx web server named ‘webserver’.
Add the new floating IP address ‘v_ip’ using the following command.
pcs resource create v_ip ocf:heartbeat:IPaddr2 ip=192.168.0.100 cidr_netmask=32 op monitor interval=20s
Next, we can add the second resource to the cluster. The resource agent of the service is ocf:heartbeat:nginx named ‘webserver’.
pcs resource create webserver ocf:heartbeat:nginx configfile=/etc/nginx/nginx.conf op monitor timeout=”5s” interval=”5s”
Make sure there is no error, then check the resources.
pcs status resources

If you see two resources; ‘v_ip’ and ‘webserver’, it means the Floating IP and Nginx web server have been added.
12. Configure Constraints
In this step, we will tell the server to make both resources created earlier to be running on the same host. We will set collocation constraint for the resources with a score of INFINITY.
pcs constraint colocation add webserver v_ip INFINITY
Set Nginx resource (webserver) to always run on the same host where v_ip is active.
pcs constraint order v_ip then webserver
To check the resources are running on the same host, we can invoke:
pcs status
13. Test the cluster.
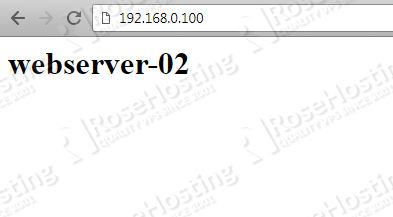
Navigate to http://192.168.0.100 on your web browser, you will see the default Nginx page from the webserver-01.

Then, invoke the following command to stop the cluster on the webserver-01:
pcs cluster stop webserver-01
Now, if you refresh the page at http://192.168.0.100, you will get the default Nginx page from the webserver-02.
Congratulation, you have successfully set up an Nginx High Availability active-passive cluster with Pacemaker. If you have a very busy website, you may consider running your website on an Nginx HA. There are many well known websites running on Nginx HA and they use Nginx HA to deliver their content quickly, reliably, and securely.
 Of course, you don’t have to Set Up Nginx High Availability Cluster using Pacemaker on CentOS 7, if you use one of our Nginx Hosting Solutions, in which case you can simply ask our expert Linux admins to help you with this. They are available 24×7 and will take care of your request immediately.
PS. If you liked this post on how to Set Up Nginx High Availability Cluster using Pacemaker on CentOS 7, please share it with your friends on the social networks using the buttons on the left or simply leave a reply below. Thanks.