 In this article we will walk you through the steps on how to setup a mailserver with Exim4 and DBMail on a Debian 7 (Wheezy) Linux VPS.
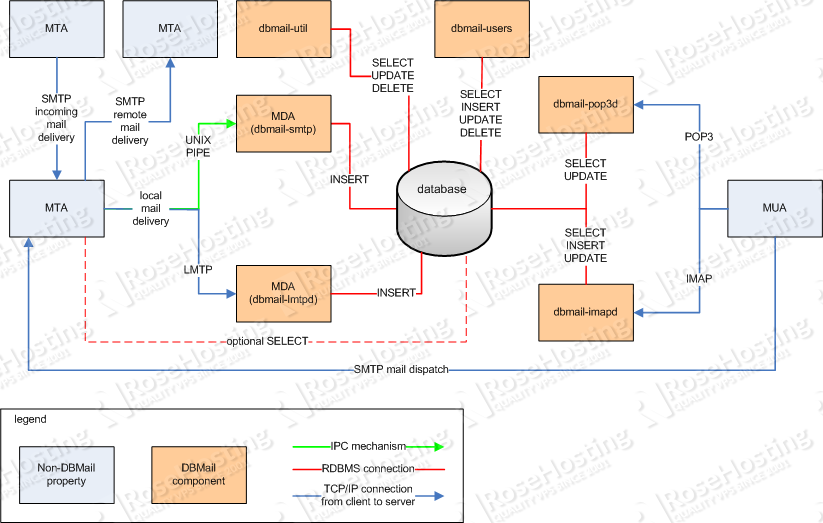
What is Exim4?
It is a mail transfer agent (MTA) used on Unix-like operating systems which is responsible for receiving, routing, and delivering e-mail messages.
What is DBMail?
It is fast and scalable sql based email service which stores email messages in a relational database. It supports multiple front-ends like IMAP4, POP3, ManageSieve, LMTP etc. and multiple back-ends like MySQL, PostgreSQL, Oracle and SQLite.
Main advantages of DBMail are:
- Scalability
- Manageability
- Speed
- Security
- Flexibility
System Requirements?
- A Debian 7 Linux VPS Hosting
- Database server
- Exim MTA
UPDATE SYSTEM
First thing to do is to SSH to your Debian VPS, fire up a screen session and update your linux vps using the following commands:
## screen -U -S exim-dbmail
## apt-get update
## apt-get upgrade
ADD DBMAIL SOURCES
Proceed with adding DBMail’s sources to your sources.list so you can install the required packages in the next step. You can add the sources using the following commands:
## cp /etc/apt/sources.list{,.orig}
## echo "deb http://debian.nfgd.net/debian stable main" >> /etc/apt/sources.list
## echo "deb-src http://debian.nfgd.net/debian stable main" >> /etc/apt/sources.list
INSTALL REQUIRED PACKAGES
Update the sources using apt and install the necessary packages by executing the following commands in your terminal as root:
## apt-get update
## apt-get install exim4 exim4-daemon-heavy mysql-server mysql-client dbmail
## apt-get purge sendmail*
CREATE DBMAIL DATABASE
Next, DBMail requires a database as its back-end and since in this article we are using the MySQL database server, proceed with creating a new user and database by running the following commands:
## mysql -u root -p

CREATE DATABASE dbmail;
GRANT ALL ON dbmail.* TO dbmail@localhost IDENTIFIED BY 'DATABASE_PASSWORD';
\q
POPULATE DBMAIL DATABASE TABLES
Ok, next thing to do is to populate the newly created database with the required database tables provided by DBMail. You can achieve this using the following commands:
## zcat /usr/share/doc/dbmail/examples/create_tables.mysql.gz > /tmp/dbmail_create_tables.sql
## mysql -u dbmail -p dbmail < /tmp/dbmail_create_tables.sql
CONFIGURE DBMAIL
Edit /etc/dbmail/dbmail.conf and setup DBMail back-end by setting up the following:
## vim /etc/dbmail/dbmail.conf

dburi = mysql://dbmail:DATABASE_PASSWORD@localhost:3306/dbmail
authdriver = sql
do not forget to replace DATABASE_PASSWORD with the actual password you used when you created the database
Next, edit /etc/default/dbmail and set the following:
## vim /etc/default/dbmail

START_IMAPD=true
START_LMTPD=true
RESTART DBMAIL SERVICE
With DBMail’s configuration in place, proceed with starting up the service using:
## service dbmail restart
ADD DBMAIL TO SYSTEM STARTUP
Add DBMail service to your Debain VPS startup so that the service is automatically started when you reboot your server:
## update-rc.d -f dbmail enable
CONFIGURE EXIM
Next, you have to appropriately configure Exim with DBMail. This includes setting up user database lookups, authentication, routing and transport. First setup Exim main configuration file and continue with user lookups, so:
## vim /etc/exim4/update-exim4.conf.conf

dc_eximconfig_configtype='internet'
dc_other_hostnames='mydomain.com'
dc_local_interfaces=''
dc_readhost=''
dc_relay_domains=''
dc_minimaldns='false'
dc_relay_nets='127.0.0.0/8'
dc_smarthost=''
CFILEMODE='644'
dc_use_split_config='true'
dc_hide_mailname=''
dc_mailname_in_oh='true'
dc_localdelivery='maildir_home'
replace mydomain.com with your actual domain name
## vim /etc/exim4/conf.d/main/05_exim4-config_dbmail_user_lookup

hide mysql_servers = localhost/dbmail/dbmail/DATABASE_PASSWORD
Setup MTA banner by adding the following:
## vim /etc/exim4/conf.d/main/06_exim4-config_smtp_banner

smtp_banner = $smtp_active_hostname MTA
Now, setup DBMail lmtp by configuring the following:
## vim /etc/exim4/conf.d/transport/30_exim4-config_dbmail_lmtp

dbmail_lmtp:
	driver = smtp
	protocol = lmtp
	hosts = 127.0.0.1
	allow_localhost
	return_path_add
Next, setup user lookup:
## vim /etc/exim4/conf.d/router/750_exim4-config_dbmail_user

dbmail_user:
	debug_print = "R: dbmail_user for $local_part@$domain"
	driver = accept
	condition = ${lookup mysql{\
		SELECT alias_idnr FROM dbmail_aliases WHERE \
		alias='${quote_mysql:$local_part@$domain}' OR \
		alias='${quote_mysql:@$domain}'}{yes}{no}}
	transport = dbmail_lmtp
	cannot_route_message = Unknown user
and proceed with setting up the user authentication:
## vim /etc/exim4/conf.d/auth/10_exim4_config_dbmail_auth_plain

auth_plain:
	driver = plaintext
	public_name = PLAIN
	server_condition = ${lookup mysql{\
		SELECT user_idnr FROM dbmail_users WHERE \
		userid='${quote_mysql:$2}' AND \
		passwd='${quote_mysql:$3}'}{yes}{no}}
	server_prompts =:
	server_set_id = $2
## vim /etc/exim4/conf.d/auth/15_exim4-config_dbmail_auth_login

auth_login:
	driver = plaintext
	public_name = LOGIN
	server_condition = ${lookup mysql{\
		SELECT user_idnr FROM dbmail_users WHERE \
		userid='${quote_mysql:$1}' AND \
		passwd='${quote_mysql:$2}'}{yes}{no}}
	server_prompts = Username::: Password::
	server_set_id = $1
## vim /etc/exim4/conf.d/auth/20_exim4-config_dbmail_auth_cram_md5

auth_cram_md5:
	driver = cram_md5
	public_name = CRAM-MD5
	server_secret = ${lookup mysql{\
		SELECT passwd FROM dbmail_users WHERE \
		userid='${quote_mysql:$1}'}{$value}fail}
	server_set_id = $1
Add lmtp to /etc/services
## vim /etc/services

lmtp            24/tcp
and finally update Exim configuration and restart the MTA using:
## update-exim4.conf
## service exim4 restart
CREATE A NEW EMAIL ACCOUNT
DBMail provides some nice command line utilities to manage the accounts. For example, to create a new account you would use:
## dbmail-users -a USERNAME -w PASSWORD -s user@domain.com
More information on this you can find at http://www.dbmail.org/dokuwiki/doku.php/manage_users
ADDING ANOTHER DOMAIN
To add another domain to the mail server, you need to edit /etc/exim4/update-exim4.conf.conf and add your domain in dc_other_hostnames separated by a semicolon as in:
## vim /etc/exim4/update-exim4.conf.conf

dc_other_hostnames='mydomain.com;myotherdomain.org'
save and close the file, update Exim configuration file and restart the MTA using:
## update-exim4.conf
## service exim4 restart
Use the following command:
## tail -f /var/log/exim4/mainlog /var/log/dbmail/dbmail.* /var/log/mail.log
to read your mail server log files.
That’s it. Head over to http://www.dbmail.org/dokuwiki/doku.php to learn more about DBMail and how to use it.
Of course you don’t have to do any of this if you use one of our Linux VPS Hosting services, in which case you can simply ask our expert Linux admins to install Exim with DBMail. They are available 24×7 and will take care of your request immediately.
PS. If you liked this post please share it with your friends on the social networks using the buttons on the left or simply leave a reply below. Thanks.