 Pure-FTPd is a free (BSD), secure, production-quality and standard-conformant FTP server which is actively supported and designed with security in mind. It focuses on efficiency, ease of use and provides simple answers to common needs, plus unique useful features for personal users especially on Linux VPS servers as well as hosting providers. Pure-FTPd can even run 100% non-root, with its built-in chroot() emulation and virtual accounts.
In this tutorial we will show you how to configure Pure-FTPd so that it uses virtual users from a MySQL database instead of real system users. This configuration is much more performant and will allow you to have thousands of FTP users on a single server.
We will also install phpMyAdmin in order to easily administer the databases created.
REQUIREMENTS
We will be using our SSD 1 Linux VPS hosting plan for this tutorial.
UPDATE THE SYSTEM
Login to your server as user ‘root’ and make sure your OpenSUSE VPS is fully up-to-date:
# ssh root@hostname
# zypper ref
# zypper up
INSTALL APACHE2, MARIADB (MYSQL) and PHPMYADMIN
Install Apache2, MariaDB and phpMyadmin with it’s respective dependencies with the following command:
# zypper install mariadb mariadb-client apache2 apache2-mod_php5 php5-mysql php5-mcrypt php5-mbstring php5-gd
Start and add MariaDB to your system’s startup:
# chkconfig -a mysql
# systemctl start mysql.service
We recommend you to run mysql_secure_installation and finalize the MariaDB setup:
# mysql_secure_installation
Create system startup links for Apache (so that it starts automatically whenever the system boots) and start it using the following commands:
# systemctl enable apache2.service
# systemctl start apache2.service
Next install phpMyAdmin:
# zypper install phpmyadmin
To access phpMyAdmin you need to modify the /etc/apache2/conf.d/phpMyAdmin.conf file using your favorite text editor and add the following lines at the very top of the file:
# vim /etc/apache2/conf.d/phpMyAdmin.conf

Alias /phpMyAdmin /srv/www/htdocs/phpMyAdmin
Alias /phpmyadmin /srv/www/htdocs/phpMyAdmin
Navigate to phpMyAdmin directory and enable the config.inc.php file:
# cd /srv/www/htdocs/phpMyAdmin

# cp config.sample.inc.php config.inc.php
The config.inc.php file expects an existent phpmyadmin database. With the following commands you can create the phpmyadmin database and import the default tables from phpmyadmin docs:
# echo "create database phpmyadmin;" | mysql -u root -p 'yourpassword'

# mysql -u root -p 'yourpassword' < /usr/share/doc/packages/phpMyAdmin/examples/create_tables.sql
Restart Apache:
# systemctl restart apache2.service
You can now use your favorite web browser and access phpMyAdmin by navigating to: http://your_IP_address/phpmyadmin or http://yourdomain/phpmyadmin . You will see the welcome page:
INSTALL PURE-FTPd
Now, install PureFTPd by issuing the following command:
# zypper install pure-ftpd
Then, create FTP group and user that all the virtual users will be mapped to:
# groupadd -g 2525 ftpgroup
# useradd -u 2525 -s /bin/false -d /bin/null -c "pureftpd user" -g ftpgroup ftpuser
Next thing you need to do is to create a database for PureFTPd. Enter your MySQL service as root:
# mysql -u root -p


MariaDB [(none)]> CREATE DATABASE pureftpd;

MariaDB [(none)]> GRANT ALL PRIVILEGES on pureftpd.* TO 'ftpuser'@'localhost' IDENTIFIED BY 'your_password';

MariaDB [(none)]> FLUSH PRIVILEGES;
Replace the string your_password with a password to your liking.
While you are still logged into MySQL let’s create the database table needed for storing the virtual users credentials. Enter the following:
MariaDB [(none)]> USE pureftpd;

MariaDB [pureftpd]> CREATE TABLE `ftpd` (
User varchar(16) NOT NULL default '',
status enum('0','1') NOT NULL default '0',
Password varchar(64) NOT NULL default '',
Uid varchar(11) NOT NULL default '-1',
Gid varchar(11) NOT NULL default '-1',
Dir varchar(128) NOT NULL default '',
ULBandwidth smallint(5) NOT NULL default '0',
DLBandwidth smallint(5) NOT NULL default '0',
comment tinytext NOT NULL,
ipaccess varchar(15) NOT NULL default '*',
QuotaSize smallint(5) NOT NULL default '0',
QuotaFiles int(11) NOT NULL default 0,
PRIMARY KEY (User),
UNIQUE KEY User (User)
)  ENGINE=InnoDB;


MariaDB [pureftpd]> exit
Everything looks fine so far. Let’s modify PureFTPd configuration file with some recommended changes. With your favorite text editor open the etc/pure-ftpd/pure-ftpd.conf file:
# vim etc/pure-ftpd/pure-ftpd.conf
Once there, make sure that the ChrootEveryone, AnonymousOnly, MySQLConfigFile, and CreateHomeDir lines are enabled and look like this:
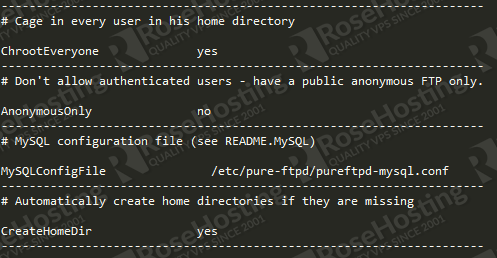
The ChrootEveryone setting is needed because it will make PureFTPd chroot every virtual user in his home directory, therefore limiting him to browse directories and files only in his home directory. The CreateHomeDir line will make PureFTPd create a user’s home directory when the user logs in and the home directory does not exist yet. AnonymousOnly must be set to no because otherwise only anonymous FTP sessions will be allowed.
Next create/edit the /etc/pure-ftpd/pureftpd-mysql.conf file:
# vim /etc/pure-ftpd/pureftpd-mysql.conf
And paste the following:
MYSQLSocket      /var/run/mysql/mysql.sock
MYSQLServer     localhost
MYSQLPort       3306
MYSQLUser       ftpuser
MYSQLPassword   your_password
MYSQLDatabase   pureftpd
#MYSQLCrypt md5, cleartext, crypt() or password() - md5 is VERY RECOMMENDABLE uppon cleartext
MYSQLCrypt      md5
MYSQLGetPW      SELECT Password FROM ftpd WHERE User="\L" AND status="1" AND (ipaccess = "*" OR ipaccess LIKE "\R")
MYSQLGetUID     SELECT Uid FROM ftpd WHERE User="\L" AND status="1" AND (ipaccess = "*" OR ipaccess LIKE "\R")
MYSQLGetGID     SELECT Gid FROM ftpd WHERE User="\L"AND status="1" AND (ipaccess = "*" OR ipaccess LIKE "\R")
MYSQLGetDir     SELECT Dir FROM ftpd WHERE User="\L"AND status="1" AND (ipaccess = "*" OR ipaccess LIKE "\R")
MySQLGetBandwidthUL SELECT ULBandwidth FROM ftpd WHERE User="\L"AND status="1" AND (ipaccess = "*" OR ipaccess LIKE "\R")
MySQLGetBandwidthDL SELECT DLBandwidth FROM ftpd WHERE User="\L"AND status="1" AND (ipaccess = "*" OR ipaccess LIKE "\R")
MySQLGetQTASZ   SELECT QuotaSize FROM ftpd WHERE User="\L"AND status="1" AND (ipaccess = "*" OR ipaccess LIKE "\R")
MySQLGetQTAFS   SELECT QuotaFiles FROM ftpd WHERE User="\L"AND status="1" AND (ipaccess = "*" OR ipaccess LIKE "\R")
Replace the string your_password with the real password for the MySQL user ftpuser in the line MYSQLPassword. We will use md5 as MYSQLCrypt method, which means that MySQL will store the users passwords as an MD5 string in the database which is far more secure than using plain text passwords.
Now we will create the system startup links for PureFTPd and start it:
# systemctl enable pure-ftpd
# systemctl start pure-ftpd
Let’s populate the database via the MySQL shell. Login as root:
# mysql -u root -p

MariaDB [(none)]> USE pureftpd;

MariaDB [pureftpd]> INSERT INTO `ftpd` (`User`, `status`, `Password`, `Uid`, `Gid`, `Dir`, `ULBandwidth`, `DLBandwidth`, `comment`, `ipaccess`, `QuotaSize`, `QuotaFiles`) VALUES ('testuser', '1', MD5('RoseHosting'), '2525', '2525', '/home/www.examledomain.com', '200', '200', '', '*', '10', '0');

MariaDB [pureftpd]> exit;
This MySQL statement will create the user testuser with status 1 (which means that the ftp account is active) and the password RoseHosting (you should change it to one of your liking). The password will be stored and encrypted using MySQL’s MD5 function, the UID and GID will be set to 2525 (the user/group we created for the virtual users to be mapped to), the home directory will be /home/www.examledomain.com and the upload and download bandwidth will be set to 200 KB/sec. (kilobytes per second) alongside a quota of 100 MB.
To test the configuration open a FTP client of your choise and enter the following credentials:
hostname : your IP address;
user: testuser
password: yourpassword
port: 21
That’s it. We successfully installed and configured Pure-FTPd so that it uses virtual users from a MySQL database. You can administer your databases and add new users using the phpMyAdmin tool.
Of course you don’t have to do any of this if you use one of our Linux VPS Hosting services, in which case you can simply ask our expert Linux admins to do this for you. They are available 24×7 and will take care of your request immediately.
PS. If you liked this post please share it with your friends on the social networks using the buttons on the left or simply leave a reply below. Thanks.
where is the installation process for the pure ftpd with my sql support ??
you diidnt mentioned in ur post ????/ can you pls update that also???
on centos 6
The configuration steps are described in the “INSTALL PURE-FTPd” section. The guide is written and tested on OpenSUSE. If you are using CentOS 6 some of the steps may differ.