

Etherpad is a free, open-source, web-based, and multi-user collaboration tool. It is used for editing a document through a web browser in real-time. It allows you to edit, review, and type documents simultaneously. It comes with tons of plugins that help you to customize your instance to suit your needs. With Etherpad, you can write articles, press releases, and to-do lists with your friends, students, or colleagues at the same time.
In this tutorial, we will show you how to install Etherpad on Ubuntu 20.04.
Table of Contents
Prerequisites
- An Ubuntu 20.04 VPS (we’ll be using our SSD 2 VPS plan)
- Access to the root user account (or access to an admin account with root privileges)
Step 1: Log in to the Server & Update the Server OS Packages
First, log in to your Ubuntu 20.04 server via SSH as the root user:

ssh root@IP_Address -p Port_number
You will need to replace ‘IP_Address‘ and ‘Port_number‘ with your server’s respective IP address and SSH port number. Additionally, replace ‘root’ with the username of the admin account if necessary.
Before starting, you have to make sure that all Ubuntu OS packages installed on the server are up to date. You can do this by running the following commands:
apt-get update -y
apt-get upgrade -y
Step 2: Install the Required Packages
First, you will need to install all dependencies required to install Etherpad in your server. You can install all of them with the following command:
apt-get install libssl-dev pkg-config git gcc g++ make build-essential gnupg2 -y
Once all the packages are installed, you will need to install Node.js in your system. At the time of writing this tutorial, the latest version of Node.js is 14.15.0. By default, Node.js is not available in the Ubuntu 20.04 standard repository. So you will need to install the Node.js repository to your system. You can add the Node.js repository with the following command:
curl -sL https://deb.nodesource.com/setup_14.x -o nodesource_setup.sh
bash nodesource_setup.sh
Once the repository is added, install the Node.js with the following command:
apt-get install nodejs -y
After installing Node.js, verify the installed version of Node.js with the following command:
node -v
You should get the following output:
v14.15.0
Step 3: Install and Configure MariaDB Database
Etherpad uses MySQL/MariaDB to store its data. So MariaDB server must be installed in your server. If not installed, you can install it with the following command:
apt-get install mariadb-server -y
Once installed, log in to the MariaDB console with the following command:
mysql
Once login, create a database and user with the following command:
MariaDB [(none)]> create database etherpaddb;
MariaDB [(none)]> grant all privileges on etherpaddb.* to etherpad@localhost identified by 'secure-password';
Next, flush the privileges and exit from the MariaDB with the following command:
MariaDB [(none)]> flush privileges;
MariaDB [(none)]> exit;
Step 4: Install and Configure Etherpad
First, create a separate user to run the Etherpad:
adduser --home /opt/etherpad --shell /bin/bash etherpad
Next, provide proper permissions to the Etherpad home directory with the following command:
install -d -m 755 -o etherpad -g etherpad /opt/etherpad
Next, login with Etherpad user and verify the Node.js version as a Etherpad user with the following command:
su - etherpad
node -v
Output:
v14.15.0
Next, download the latest version of Etherpad from the Git repository using the following command:
git clone --branch master https://github.com/ether/etherpad-lite.git
Next, change the directory to the downloaded directory and run the Etherpad using the following command:
cd etherpad-lite
bin/run.sh
Once the Etherpad server started successfully, press CTRL + C to stop the server.
Next, edit the settings.json file and make some changes:
nano settings.json
Remove the following lines:
"dbType" : "dirty",
  "dbSettings" : {
                   "filename" : "var/dirty.db"
                 },
Change the MySQL settings as shown below:
  "dbType" : "mysql",
  "dbSettings" : {
    "user":     "etherpad",
    "host":     "localhost",
    "port":     3306,
    "password": "secure-password",
    "database": "etherpaddb",
    "charset":  "utf8mb4"
  },
Change the line trustProxy to true:
"trustProxy": true,
Define a password for the admin user:
  "users": {
    "admin": {
      "password": "secure-password",
      "is_admin": true
    },
Save and close the file then install the required dependencies with the following command:
./bin/installDeps.sh
Next, exit from the Etherpad user with the following command:
exit
Step 5: Create a Systemd Service File for Etherpad
Next, you will need to create a systemd service file to manage the Etherpad service.
nano /etc/systemd/system/etherpad.service
Add the following lines:
[Unit]
Description=Etherpad-lite, the collaborative editor.
After=syslog.target network.target

[Service]
Type=simple
User=etherpad
Group=etherpad
WorkingDirectory=/opt/etherpad/etherpad-lite
Environment=NODE_ENV=production

ExecStart=/usr/bin/node /opt/etherpad/etherpad-lite/src/node/server.js

Restart=always

[Install]
WantedBy=multi-user.target
Save and close the file then reload the systemd daemon to apply the changes:
systemctl daemon-reload
Next, start the Etherpad service and enable it to start at system reboot with the following command:
systemctl start etherpad
systemctl enable etherpad
At this point, Etherpad is started and listening on port 9001. You can verify it with the following command:
ss -plntu | grep 9001
Output:
tcp LISTEN 0 511 0.0.0.0:9001 0.0.0.0:* users:(("node",pid=14889,fd=27))
Step 6: Configure Nginx as a Reverse Proxy
Next, you will need to install and configure Nginx as a reverse proxy to access the Etherpad.
First, install the Nginx with the following command:
apt-get install nginx -y
Once installed, create a new Nginx virtual host configuration file:
nano /etc/nginx/sites-available/etherpad.conf
Add the following lines:
upstream etherpad {
   server localhost:9001;
   keepalive 32;
}

server {
   listen 80;
   server_name etherpad.example.com;

   location / {
       client_max_body_size 50M;
       proxy_set_header X-Real-IP $remote_addr;
       proxy_http_version 1.1;
       proxy_pass http://etherpad;
   }
}
Save and close the file then activate the Nginx virtual host configuration file with the following command:
ln -s /etc/nginx/sites-available/etherpad.conf /etc/nginx/sites-enabled/
Next, restart the Nginx service to apply the changes:
systemctl restart nginx
Step 7: Access Etherpad
Now, open your web browser and access the Etherpad web interface using the URL http://etherpad.example.com. You will be redirected to the Etherpad dashboard:

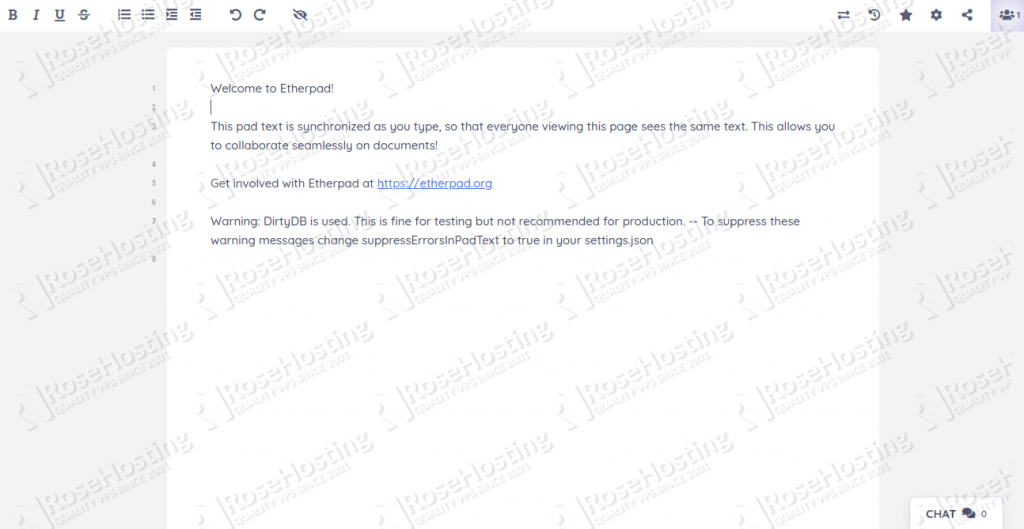
Provide your pad name and click on the OK button. You will be redirected to the Etherpad editor as shown below:
Congratulations! you have successfully installed and configured Etherpad with Nginx as a reverse proxy on Ubuntu 20.04.

Of course, you don’t have to install and configure Etherpad on Ubuntu 20.04, if you use one of our Managed Ubuntu Hosting solutions, in which case you can simply ask our expert Linux admins to set up and configure Etherpad on Ubuntu 18.20 for you. They are available 24×7 and will take care of your request immediately.
PS. If you liked this post on how to install Etherpad on an Ubuntu 20.04 VPS, please share it with your friends on the social networks using the share buttons below, or simply leave a comment down in the comments section. Thanks.