![]() In the following article we are going to explain how you can install Jetty on a CentOS 7 VPS.
In the following article we are going to explain how you can install Jetty on a CentOS 7 VPS.
Jetty is a Java HTTP (Web) server and Java Servlet container and provides support for SPDY, WebSocket, OSGi, JMX, JNDI, JAAS and many other integrations. It is often used for machine to machine communications, within larger software frameworks. Jetty is developed as a free and open source project as part of the Eclipse Foundation.
Jetty is used in a wide variety of projects and products, both in development and production. It can be easily embedded in devices, tools, frameworks, application servers, and clusters.
Jetty has the following features:
- Full-featured and standards-based
- Open source and commercially usable
- Flexible and extensible
- Small footprint
- Embeddable
- Asynchronous
- Enterprise scalable
- Dual licensed under Apache and Eclipse
REQUIREMENTS
We will be using our CentOS 7 minimal Linux VPS template for this tutorial.
UPDATE THE SYSTEM
As always, make sure your server is fully up-to-date with the command below:
# yum update
Also, install unzip and a text editor of your choice. We will use nano as our text editor:
# yum install nano unzip
INSTALL AND SETUP JAVA
Jetty requires JAVA in order to run. We are going to install the latest version of Oracle’s JAVA JDK 8. At the time of writing this article, the latest version of JAVA is 8u60 and can be downloaded and installed using the command below:
# wget --no-cookies --no-check-certificate --header "Cookie: oraclelicense=accept-securebackup-cookie" "http://download.oracle.com/otn-pub/java/jdk/8u60-b27/jdk-8u60-linux-x64.rpm" -O /opt/jdk-8-linux-x64.rpm
Install JAVA:
# yum install /opt/jdk-8-linux-x64.rpm
Configure the JAVA package using the alternatives command:
# JDK_DIRS=($(ls -d /usr/java/jdk*))

# JDK_VER=${JDK_DIRS[@]:(-1)}

# alternatives --install /usr/bin/java java /usr/java/"${JDK_VER##*/}"/jre/bin/java 20000

# alternatives --install /usr/bin/jar jar /usr/java/"${JDK_VER##*/}"/bin/jar 20000

# alternatives --install /usr/bin/javac javac /usr/java/"${JDK_VER##*/}"/bin/javac 20000

# alternatives --install /usr/bin/javaws javaws /usr/java/"${JDK_VER##*/}"/jre/bin/javaws 20000

# alternatives --set java /usr/java/"${JDK_VER##*/}"/jre/bin/java

# alternatives --set javaws /usr/java/"${JDK_VER##*/}"/jre/bin/javaws

# alternatives --set javac /usr/java/"${JDK_VER##*/}"/bin/javac

# alternatives --set jar /usr/java/"${JDK_VER##*/}"/bin/jar
You may want to check if JAVA has been properly setup on your server using:
# java -version
INSTALL JETTY
We will download and unpack the Jetty installation archive into the /opt directory. Currently, while this article has been written, the latest Jetty version is 9.3.3, so we will download that one. Enter the following commands:
# cd /opt

# wget http://eclipse.mirror.rafal.ca/jetty/stable-9/dist/jetty-distribution-9.3.3.v20150827.zip

# unzip jetty-distribution-9.3.3.v20150827.zip
Rename the Jetty installation directory into one with an easier name:
# mv jetty-distribution-9.3.3.v20150827 jetty
Create a user called Jetty and configure the correct file ownership:
# useradd -m jetty

# chown -R jetty:jetty /opt/jetty/
Symlink the jetty.sh script to the /etc/init.d/ directory to create a start up script file:
# ln -s /opt/jetty/bin/jetty.sh /etc/init.d/jetty
Add the script:
# chkconfig --add jetty
Configure Jetty to start on system boot:
# chkconfig --level 345 jetty on
Now, you need to create a configuration file for Jetty. Open a file:
# nano /etc/default/jetty
Now paste the following:
JETTY_HOME=/opt/jetty
JETTY_USER=jetty
JETTY_PORT=8080
JETTY_HOST=your_server_IP
JETTY_LOGS=/opt/jetty/logs/
Don’t forget to add your server IP address in the JETTY_HOST line.
Navigate to the Jetty installation directory:
# cd /opt/jetty
Next, delete the webapps directory since there is nothing in it and copy the webapps directory from demo-base. It is a test and demo data from Jetty.
# rm -rf webapps/

# cp -r demo-base/webapps/ /opt/jetty/
Start Jetty:
# service jetty start
With the curl command test if you can retrieve the index page.
# curl localhost:8080
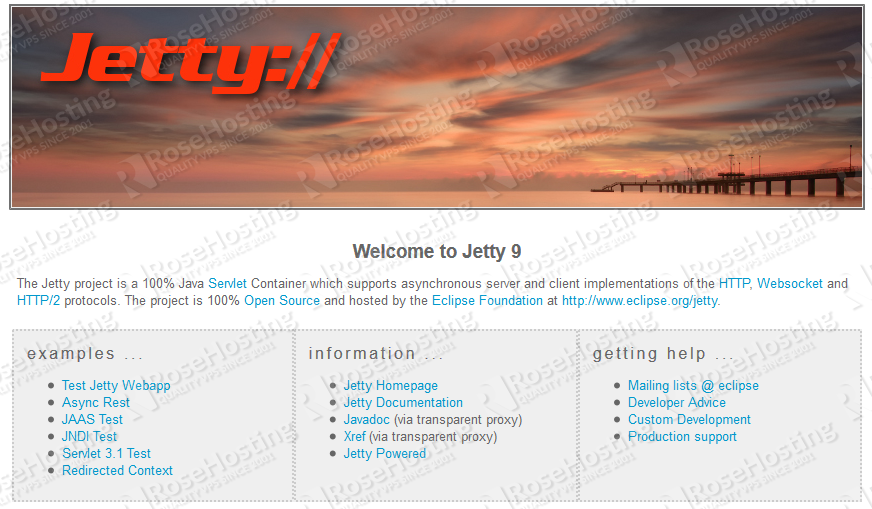
Or open your favorite web browser and navigate to http://your_server_IP:8080 after which you will see the welcome page like the image below:
Congratulations. You have successfully installed Jetty on your CentOS 7 VPS. You can now check the Jetty documentation for more information.
Of course you don’t have to do any of this if you use one of our Linux VPS Hosting services, in which case you can simply ask our expert Linux admins to install Jetty for you. They are available 24×7 and will take care of your request immediately.
PS. If you liked this post please share it with your friends on the social networks using the buttons on the left or simply leave a reply below. Thanks.
There was a warning : JETTY_LOGS is Deprecated. Please configure logging within the jetty base.
And an exception occurred: Starting Jetty: ERROR : java.io.IOException: Unable to write to directory: /var/run/jetty
I use Jetty 9.4.5. How can I solve this problem ?
You can solve this problem by running the following command: chown -R jetty:jetty /var/run/jetty/