 Joomla is a free and open-source content management system (CMS) for publishing web content. It is is written in PHP and it enables users to build websites and create potent online applications in an easy way.
Joomla is written in PHP, uses object-oriented programming (OOP) techniques and software design patterns, stores data in a MySQL, MS SQL or PostgreSQL database and includes features such as page caching, RSS feeds, printable versions of pages, news flashes, blogs, polls, search, and support for language internationalization.
On the other hand, CiviCRM is a web-based, open source, customer relationship management software that is specifically designed for the needs of non-profit, non-governmental, and advocacy groups. It is designed to manage information about an organization’s donors, members, event registrants, subscribers, grant application seekers and funders, and case contacts.
CiviCRM can be deployed in conjunction with either Drupal, Joomla or WordPress CMS to track contacts and their relationships to projects and initiatives.
So, in this article we will show you how to install Joomla and deploy CiviCRM in conjunction with Joomla on an Ubuntu 14.04 VPS.
REQUIREMENTS
We will be using our SSD 1 Linux VPS Hosting plan for this tutorial.
Login to your server via SSH
# ssh root@server_ip
UPDATE THE SYSTEM
Make sure your server is fully up to date.
# apt-get update && apt-get upgrade
Then, create a database for your Joomla installation. Log into MySQL as root:
# mysql -u root -p
Use the below statements:
mysql> create database joomla;

mysql> grant all privileges on joomla.* to joomlauser@localhost identified by 'your_password';

mysql> flush privileges;

mysql> exit
INSTALL JOOMLA
We will create a directory in Apache’s document root called joomla where we will download the Joomla installation archive. Create and enter the directory using:
# mkdir /var/www/html/joomla

# cd /var/www/html/joomla
Download the latest Joomla version (when this tutorial was written, the latest stable version was 3.4.5):
# wget https://github.com/joomla/joomla-cms/releases/download/3.4.5/Joomla_3.4.5-Stable-Full_Package.zip
Unzip the archive:
# unzip Joomla_3.4.5-Stable-Full_Package.zip
Now, you need to create a virtual host directive so you can finish your Joomla installation from your domain. Create a new file, called let’s say joomla.conf (of course you can change the name according to your needs) using your favorite text editor. We will be using vim:
# vim /etc/apache2/sites-available/joomla.conf
Paste the following:
<VirtualHost *:80>
   ServerAdmin admin@your_domain
   DocumentRoot /var/www/html/joomla
   ServerName your_domain
   ServerAlias www.your_domain
      <Directory /var/www/html/joomla/>
         Options Indexes FollowSymLinks MultiViews
         AllowOverride All
         Order allow,deny
         allow from all
      </Directory>
   ErrorLog /var/log/apache2/your_domain-error_log
   CustomLog /var/log/apache2/your_domain-access_log common
</VirtualHost>
Do not forget to replace the your_domain values with your actual domain.
Set the proper ownership for your Joomla installation:
# chown www-data: -R /var/www/html/joomla/
Enable the virtual host directive you’ve just created:
# a2ensite joomla.conf
Restart Apache so the changes can take effect:
# service apache2 restart
Next, open your favorite web browser and navigate to http://your_domain where you can finish the Joomla installation.
Once that is done, go to your server command line interface and execute the following command:
# cd /var/www/html/joomla/tmp/
You are now located in the directory where you will download the latest CiviCRM version (which at this point is 4.6.10). Enter the underneath command:
# wget http://iweb.dl.sourceforge.net/project/civicrm/civicrm-stable/4.6.10/civicrm-4.6.10-joomla.zip
Unzip the archive:
# unzip civicrm-4.6.10-joomla.zip
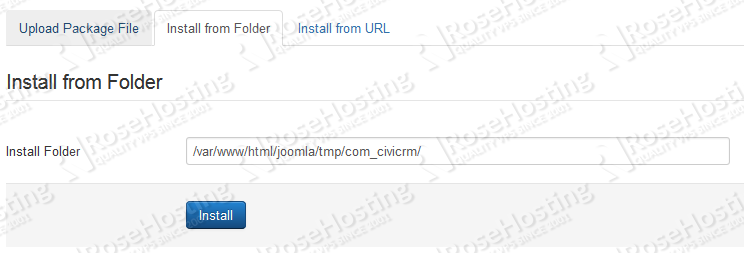
You will now notice that the unpacked directory is called /com_civicrm/ . Go back to your web browser and log into your Joomla administration backend at http://your_domain/administrator . Once logged, click on Extensions -> Manage . Now click on Install from Folder and in the Install Folder field provide the path to your CiviCRM directory which is: /var/www/html/joomla/tmp/com_civicrm/ . It should look like the picture below:
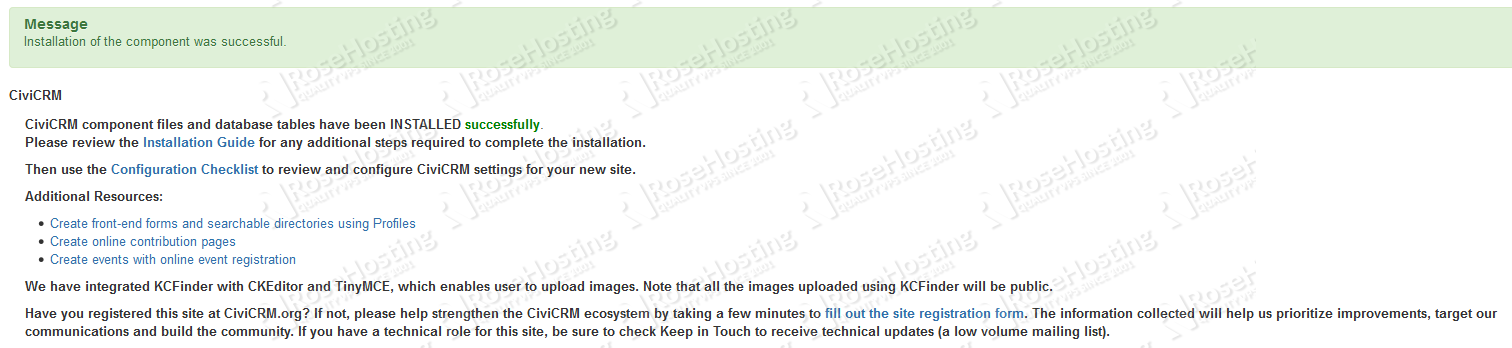
Click on install and you should get a notification that CiviCRM has been successfully installed like the underneath image:
Congratulations. By following this tutorial you have successfully installed Joomla and deployed CiviCRM in conjuction with Joomla on your Ubuntu 14.04 VPS . You can now access CiviCRM by clicking on Components -> CiviCRM from your Joomla administration backend.
For more info on CiviCRM please visit their official documentation.
Of course you don’t have to do any of this if you use one of our Linux VPS Hosting services, in which case you can simply ask our expert Linux admins to do this for you. They are available 24×7 and will take care of your request immediately.
PS. If you liked this post please share it with your friends on the social networks using the buttons on the left or simply leave a reply below. Thanks.