

Memcached is an open-source object caching program that speeds up your database performance by caching data in memory. It is very useful for dynamic websites that allow repeated PHP object calls to be cached in system memory. It stores data based on key-values for small arbitrary strings or objects. It offers a lot of features including, ease of use, sub-millisecond latency, multithreaded architecture, data partitioning, support for multiple languages, and many more.
In this tutorial, we will show you how to install Memcached with Apache on an Ubuntu 20.04 VPS.
Table of Contents
Prerequisites
- An Ubuntu 20.04 VPS (we’ll be using our SSD 2 VPS plan)
- Access to the root user account (or access to an admin account with root privileges)
Step 1: Log in to the Server & Update the Server OS Packages
First, log in to your Ubuntu 20.04 server via SSH as the root user:
ssh root@IP_Address -p Port_number
You will need to replace ‘IP_Address’ and ‘Port_number’ with your server’s respective IP address and SSH port number. Additionally, replace ‘root’ with the username of the admin account if necessary.
Before starting, you have to make sure that all Ubuntu OS packages installed on the server are up to date. You can do this by running the following commands:
apt-get update -y
apt-get upgrade -y
Step 2: Install Memcached
The Memcached package is available in the Ubuntu 20.04 default OS repository. You can install it by running the following command:
apt-get install memcached libmemcached-tools -y
By default, the Memcached service will start automatically after installing it in your system. You can verify it with the following command:
systemctl status memcached
You should get the following output:
● memcached.service - memcached daemon
     Loaded: loaded (/lib/systemd/system/memcached.service; enabled; vendor preset>
     Active: active (running) since Fri 2021-01-08 08:25:36 UTC; 12s ago
       Docs: man:memcached(1)
   Main PID: 32022 (memcached)
      Tasks: 10 (limit: 2353)
     Memory: 1.5M
     CGroup: /system.slice/memcached.service
             └─32022 /usr/bin/memcached -m 64 -p 11211 -u memcache -l 127.0.0.1 -P>

Jan 08 08:25:36 ubuntu2004 systemd[1]: Started memcached daemon.
You can also start and stop the Memcached service using the following command:
systemctl start memcached
systemctl stop memcached
Memcached listens on port 11211, you can also verify it using the following command:
ss -antpl | grep 11211
You should get the following output:
LISTEN 0 1024 127.0.0.1:11211 0.0.0.0:* users:(("memcached",pid=32022,fd=26))
Step 3: Configure Memcached
Memcached main configuration file is located at /etc/memcached.conf. By default, Memcached listens on localhost on port 11211. If your application is running on the remote host then you will need to configure Memcached to allow connection from the remote host.
To do so, edit the /etc/memcached.conf:
nano /etc/memcached.conf
Find the following line:
-l 127.0.0.1
Replace it with your server IP as shown below:
-l 192.168.0.100
Save and close the file then restart the Memcached service to apply the changes:
systemctl restart memcached
Step 4: Install and Configure Apache with Memcached Support
Next, you will need to install Apache and PHP, and enable Memcached support. You can install Apache, PHP and PHP Mecached extensions with the following command:
apt-get install apache2 php libapache2-mod-php php-memcached php-cli -y
Save and close the file then restart Apache and Memcached service to apply the changes:
systemctl restart apache2
systemctl restart memcached
Step 5: Verify Memcached
Next, create a file inside the Apache web root directory and test whether Memcached works or not.
nano /var/www/html/phpinfo.php
Add the following line:
<?php
phpinfo();
?>
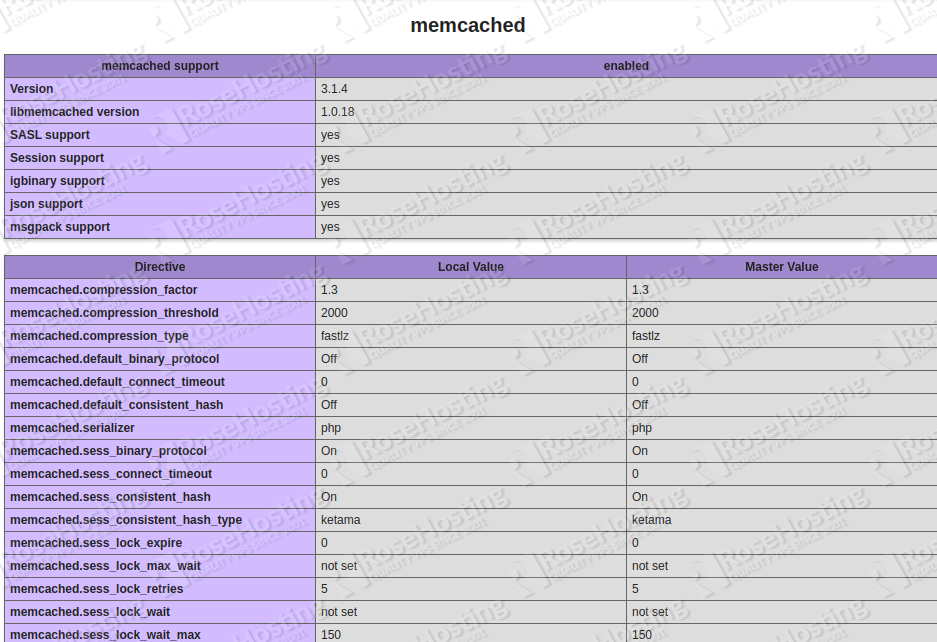
Save and close the file then open your web browser and type the URL http://your-server-ip/phpinfo.php. You should see the following screen:

Of course, you don’t have to do any of this if you use one of our Linux VPS Hosting services, in which case you can simply ask our expert Linux admins to setup this for you. They are available 24×7 and will take care of your request immediately.
PS. If you liked this post please share it with your friends on the social networks using the buttons on the left or simply leave a reply below. Thanks.