We will show you how to install MongoDB with RockMongo on CentOS 7. MongoDB is a NoSQL document-oriented database and it is cross-platform which makes the process of data integration faster and much easier. RockMongo on the other hand is an open source tool developed for MongoDB administration, written in PHP 5. Its interface is user-friendly and provides an easy way to create databases, query collections, import and export data, insert and fetch documents etc… It is the MongoDB administration tool equivalent of phpMyAdmin. So what are the MongoDB and RockMongo prerequisites you ask? Well, you’ll need a web server with PHP 5.* installed and the php_mongo extension enabled. Installing MongoDB with RockMongo on CentOS 7 is fairly easy task, if you carefully follow the steps below.If the machine that you will install MongoDB and RockMongo on doesn’t have a web server and PHP installed, then feel free to follow our fine tutorial and install Apache along with PHP.
Table of Contents
1. REQUIREMENTS
We will be using our SSD 1 Linux VPS hosting plan for this tutorial.
Log in to your server via SSH:
# ssh root@server_ip
Before starting, enter the command below to check whether you have the proper version of CentOS installed on your machine:
# cat /etc/redhat-release
which should give you the underneath output:
CentOS Linux release 7.2.1511 (Core)
2. UPDATE THE SYSTEM
Make sure your server is fully up to date:
# yum update
3. INSTALL MONGODB and ROCKMONGO
In this section we will be cover the steps needed for installing MongoDB and RockMongo. First you need to install some much needed packages. Execute the following command:
# yum install git install gcc php-pear php-devel openssl-devel unzip
Now create a MongoDB repo using your favorite text editor. We are using nano:
# nano /etc/yum.repos.d/mongodb.repo
Paste the following into the file:
[mongodb]
name=MongoDB Repository
baseurl=http://downloads-distro.mongodb.org/repo/redhat/os/x86_64/
gpgcheck=0
enabled=1
Save and close the file. Clean the package index:
# yum clean all
Install MongoDB:
# yum install mongo-10gen mongo-10gen-server
Start MongoDB and enable it to start on boot:
# systemctl start mongod

# systemctl enable mongod
You can check the status of MongoDB with the below commands:
#  systemctl status mongod

#  mongostat
4. Install php_mongo extension
MongoDB is now installed on your server, so let’s continue with the RockMongo installation. RockMongo needs an active php_mongo extension. So let’s start. To install php_mongo we will use PECL. PECL is a repository for PHP Extensions, providing a directory of all known extensions and hosting facilities for downloading and developing PHP extensions. Execute:
# pecl install mongo
Once the installation is finished you should get the message below:
Build process completed successfully
Installing '/usr/lib64/php/modules/mongo.so'
install ok: channel://pecl.php.net/mongo-1.6.13
configuration option "php_ini" is not set to php.ini location
You should add "extension=mongo.so" to php.ini
As the message says, you now need to edit your server php.ini file and add the Mongo extension. To find which is your actual php.ini file execute:
# php -i |grep php.ini
Now edit the file and paste the ‘extension=mongo.so’ line in the ‘Dynamic Extensions’ section. Save and close the file. Then restart Apache for the changes to take effect.
# nano /etc/php.ini

# service httpd restart
Verify that the extension is available:
# php -m | grep -i mongo
You should get the below output:
mongo
OK, with that out of the way, you can now finally download RockMongo and install it. Enter the /opt directory:
# cd /opt
5. Download RockMongo
Download RockMongo:
# wget https://github.com/iwind/rockmongo/archive/master.zip
Unzip the file:
# unzip master.zip
Move the installation in your Apache default document root:
# mv rockmongo-master/ /var/www/html/rockmongo
If you modified some Apache config files in the meantime, do not forget to restart Apache for the changes to take effect.
# service httpd restart
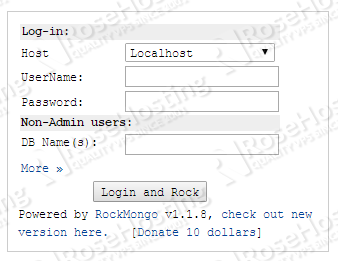
Congratulations, you have successfully installed MongoDB along RockMongo on your CentOS 7 VPS. Now open your favorite web browser and navigate to http://your_server_IP/rockmongo/ where you will be welcomed by the RockMongo interface as shown in the image below:
For further information on MongoDB and RockMongo visit their documentations:
MongoDB

RockMongo
Of course you don’t have to Install MongoDB with RockMongo on CentOS 7, if you use one of our Linux VPS Hosting services, in which case you can simply ask our expert Linux admins to install MongoDB and RockMongo on CentOS 7, for you. They are available 24×7 and will take care of your request immediately.
PS. If you liked this post, on how to install MongoDB with RockMongo on CentOS 7, please share it with your friends on the social networks using the buttons on the left or simply leave a reply below. Thanks.
Why firewalld and SElinux setting are not defined? Did you disable them?
We expect that http traffic is already allowed through the firewall. You can do this using the following commands:
firewall-cmd –zone=public –permanent –add-service=http
firewall-cmd –reload
If you are also unable to connect to the Mongodb and your log files says:Failed to connect to: 127.0.0.1:27017: Permission denied, you can use the following commands to fix the problem:
/usr/sbin/setsebool -P httpd_can_network_connect 1
service httpd restart