Today we will show you, how to install Munin on CentOS 7. Munin is a networked resource monitoring tool that can help analyze resource trends and usage of servers and services. It offers monitoring and alerting services for servers, switches, applications, services and is designed to be very plug and play. Installing Munin on CentOS 7, is really an easy task, you should carefully follow the steps below and Munin should be installed on CentOS 7 in less then 10 minutes. Munin has a master/slave architecture in which the master connects to all the slaves at regular intervals and asks them for data which then is stored in RRD files. It alerts the users when things go wrong and alerts them a second time when the problem has been resolved.
Requirements:
We will be using our SSD 1 Linux VPS Hosting plan for this tutorial.
Table of Contents
1. Logian via SSH
Log in to your server via SSH:
# ssh root@server_ip
2. Verify CentOS Version
Before starting, enter the below command to check whether you have the proper version of CentOS installed on your machine:
# cat /etc/redhat-release
It should give you the underneath output:
CentOS Linux release 7.2.1511 (Core)
3. Update the System
Make sure your server is fully up to date:
# yum update
4. Install the EPEL repository
Once the update is completed, install the EPEL repository:
# yum install epel-release
5. Install Munin and Apache
You can now install Munin and Apache using the below command:
# yum install munin munin-node httpd -y
6. Start and Configure Munin
After the installation is completed, start Munin and enable it to start on boot.
# systemctl start munin-node

# systemctl enable munin-node
7. Restart Munin
When in need of a restart, you can use systemctl restart munin-node to restart Munin.
Check against the /etc/munin/munin.conf file whether you have the below lines enabled:
[localhost]
address 127.0.0.1
use_node_name yes
You can either open the file with a text editor or use the grep command. For example to check the address set, you can use:
# grep address /etc/munin/munin.conf
8. Configure Munin
Using the htpasswd utility we will create a username and password for basic authentication, thus password protecting Munin. Enter the following command:
# htpasswd /etc/munin/munin-htpasswd admin
When prompted as shown below, enter the password for the admin user:
New password:
Re-type new password:
Adding password for user admin
Add your server hostname to the munin-node.conf file. Open it with a text editor of your choice. We are using nano:
# nano /etc/munin/munin-node.conf
You can add the host_name line at the end of the file. For example:
host_name vps.rosehosting.com
Save and close the file.
9. Set Up Munin config for Apache
Open the Munin config for Apache and add the below lines to the /var/www/html/munin directory:
# nano /etc/httpd/conf.d/munin.conf

Order Deny,Allow
   Deny from all
   Allow from 127.0.0.1 your_public_IP
After adding, the section should look like this:
<directory /var/www/html/munin>
AuthUserFile /etc/munin/munin-htpasswd
AuthName "Munin"
AuthType Basic
require valid-user
Order Deny,Allow
   Deny from all
   Allow from 127.0.0.1 your_public_IP
10. Verify Munin Installation on CentOS 7
Restart Apache for the changes to take effect:
# systemctl restart httpd
Congratulations. You have successfully installed Munin on CentOS 7. Now open your favorite web browser and navigate to: http://your_server_IP/munin and enter the logging credentials that you’ve just set using the htpasswd utility.
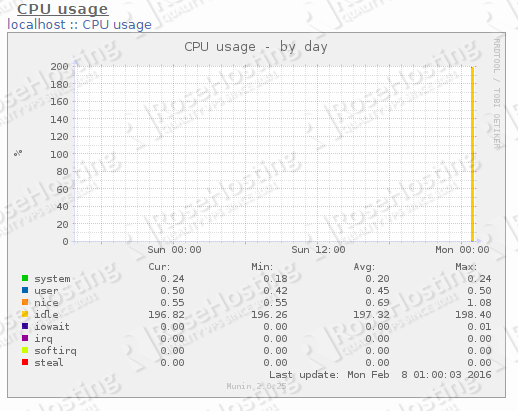
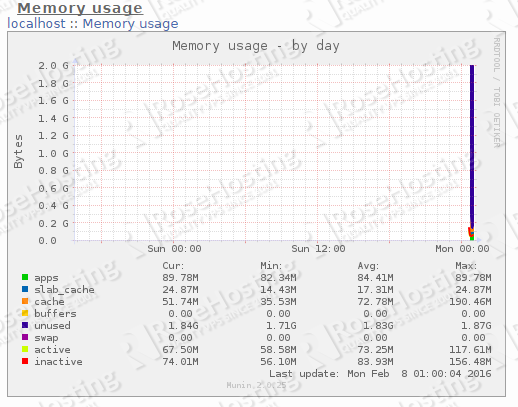
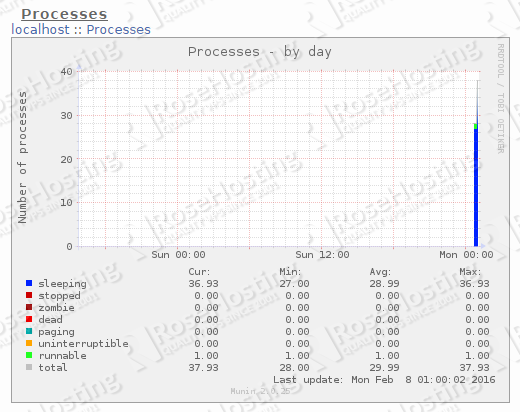
Below are some of the graph snapshots we took from Munin that monitors our idle Linux VPS.
Of course you don’t have to install Munin on CentOS 7, if you use one of our Ultra-Fast CentOS 7 VPS Hosting services, in which case you can simply ask our expert Linux admins to install Munin on CentOS 7, for you. They are available 24×7 and will take care of your request immediately.
PS. If you liked this post on, how to install Munin on CentOS 7, please share it with your friends on the social networks using the buttons on the left or simply leave a reply below. Thanks.