Nextcloud is the most popular open-source self-hosted file sync and sharing application. It is an alternative to other file-sharing applications such as Google Drive, Dropbox, OwnCloud, etc. Nextcloud offers a rich set of features, including file sync and sharing, an online document editor, calendar management, contact management, and more. This web application gives you complete control over what data you store, where and how it is stored, who can access it, and how it is deleted. The software is free to install on Linux, and the client software can be installed on any operating system, such as Windows, OS X, or Linux. Mobile apps are also available for Android and iOS devices. In this tutorial, we will show you how to install NextCloud on Ubuntu 26.04 with NGINX, PostgreSQL/MariaDB, and Redis.
Table of Contents
Prerequisites
- An Ubuntu 26.04 server
- SSH root access or a regular system user with sudo privileges
Conventions
# – given commands should be executed with root privileges either directly as a root user or by use of sudo command
$ – given commands should be executed as a regular user
Step 1. Update the System
Let’s log in to your Ubuntu 26.04 VPS through SSH as a root user or as a regular user with sudo privileges.
ssh root@IP_Address -p Port_numberIf you cannot log in as root, remember to substitute “root” with a user that has sudo privileges. Additionally, change “IP_Address” and “Port_Number”; make sure they match your server’s respective IP address and SSH port.

You can check whether you have the correct Ubuntu version installed on your server with the following command:
# lsb_release -aYou should get this output:
No LSB modules are available.
Distributor ID: Ubuntu
Description:    Ubuntu 26.04 LTS
Release:    26.04
Codename:   resolute
Step 2. Install PHP
Ubuntu 26.04 ships with PHP 8.5, and Nextcloud version 34 supports PHP 8.5. For more information about the system requirements, we can refer to the official Nextcloud documentation or GitHub versions. So, let’s install PHP and its required extensions.
# apt install php-{apcu,gmp,fpm,xml,intl,common,curl,mbstring,mysql,gd,imagick,zip,pgsql,redis} unzip imagemagick-7.q16hdri libmagickcore-7.q16-10-extraBy default, the PHP memory_limit is set to 128MB. We need to change this at least to 512MB.
# nano /etc/php/8.5/fpm/php.ini Find the string containing memory_limit and change the value.
Also add the line below:
opcache.interned_strings_buffer = 16Step 3. Install a Database Server
NextCloud supports MySQL/MariaDB, PostgreSQL, Oracle, or SQLite. In this step, we will install the MariaDB server from the default Ubuntu 26.04 repository. To install the MySQL server, execute the command below:
# apt install mysql-server MySQL should be up and running now.
If you prefer to choose PostgreSQL. You can skip the step above and follow this one instead.
# apt install postgresqlStep 4. Create a Database
On Ubuntu 26.04, MariaDB or PostgreSQL will start automatically upon installation. Since the database server is up and running now, we can log in to the MySQL shell and create a database for our NextCloud website. Skip this step and follow the PostgreSQL step if you chose PostgreSQL.
# mariadb Once logged in to the MySQL shell, we can run the following commands.
MariaDB [(none)]> CREATE DATABASE nextcloud;
MariaDB [(none)]> CREATE USER 'nextcloud'@'localhost' IDENTIFIED BY 'm0d1fyth15';
MariaDB [(none)]> GRANT ALL PRIVILEGES ON nextcloud.* TO 'nextcloud'@'localhost';
MariaDB [(none)]> FLUSH PRIVILEGES;
MariaDB [(none)]> \q
Remember to replace m0d1fyth15 with a stronger password.
If you choose PostgreSQL, follow the steps below.
# sudo -u postgres psqlOnce logged in to the PostgreSQL shell, we can run these commands.
postgres=# CREATE DATABASE nextcloud TEMPLATE template0 ENCODING 'UNICODE';
postgres=# CREATE USER nextcloud WITH PASSWORD 'm0d1fyth15';
postgres=# ALTER DATABASE nextcloud OWNER TO nextcloud;
postgres=# GRANT ALL PRIVILEGES ON DATABASE nextcloud TO nextcloud;
postgres=# \q
Step 5. Download Nextcloud
In this step, we will download the latest version of the Nextcloud installation file. You can check their releases to choose and download a specific Nextcloud version.
Simply execute these commands to download the latest version.
# cd /tmp
# wget https://download.nextcloud.com/server/releases/latest.zip -O latest.zip
Now, we need to extract it.
# unzip latest.zip -d /var/www/html
# mkdir /var/www/html/nextcloud/data
The commands above will download and then extract the compressed file into the directory /var/www/html/nextcloud. Now, let’s give the correct permissions.
# chown -R www-data:www-data /var/www/html/nextcloudStep 6. Install and Configure Nginx
NextCloud supports Apache and Nginx. But in this tutorial, we will install and use Nginx, not Apache. Run the following command to install it
# apt install nginx -yOn Ubuntu machines, Nginx will run automatically upon installation. It is also configured to start automatically upon reboot. Now, let’s create an Nginx server block for the domain or subdomain name to host Nextcloud on the server.
# nano /etc/nginx/conf.d/nextcloud.conf Insert the following into that file.
upstream nextcloud {
    server unix:/run/php/php8.5-fpm.sock;
}

map $arg_v $asset_immutable {
    "" "";
    default ", immutable";
}

server {
    listen 80;
    server_name nextcloud.yourdomain.com;
    server_tokens off;
    root /var/www/html/nextcloud;
    client_max_body_size 512M;
    client_body_timeout 300s;
    fastcgi_buffers 64 4K;

    gzip on;
    gzip_vary on;
    gzip_comp_level 4;
    gzip_min_length 256;
    gzip_proxied expired no-cache no-store private no_last_modified no_etag auth;
    gzip_types application/atom+xml text/javascript application/javascript application/json application/ld+json application/manifest+json application/rss+xml application/vnd.geo+json application/vnd.ms-fontobject application/wasm application/x-font-ttf application/x-web-app-manifest+json application/xhtml+xml application/xml font/opentype image/bmp image/svg+xml image/x-icon text/cache-manifest text/css text/plain text/vcard text/vnd.rim.location.xloc text/vtt text/x-component text/x-cross-domain-policy;

    client_body_buffer_size 512k;

    add_header Referrer-Policy                   "no-referrer"       always;
    add_header X-Content-Type-Options            "nosniff"           always;
    add_header X-Frame-Options                   "SAMEORIGIN"        always;
    add_header X-Permitted-Cross-Domain-Policies "none"              always;
    add_header X-Robots-Tag                      "noindex, nofollow" always;

    fastcgi_hide_header X-Powered-By;

    include mime.types;
    types {
        text/javascript mjs;
#    application/wasm wasm;
    }

    index index.php index.html /index.php$request_uri;

    location = / {
        if ( $http_user_agent ~ ^DavClnt ) {
            return 302 /remote.php/webdav/$is_args$args;
        }
    }

    location = /robots.txt {
        allow all;
        log_not_found off;
        access_log off;
    }

    location ^~ /.well-known {

        location = /.well-known/carddav { return 301 /remote.php/dav/; }
        location = /.well-known/caldav  { return 301 /remote.php/dav/; }

        location /.well-known/acme-challenge    { try_files $uri $uri/ =404; }
        location /.well-known/pki-validation    { try_files $uri $uri/ =404; }

        return 301 /index.php$request_uri;
    }

    location ~ ^/(?:build|tests|config|lib|3rdparty|templates|data)(?:$|/)  { return 404; }
    location ~ ^/(?:\.|autotest|occ|issue|indie|db_|console)                { return 404; }

    location ~ ^/(?:composer\.(?:json|lock)|package(?:-lock)?\.json|core/shipped\.json)$ { return 404; }

    location ~ \.php(?:$|/) {
        rewrite ^/(?!index|remote|public|cron|status|ocs\/v[12]|ocs-provider\/.+|core\/ajax\/update|updater\/.+|.+\/richdocumentscode(_arm64)?\/proxy) /index.php$request_uri;

        fastcgi_split_path_info ^(.+?\.php)(/.*)$;
        set $path_info $fastcgi_path_info;

        try_files $fastcgi_script_name =404;

        include fastcgi_params;
        fastcgi_pass nextcloud;

        fastcgi_param SCRIPT_FILENAME            $document_root$fastcgi_script_name;
        fastcgi_param PATH_INFO                  $path_info;
        fastcgi_param HTTPS                      on;
        fastcgi_param modHeadersAvailable        true;
        fastcgi_param front_controller_active    true;
        fastcgi_intercept_errors on;
        fastcgi_request_buffering on;
        fastcgi_max_temp_file_size 0;
    }

    location ~ \.(?:css|js|mjs|svg|gif|ico|jpg|png|webp|wasm|tflite|map|ogg|flac|mp4|webm)$ {
        try_files $uri /index.php$request_uri;

        add_header Cache-Control                     "public, max-age=15778463$asset_immutable";
        add_header Referrer-Policy                   "no-referrer"       always;
        add_header X-Content-Type-Options            "nosniff"           always;
        add_header X-Frame-Options                   "SAMEORIGIN"        always;
        add_header X-Permitted-Cross-Domain-Policies "none"              always;
        add_header X-Robots-Tag                      "noindex, nofollow" always;
        access_log off;
    }

    location ~ \.(otf|woff2?)$ {
        try_files $uri /index.php$request_uri;
        expires 7d;
        access_log off;
    }

    location /remote {
        return 301 /remote.php$request_uri;
    }

    location / {
        try_files $uri $uri/ /index.php$request_uri;
    }
}
Save the file, then exit from the editor. To apply the changes, do not forget to restart nginx.
# systemctl restart nginxStep 7: Install SSL Certificate
We are going to install an SSL certificate for our Nextcloud website using the free SSL certificate from Let’s Encrypt. To achieve this, we can use Certbot. Certbot is a free and open-source tool for automatically generating and managing SSL/TLS certificates. Powered by Let’s Encrypt, it’s powerful and easy to use. Let’s execute the command below to install Certbot.
# apt install certbot python3-certbot-nginx -yOnce installed, you can run this command to issue an SSL certificate. Please make sure to replace the subdomain with your actual domain or subdomain name; it should match the one in the nginx server block configuration file we created earlier. Also, make sure the domain or subdomain is already pointing to your server’s IP address.
# certbot --nginx -d nextcloud.yourdomain.comMake sure to answer the prompted questions, and you will see an output like this:
[root@rh ~]# certbot --nginx -d nextcloud.yourdomain.com
Saving debug log to /var/log/letsencrypt/letsencrypt.log
Enter email address (used for urgent renewal and security notices)
 (Enter 'c' to cancel): you@yourdomain.com

- - - - - - - - - - - - - - - - - - - - - - - - - - - - - - - - - - - - - - - -
Please read the Terms of Service at:
https://letsencrypt.org/documents/LE-SA-v1.8-July-06-2026.pdf
You must agree in order to register with the ACME server. Do you agree?
- - - - - - - - - - - - - - - - - - - - - - - - - - - - - - - - - - - - - - - -
(Y)es/(N)o: y

- - - - - - - - - - - - - - - - - - - - - - - - - - - - - - - - - - - - - - - -
Would you be willing, once your first certificate is successfully issued, to
share your email address with the Electronic Frontier Foundation, a founding
partner of the Let's Encrypt project and the non-profit organization that
develops Certbot? We'd like to send you email about our work encrypting the web,
EFF news, campaigns, and ways to support digital freedom.
- - - - - - - - - - - - - - - - - - - - - - - - - - - - - - - - - - - - - - - -
(Y)es/(N)o: n
Account registered.
Requesting a certificate for nextcloud.yourdomain.com

Successfully received certificate.
Certificate is saved at: /etc/letsencrypt/live/nextcloud.yourdomain.com/fullchain.pem
Key is saved at:         /etc/letsencrypt/live/nextcloud.yourdomain.com/privkey.pem
This certificate expires on 2026-10-09.
These files will be updated when the certificate renews.
Certbot has set up a scheduled task to automatically renew this certificate in the background.

Deploying certificate
Successfully deployed certificate for cloud.example.com to /etc/nginx/conf.d/nextcloud.conf
Congratulations! You have successfully enabled HTTPS on https://nextcloud.yourdomain.com

- - - - - - - - - - - - - - - - - - - - - - - - - - - - - - - - - - - - - - - -
If you like Certbot, please consider supporting our work by:
 * Donating to ISRG / Let's Encrypt:   https://letsencrypt.org/donate
 * Donating to EFF:                    https://eff.org/donate-le
- - - - - - - - - - - - - - - - - - - - - - - - - - - - - - - - - - - - - - - -
Now, let’s restart nginx
# systemctl restart nginxStep 8. Install NextCloud
At this point, we can visit https://nextcloud.yourdomain.com in any web browser to complete the installation. Make sure to open your own https://nextcloud.yourdomain.com using your favorite web browser.
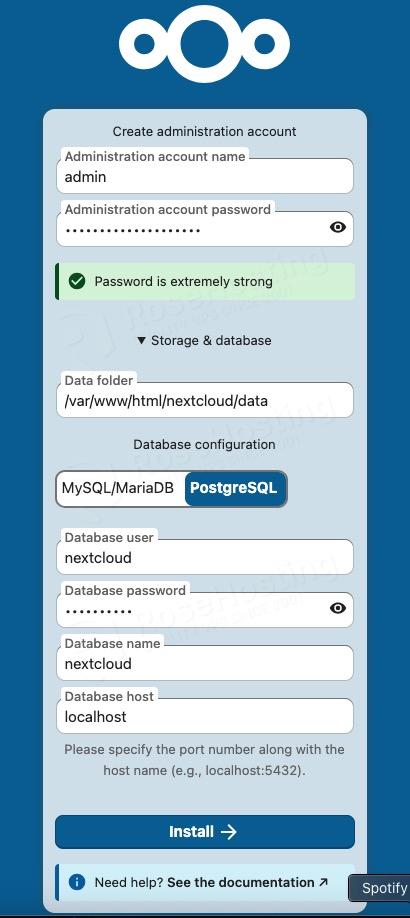
Here, you can choose MySQL/MariaDB or PostgreSQL. Fill in all, then hit the Install button.
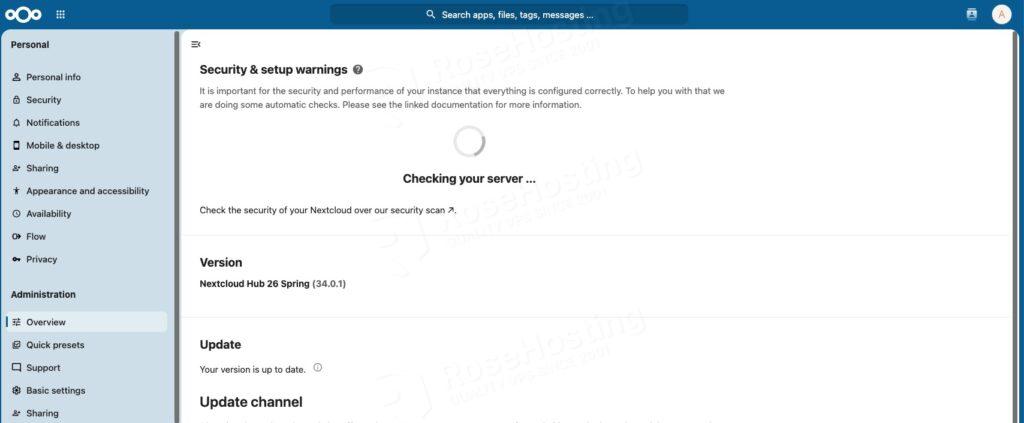
You will be taken to the dashboard and see some warning messages.
Run these commands:
# cd /var/www/html/nextcloud
# sudo -u www-data php occ config:system:set maintenance_window_start --value="1" --type=integer
# sudo -u www-data php occ maintenance:repair --include-expensive
Step 9. Install and Configure Redis
To speed up Nextcloud, we can install Redis as a memory cache and file lock. To make Nextcloud even faster, we can also set up a local memory cache alongside Redis. Let’s run the command below to install Redis from the default APT repository.
# apt install redisThen, add these lines to the config/config.php file
# nano /var/www/htm/config/config.phpInseert these inside “$CONFIG = array”
  'memcache.local' => '\OC\Memcache\APCu',
  'memcache.distributed' => '\\OC\\Memcache\\Redis',
  'memcache.locking' => '\\OC\\Memcache\\Redis',
  'redis' => array (
    'host' => '127.0.0.1',
    'port' => 6379,
    'timeout' => 0.0,
  ),
These are the caches we configured:
- Local Cache (memcache.local): Saves frequently used PHP files in memory. It acts like a shortcut for a single user loading web pages.
- Distributed Cache (memcache.distributed): Speeds up file sharing and syncing for setups with multiple servers or users.
- File Locking (memcache.locking): Prevents data crashes when two users edit the exact same file at the exact same time.
Make sure to restart both nginx and PHP-FPM
# systemctl restart nginx php8.5-fpmWrap Up
That’s it! You can now refresh your Nextcloud dashboard overview page; you will see some warnings disappear.
Congratulations! You have followed this article and learned how to install NextCloud on Ubuntu 26.04.
You don’t have to install NextCloud on Ubuntu 26.04 if you have an active Ubuntu Hosting service with us; in that case, you can simply ask our expert Linux admins to install NextCloud on Ubuntu 26.04 for you. They are available 24×7 and will address your request immediately. Managing NextCloud instances is not just about the installation; we can help you optimize your NextCloud installation if you have an active service with us.
If you liked this post on installing NextCloud on Ubuntu 26.04, please share it with your friends or leave a comment below.