
Welcome to our guide on setting up Passbolt CE (Community Edition) on Ubuntu 22.04. Securing your sensitive information is critical. Passbolt CE is an open-source password management solution that ensures the safety of your credentials.
This tutorial is designed for both tech enthusiasts and IT professionals, offering a straightforward, step-by-step process to install Passbolt CE on your Ubuntu 22.04 system. Whether you’re looking to bolster personal cybersecurity or enhance team-oriented password management, this guide has you covered.
Follow each step carefully, and feel free to refer back to this guide whenever needed. Happy installing!
Table of Contents
Prerequisites
- An Ubuntu 22.04 VPS
- At least 2GB of RAM
- SSH root access or a system user with sudo privileges
- A working SMTP server for email notifications
Step 1. Update System Packages
To start, log in to your Ubuntu 22.04 VPS using SSH:
ssh root@IP_Address -p Port_numberReplace ‘IP_Address’ and ‘Port_number’ with your server’s actual IP address and SSH port number. If needed, replace ‘root’ with the username of your sudo account.
Once logged in, you must make sure that all Ubuntu OS packages installed on the server are up to date. You can do this by running the following commands:
sudo apt-get update -y && sudo apt-get upgrade -yStep 2. Install Web Server
In this tutorial, we will use Nginx as the web server, but you can also opt for Apache if you prefer. Nginx, a highly efficient web server, is currently in high demand. Moreover, it serves as a versatile tool, capable of functioning as both a reverse proxy and caching server. Utilize the following command to install the Nginx Web server:
sudo apt install nginxOnce installed, we can enable Nginx to start automatically at boot time by executing the following command:
sudo systemctl enable nginxNext, start Nginx using:
sudo systemctl start nginxIf everything works as expected, you can check the status with the following command:
sudo systemctl status nginxHere’s how the output should look:
● nginx.service - A high performance web server and a reverse proxy server
     Loaded: loaded (/lib/systemd/system/nginx.service; enabled; vendor preset: enabled)
     Active: active (running) since Tue 2024-02-06 06:33:35 CST; 6s ago
       Docs: man:nginx(8)
    Process: 2741 ExecStartPre=/usr/sbin/nginx -t -q -g daemon on; master_process on; (code=exited, status=0/SUCCESS)
    Process: 2742 ExecStart=/usr/sbin/nginx -g daemon on; master_process on; (code=exited, status=0/SUCCESS)
   Main PID: 2743 (nginx)
      Tasks: 3 (limit: 4558)
     Memory: 3.3M
        CPU: 44ms
     CGroup: /system.slice/nginx.service
             ├─2743 "nginx: master process /usr/sbin/nginx -g daemon on; master_process on;"
             ├─2744 "nginx: worker process" "" "" "" "" "" "" "" "" "" "" "" "" "" "" "" "" "" "" "" "" "" "" "" "" "" "" ""
             └─2745 "nginx: worker process" "" "" "" "" "" "" "" "" "" "" "" "" "" "" "" "" "" "" "" "" "" "" "" "" "" "" ""
Step 3. Install MariaDB
MariaDB serves as a drop-in replacement for MySQL. It has been developed by former members of the MySQL team who expressed concerns that Oracle might transition MySQL into a closed-source product. Execute the following command to install MariaDB on Ubuntu 22.04:
sudo apt install mariadb-server mariadb-clientOnce installed, we can enable MariaDB to start automatically at boot time by executing the following command:
sudo systemctl enable mariadbNext, start MariaDB using:
sudo systemctl start mariadbIf everything works as expected, you can check the status with the following command:
sudo systemctl status mariadbHere’s how the output should look:
● mariadb.service - MariaDB 10.6.16 database server
     Loaded: loaded (/lib/systemd/system/mariadb.service; enabled; vendor preset: enabled)
     Active: active (running) since Tue 2024-02-06 06:34:27 CST; 19s ago
       Docs: man:mariadbd(8)
             https://mariadb.com/kb/en/library/systemd/
   Main PID: 3386 (mariadbd)
     Status: "Taking your SQL requests now..."
      Tasks: 12 (limit: 4558)
     Memory: 61.1M
        CPU: 525ms
     CGroup: /system.slice/mariadb.service
             └─3386 /usr/sbin/mariadbd
Step 4. Install PHP
There are two main methods to install PHP on Ubuntu. We will use the standard approach and install PHP from the Ubuntu repositories using the APT package manager, as shown below:
sudo apt install phpHowever, it is important to note that this method does not provide the latest version of PHP. Currently, the repository only provides PHP 8.1.
Next, we will install PHP extensions with the following command:
sudo apt install php-{fpm,mysql,common,cli,opcache,readline,mbstring,xml,gd,curl,imagick,gnupg,ldap,imap,zip,bz2,intl,gmp}Step 5. Create Database and Database User
Now, with the LEMP stack installed, we are going to create an empty database for Passblot and the database user with permission to access that database.
Login to the MySQL console and execute the following commands:
sudo mysql -u rootCREATE DATABASE passbolt;
CREATE USER 'passbolt'@'localhost' IDENTIFIED BY 'YourStrongPasswordHere';
GRANT ALL PRIVILEGES ON passbolt.* TO 'passbolt'@'localhost';
FLUSH PRIVILEGES;
EXIT;Be sure to update ‘YourStrongPasswordHere’ with a more secure password.
Step 6. Clone Passbolt GitHub Repository
After installing system dependencies for Passbolt to function, we will clone the repository of the latest stable version of Passbolt available on GitHub by executing the following commands:
sudo apt install git
sudo -R chown www-data:www-data /var/www/
cd /var/www/
sudo -u www-data git clone https://github.com/passbolt/passbolt_api.git
Next, access the Passbolt directory and install composer:
cd /var/www/passbolt_api/
sudo apt install composer
Use Composer to install PHP dependencies with the following command:
sudo -u www-data composer install --no-devIt should ask if you want to set the directory permissions, respond with “Y”:

Step 7. Create OpenPGP Key
For users of Virtual Private Servers (VPS), it is advisable to install the haveged package to ensure an adequate generation of entropy.
sudo apt install havegedIf everything works as expected, you can check the status with the following command.
sudo systemctl status havegedHere’s how the output should look:
● haveged.service - Entropy Daemon based on the HAVEGE algorithm
     Loaded: loaded (/lib/systemd/system/haveged.service; enabled; vendor preset: enabled)
     Active: active (running) since Tue 2024-02-06 08:08:08 CST; 1min 14s ago
       Docs: man:haveged(8)
             http://www.issihosts.com/haveged/
   Main PID: 22174 (haveged)
      Tasks: 1 (limit: 4558)
     Memory: 3.3M
        CPU: 356ms
     CGroup: /system.slice/haveged.service
             └─22174 /usr/sbin/haveged --Foreground --verbose=1
Then run the following command to generate a new key pair.
sudo -u www-data gpg --quick-gen-key --pinentry-mode=loopback 'YourFirstName YourLastName <yourMailAddress@yourDomain.com>' default default neverReplace “YourFirst Name” and “YourLastName” with your first and last name and “yourMailAddress@yourDomain.com” with your mail account.
If prompted to set a password, simply ignore it by pressing Enter, as the php-gnupg module currently does not support password usage.
Copy the private key and public key to the Passbolt configuration location by running the following commands:
sudo -u www-data gpg --armor --export-secret-keys yourMailAddress@yourDomain.com | sudo tee /var/www/passbolt_api/config/gpg/serverkey_private.asc > /dev/null

sudo -u www-data gpg --armor --export yourMailAddress@yourDomain.com | sudo tee /var/www/passbolt_api/config/gpg/serverkey.asc > /dev/null
Initialize the keyring for the www-data user to set up the cryptographic keys and associated operations for the www-data user:
sudo -u www-data gpg --list-keysSave the key fingerprint to use later:

Step 8. Configure Passbolt
Access the Passbolt directory:
cd /var/www/passbolt_apiCreate a copy of the default configuration file using the command:
sudo cp config/passbolt.default.php config/passbolt.phpOpen the configuration file with a text editor:
sudo nano config/passbolt.phpThen change the content:
'fullBaseUrl' => 'https://passbolt.yourdomain.com',Be sure to update passbolt.yourdomain.com with the URL you will use to connect your Passbolt.
In the database configuration section, input the database name, username, and password you created for the Passbolt.
    // Database configuration.
    'Datasources' => [
        'default' => [
            'host' => 'localhost',
            //'port' => 'non_standard_port_number',
            'username' => 'passbolt',
            'password' => 'YourStrongPasswordHere',
            'database' => 'passbolt',
In the email configuration section, you need to fill in the details of your email account, which you will use to recover passwords.
   // Email configuration.
    'EmailTransport' => [
        'default' => [
            'host' => 'yourSMTPHostname.com',
            'port' => 465,
            'username' => 'yourSMTPUser',
            'password' => 'yourSMTPPassword',
            // Is this a secure connection? true if yes, null if no.
            'tls' => true,
            //'timeout' => 30,
            //'client' => null,
            //'url' => null,
        ],
    ],
    'Email' => [
        'default' => [
            // Defines the default name and email of the sender of the emails.
            'from' => ['yourMailAddress@yourDomain.com' => 'Passbolt'],
            //'charset' => 'utf-8',
            //'headerCharset' => 'utf-8',
        ],
    ],
In the GPG section, enter the GPG key fingerprint as shown below. Ensure to delete all whitespace characters from the fingerprint. Additionally, uncomment the lines for the public and private keys.
                'fingerprint' => 'E2E6E2EB5CE2DF9158CABBE63A22420DB732C8D3',
                'public' => CONFIG . 'gpg' . DS . 'serverkey.asc',
                'private' => CONFIG . 'gpg' . DS . 'serverkey_private.asc',
To save and close the file you should press CTRL + X and then Y.
Step 9. Start the Installation
Now, we need to run the installation script using the www-data user.
sudo su -s /bin/bash -c "/var/www/passbolt_api/bin/cake passbolt install --force" www-dataDuring the installation, you will be asked to create the admin account.
User email (also called username)
> YourPassboltUser@yourdomain.com
First name
> YourFirstName
Last name
> YourLastName
User saved successfully.
To start registration follow the link provided in your mailbox or here: https://passbolt.yourdomain.com/setup/start/a97554f8-3e3f-4764-89a4-858d3a64b99f/cce4db00-3464-41fe-a3f9-d201e73e81b7
Passbolt installation success! Enjoy! ☮
After creating an account, you will receive a URL to complete the installation in a web browser. Before proceeding, it’s necessary to create the server block on Nginx.
Step 10. Create Server Block on Nginx
Define the server block for your domain by creating this file. We’re using nano, but you can use any text editor that you prefer:
sudo nano /etc/nginx/conf.d/passbolt.confOnce the file is created, insert these contents:
server {
    listen 80;
    server_name passbolt.yourdomain.com;
    root /var/www/passbolt_api/webroot/;
    error_log /var/log/nginx/passbolt_error.log;
    access_log /var/log/nginx/passbolt_access.log;
    index index.php index.html index.htm index.nginx-debian.html;

    location / {
        try_files $uri $uri/ /index.php?$query_string;
    }

    location ~ \.php$ {
        fastcgi_split_path_info ^(.+\.php)(/.+)$;
        fastcgi_pass unix:/var/run/php/php8.1-fpm.sock;
        fastcgi_index index.php;
        fastcgi_param SCRIPT_FILENAME $document_root$fastcgi_script_name;
        include fastcgi_params;
        fastcgi_buffer_size 128k;
        fastcgi_buffers 256 16k;
        fastcgi_busy_buffers_size 256k;
        fastcgi_temp_file_write_size 256k;
    }

    location = /favicon.ico {
        log_not_found off;
        access_log off;
    }

    location = /robots.txt {
        access_log off;
        log_not_found off;
    }

    location ~ /\. {
        deny all;
        access_log off;
        log_not_found off;
    }

    location ~* (Gruntfile|package|composer)\.(js|json)$ {
        deny all;
        access_log off;
        log_not_found off;
    }

    location ~* \.(jpg|jpeg|gif|png|webp|svg|woff|woff2|ttf|css|js|ico|xml)$ {
        access_log off;
        log_not_found off;
        expires 360d;
    }

}
Be sure to update passbolt.yourdomain.com with the URL you will use to connect your Passbolt.
To save and close the file you should press CTRL + X and then Y.
You can check if the syntax is correct using:
sudo nginx -tHere’s how the output will look:
# nginx -t
nginx: the configuration file /etc/nginx/nginx.conf syntax is ok
nginx: configuration file /etc/nginx/nginx.conf test is successful
Then reload the Nginx service to apply the changes:
systemctl reload nginxStep 11. Install Certbot
To enable SSL, we need to install an SSL certificate for our Passbolt domain/subdomain. Follow these steps to install SSL from Let’s Encrypt using certbot.
sudo apt install python3-certbot-nginx -yOnce installed, run the following command to install the SSL certificate:
certbotYou will be prompted to provide your email address, accept the Let’s Encrypt TOS, and choose whether to share your email address with the Electronic Frontier Foundation. Then, you’ll need to select the domain/subdomain name you want to activate HTTPS for. Type the corresponding number and press ENTER to choose your Passbolt website.
Let’s Encrypt will then install the certificate and prompt you whether to configure HTTP to HTTPS redirection. You can choose to redirect, and certbot will create the redirection and reload NGINX if everything is okay.
Upon running the ‘certbot’ command, you will receive an output similar to this:
Saving debug log to /var/log/letsencrypt/letsencrypt.log

Enter email address (used for urgent renewal and security notices)

 (Enter 'c' to cancel): YourPassboltUser@yourdomain.com

- - - - - - - - - - - - - - - - - - - - - - - - - - - - - - - - - - - - - - - -

Please read the Terms of Service at

https://letsencrypt.org/documents/LE-SA-v1.3-September-21-2022.pdf. You must

agree in order to register with the ACME server. Do you agree?

- - - - - - - - - - - - - - - - - - - - - - - - - - - - - - - - - - - - - - - -

(Y)es/(N)o: y

- - - - - - - - - - - - - - - - - - - - - - - - - - - - - - - - - - - - - - - -

Would you be willing, once your first certificate is successfully issued, to

share your email address with the Electronic Frontier Foundation, a founding

partner of the Let's Encrypt project and the non-profit organization that

develops Certbot? We'd like to send you email about our work encrypting the web,

EFF news, campaigns, and ways to support digital freedom.

- - - - - - - - - - - - - - - - - - - - - - - - - - - - - - - - - - - - - - - -

(Y)es/(N)o: y

Account registered.

Which names would you like to activate HTTPS for?

- - - - - - - - - - - - - - - - - - - - - - - - - - - - - - - - - - - - - - - -

1: passbolt.yourdomain.com

- - - - - - - - - - - - - - - - - - - - - - - - - - - - - - - - - - - - - - - -

Select the appropriate numbers separated by commas and/or spaces, or leave input

blank to select all options shown (Enter 'c' to cancel): 1

Requesting a certificate for passbolt.yourdomain.com

Successfully received certificate.

Certificate is saved at: /etc/letsencrypt/live/passbolt.yourdomain.com/fullchain.pem

Key is saved at:         /etc/letsencrypt/live/passbolt.yourdomain.com/privkey.pem

This certificate expires on 2024-05-06.

These files will be updated when the certificate renews.

Certbot has set up a scheduled task to automatically renew this certificate in the background.

Deploying certificate

Successfully deployed certificate for passbolt.yourdomain.com to /etc/nginx/conf.d/passbolt.conf

Congratulations! You have successfully enabled HTTPS on https://passbolt.yourdomain.com

- - - - - - - - - - - - - - - - - - - - - - - - - - - - - - - - - - - - - - - -

If you like Certbot, please consider supporting our work by:

 * Donating to ISRG / Let's Encrypt:   https://letsencrypt.org/donate

 * Donating to EFF:                    https://eff.org/donate-le

- - - - - - - - - - - - - - - - - - - - - - - - - - - - - - - - - - - - - - - -
Step 12. Finish the Installation
Passbolt is only compatible with Firefox and Google Chrome. To complete the installation, you’ll need to download and install the browser extension.
Once the extension is installed, then go to the URL provided at the end of the installation script.
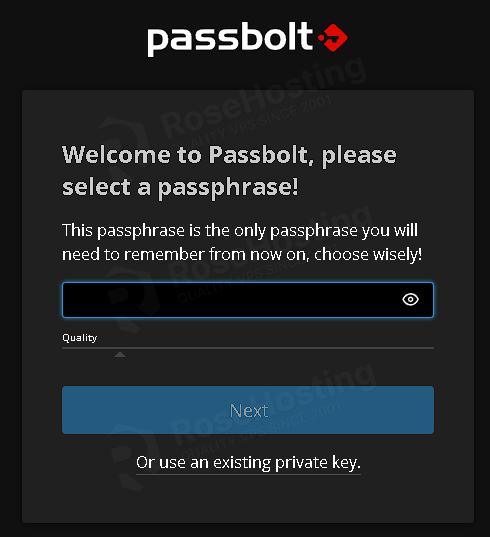
If the access was successful, we must create the password:
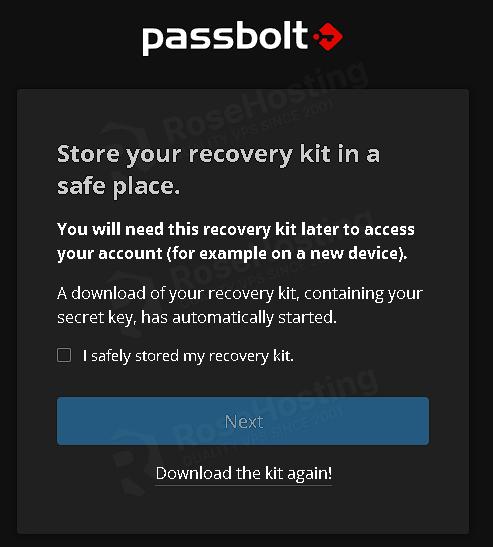
Next, download the recovery kit:
Next, create the security token:

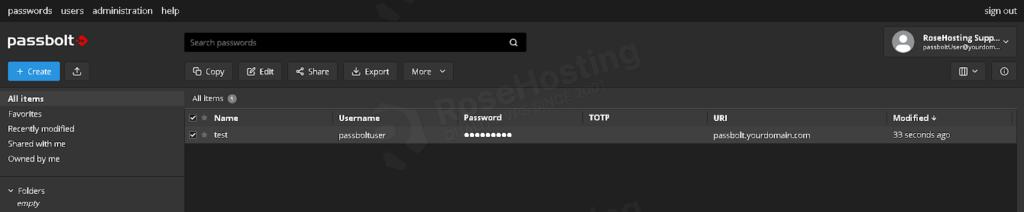
Now that Passbolt has been successfully installed, you can create passwords
Step 13. Set Up Cron Job for the Passbolt Mail Queue
To send email messages, you need to set a cron job to run every minute.
You must add the cron job for the user associated with your web server, which in this tutorial is the www-data user. Run the following command:
sudo crontab -u www-data -eThen add the following content:
* * * * * /var/www/passbolt_api/bin/cake EmailQueue.senderSave and close the file.
You can now access Passbolt Manager using your domain name at http://passbolt.yourdomain.com and begin working on your project. For additional details about Passbolt, its features, and configuration, refer to their official documentation.
Of course, you don’t have to install Passbolt on Ubuntu 22.04 if you use one of our Linux VPS Hosting services, in which case you can simply ask our expert Linux admins to install and configure Passbolt on Ubuntu 22.04 for you. They are available 24×7 and will take care of your request immediately.
PS. If you liked this post on installing Passbolt on Ubuntu 22.04, please share it with your friends on social networks or simply leave a comment in the comments section. Thank you.
Thank you for the great manual.
Just one small detail regarding the package installation, which doesn’t work for me, but with correction should look something like this:
sudo apt install php-{fpm,mysql,common,cli,opcache,readline,mbstring,xml,gd,curl,imagick,gnupg,ldap,imap,zip,bz2,intl,gmp}
Thanks for noticing, we updated the package names.