In this guide, we will show you how to install Tomcat on an Ubuntu 18.04 VPS. Tomcat is an open source web server and servlet container developed by the Apache Software Foundation (ASF) that executes Java servlets and renders Web pages that include Java server page coding.
 In order to run Tomcat on your VPS, the following requirements have to be met:
- Java 8 or higher
- SSH root access to your server
- A VPS with at least 1 GB of RAM
Table of Contents
Update OS packages
Before we can start with the Tomcat installation, we have to make sure that all Ubuntu OS packages installed on the server are up to date. We can do this by executing the following commands:
sudo apt-get update
sudo apt-get upgrade
Install JAVA
In order to install and run Tomcat on the server, we need to have Java installed. We can check if Java is already installed using this command:
which java
If there is no output, it means that Java is not installed on the server yet. We can install Oracle JDK or OpenJDK. We need to have Java version 8 or higher installed on your system to run Tomcat 9. We can install it using the following command:
sudo apt-get install default-jdk
In order to check the Java version, run the following command on your server:
java -version
We should receive the following output:
openjdk version "10.0.2" 2018-07-17
OpenJDK Runtime Environment (build 10.0.2+13-Ubuntu-1ubuntu0.18.04.4)
OpenJDK 64-Bit Server VM (build 10.0.2+13-Ubuntu-1ubuntu0.18.04.4, mixed mode)
Install Tomcat
Download the latest stable version of Tomcat from the Apache Tomcat official website at http://tomcat.apache.org/download-90.cgi and extract it in a directory on your server:
cd /opt
wget -O tomcat9.tar.gz http://mirror.olnevhost.net/pub/apache/tomcat/tomcat-9/v9.0.14/bin/apache-tomcat-9.0.14.tar.gz
tar -xvzf tomcat9.tar.gz
mv apache-tomcat-9.0.14 tomcat9
It is not a good idea to run Tomcat as root user, so for security reason, we will create a new system user:
useradd -r tomcat9 -d /opt/tomcat9 --shell /bin/false
Once the tomcat9 system user has been created, change the ownership of the /opt/tomcat9 directory to tomcat user:
chown tomcat9:tomcat9 -R /opt/tomcat9/
Create a new systemd file for Tomcat:
vi /etc/systemd/system/tomcat9.service
Add the following content:
[Unit]
Description=Apache Tomcat
After=network.target

[Service]
Type=forking

User=tomcat9
Group=tomcat9

Environment=JAVA_HOME=/usr/lib/jvm/java-11-openjdk-amd64
Environment=CATALINA_PID=/opt/tomcat9/tomcat9.pid
Environment=CATALINA_HOME=/opt/tomcat9
Environment=CATALINA_BASE=/opt/tomcat9
Environment="CATALINA_OPTS=-Xms512M -Xmx1024M -server -XX:+UseParallelGC"

ExecStart=/opt/tomcat9/bin/startup.sh
ExecStop=/opt/tomcat9/bin/shutdown.sh

ExecReload=/bin/kill $MAINPID
RemainAfterExit=yes

[Install]
WantedBy=multi-user.target
Save the tomcat9.service file. Run the following command to reload the systemd manager configuration:
systemctl daemon-reload
Now we can start the Apache Tomcat 9 service:
systemctl start tomcat9
In order to enable the Tomcat service to start on server boot, run:
systemctl enable tomcat9
We can check the status of the Tomcat 9 service and confirm that it is properly installed by executing the following command:
systemctl status tomcat9
The output of this command should be similar to this:
● tomcat9.service - Apache Tomcat
   Loaded: loaded (/etc/systemd/system/tomcat9.service; enabled; vendor preset: enabled)
   Active: active (exited) since Thu 2018-12-27 04:34:47 CST; 3s ago
  Process: 5473 ExecStart=/opt/tomcat9/bin/startup.sh (code=exited, status=0/SUCCESS)
 Main PID: 5481 (code=exited, status=0/SUCCESS)
    Tasks: 45 (limit: 2320)
   CGroup: /system.slice/tomcat9.service
           └─5482 /usr/lib/jvm/java-11-openjdk-amd64/bin/java -Djava.util.logging.config.file=/opt/tomcat9/conf/logging.properties -Djava.util.logging.manager=org.apache.jul

Dec 27 04:34:47 for-blog-post.rosehostingtest.com systemd[1]: Starting Apache Tomcat...
Dec 27 04:34:47 for-blog-post.rosehostingtest.com startup.sh[5473]: Tomcat started.
Dec 27 04:34:47 for-blog-post.rosehostingtest.com systemd[1]: Started Apache Tomcat.
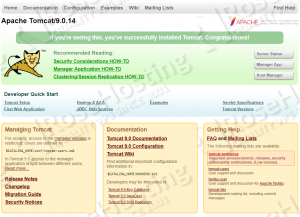
Apache Tomcat is listening on port 8080, so open a web browser and navigate to http://IP_address:8080 and you should see the home page of Apache Tomcat.
Create a reverse proxy in Apache
We can also configure Apache2 web server as a reverse proxy for Tomcat 9 web server, so Apache will accept all requests over port 80 in front of Tomcat 9 which is running on port 8080.
We need to enable two Apache modules: proxy and proxy_http. We can use the a2enmod command to enable them:
sudo a2enmod proxy
sudo a2enmod proxy_http
Then, we have to restart Apache for the changes to take effect:
systemctl restart apache2
Create/modify the virtual host configuration about your domain and add/modify the proxy directives (ProxyRequests, ProxyPass and ProxyPassReverse) as shown in our example:
vi /etc/apache2/sites-available/your-domain.com.conf
<VirtualHost *:80>
  ServerName your-domain.com
  ServerAlias www.your-domain.com
  ProxyRequests off
  ProxyPass / http://127.0.0.1:8080/
  ProxyPassReverse / http://127.0.0.1:8080/
</VirtualHost>
Enable the ‘your-domain.com.conf’ Apache configuration file if it was not enabled previously, and restart Apache for the changes to take effect:
sudo a2ensite your-domain.com.conf
systemctl restart apache2
Now we can access the Tomcat webapp without using port 8080 in a web browser, i.e. we can access it using: http://your-domain.com
That is it. We successfully installed Tomcat on Ubuntu 18.04.
Of course, you don’t have to install Tomcat on Ubuntu 18.04, if you use one of our Managed Tomcat Hosting solutions, in which case you can simply ask our expert Linux admins to set up and configure Apache Tomcat on Ubuntu 18.04 for you. They are available 24×7 and will take care of your request immediately. We also published a guide on How to Install Tomcat on Ubuntu 20.04.
PS. If you liked this post on how to install Tomcat on Ubuntu 18.04, please share it with your friends on the social networks using the buttons on the left or simply leave a reply below. Thanks.