In this tutorial, we will show you how to install WonderCMS on an Ubuntu 18.04 VPS.
 WonderCMS is a free, open-source, and database-free flat-file content management system written in PHP and jQuery. It is a simple, fast, responsive CMS that allows you to create websites without the need of a separate database. WonderCMS comes with a rich set of features, including WYSIWYG (What You See Is What You Get) support, SEO friendly, friendly URLs, a simple click and edit functionality, easy to theme, custom login URL, and lots more. Let’s get started with the installation.
Table of Contents
Prerequisites
- An Ubuntu 18.04 VPS with root access enabled, or a user with sudo privileges.
- Apache with mod_rewrite module enabled
- PHP 7.1 or greater with curl, mbstring and Zip extensions enabled.
Step 1: Log in and Update Packages
First, we’re going to need to log into our server using SSH. You can do that by entering this command:
ssh root@IP_Address -p Port_Number
Remember to replace “root” with your username if you are not using the root user. Change “IP_Address” and “Port_Number” according to your server’s IP address and SSH port number.
Once you are logged in, you should update all of your packages to their latest available versions.
apt-get update -y
apt-get upgrade -y
Once all the packages are up-to-date, restart your server to apply the configuration changes.
Step 2: Install Apache and PHP
First, we will need to install the Apache web server, PHP, and other required packages on the server.
Run the following command to install all the required packages:
apt-get install apache2 php7.2 libapache2-mod-php7.2 php7.2-common php7.2-mbstring php7.2-xmlrpc php7.2-sqlite3 php7.2-soap php7.2-gd php7.2-xml php7.2-cli php7.2-curl php7.2-zip unzip git
Once installed, open the php.ini file and tweak some settings:
nano /etc/php/7.2/apache2/php.ini
Change the following lines as shown below:
memory_limit = 256M
upload_max_filesize = 100M
max_execution_time = 360
date.timezone = "America/Chicago"
Save and close the file.
Then, restart the Apache service and enable it to start after system reboot:
systemctl restart apache2
systemctl enable apache2
Step 3: Install WonderCMS
First, download the latest version of WonderCMS from the Git repository using the following command:
cd /var/www/html/
git clone https://github.com/robiso/wondercms.git
Once downloaded, set the correct permissions for WonderCMS files with the following command:
chown -R www-data:www-data /var/www/html/wondercms
chmod -R 755 /var/www/html/wondercms
Once you have done, you can proceed to the next step.
Step 4: Configure Apache for WonderCMS
Next, we will need to create an Apache virtual host configuration file for WonderCMS. Run the following command to create a new virtual host configuration file:
nano /etc/apache2/sites-available/wondercms.conf
Add the following content:
<VirtualHost *:80>
    ServerAdmin admin@your-domain.com
    DocumentRoot /var/www/html/wondercms/
    ServerName your-domain.com
    <Directory /var/www/html/wondercms/>
        Options FollowSymlinks
        AllowOverride All
        Require all granted
    </Directory>

    ErrorLog ${APACHE_LOG_DIR}/wondercms_error.log
    CustomLog ${APACHE_LOG_DIR}/wondercms_access.log combined

</VirtualHost>
Make sure to replace “your-domain.com” with an actual registered domain name.
Save and close the file when you have finished. Then, enable the virtual host configuration and Apache rewrite module with the following command:
a2ensite wondercms.conf
a2enmod rewrite
Finally, restart Apache service to apply all the changes we have made.
systemctl restart apache2
You can also verify the Apache service status with the following command:
systemctl status apache2
If everything is fine you should get the following output:
● apache2.service - The Apache HTTP Server
Loaded: loaded (/lib/systemd/system/apache2.service; enabled; vendor preset: enabled)
Drop-In: /lib/systemd/system/apache2.service.d
└─apache2-systemd.conf
Active: active (running) since Mon 2019-08-12 15:45:12 UTC; 6s ago
Process: 14034 ExecStop=/usr/sbin/apachectl stop (code=exited, status=0/SUCCESS)
Process: 14006 ExecReload=/usr/sbin/apachectl graceful (code=exited, status=0/SUCCESS)
Process: 14039 ExecStart=/usr/sbin/apachectl start (code=exited, status=0/SUCCESS)
Main PID: 14052 (apache2)
Tasks: 6 (limit: 1098)
CGroup: /system.slice/apache2.service
├─14052 /usr/sbin/apache2 -k start
├─14057 /usr/sbin/apache2 -k start
├─14058 /usr/sbin/apache2 -k start
├─14059 /usr/sbin/apache2 -k start
├─14060 /usr/sbin/apache2 -k start
└─14061 /usr/sbin/apache2 -k start

Aug 12 15:45:12 hitesh systemd[1]: Starting The Apache HTTP Server...
Aug 12 15:45:12 hitesh systemd[1]: Started The Apache HTTP Server.
Step 5: Access WonderCMS Web Interface
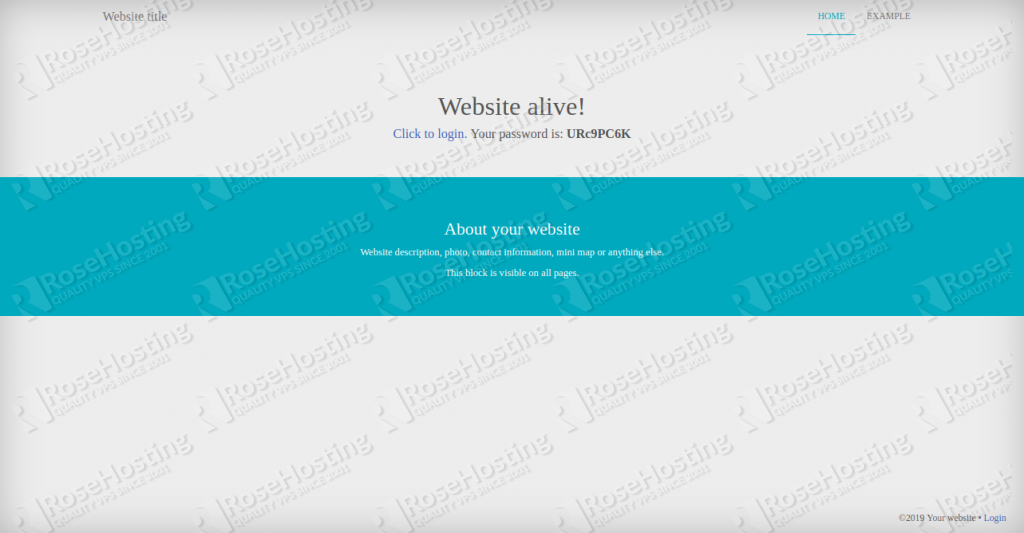
WonderCMS is now installed and configured. Next, open your web browser and type the URL http://your-domain.com.
Now, click on the “Click to login” and log in with the password provided.
Next, click on the SETTINGS on the top right corner to change the default login password. You should see the following page:
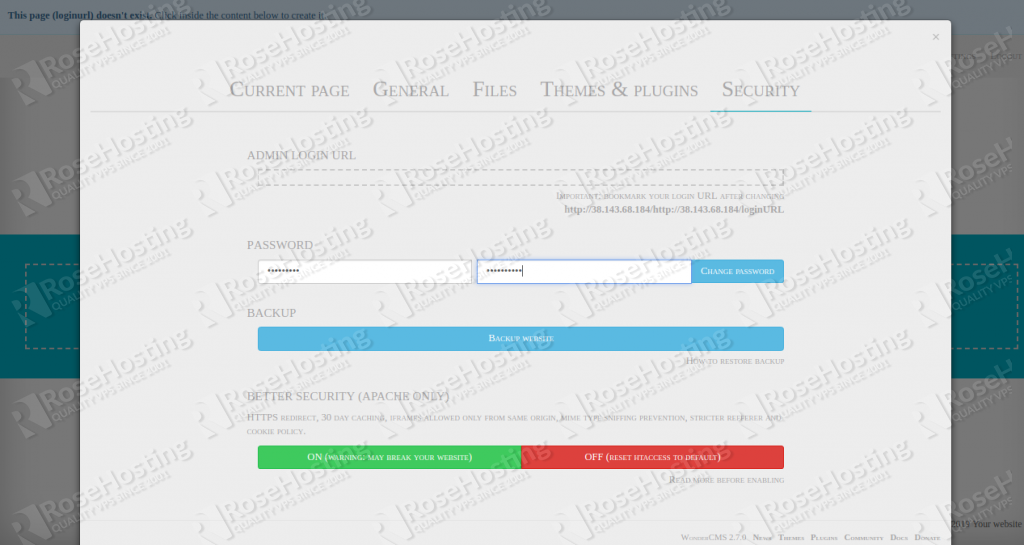
Next, provide your new password and click on the CHANGE PASSWORD button to change the default password. You should see the following page:
Congratulations! you have successfully installed and configured WonderCMS on Ubuntu 18.04 server. You can now add a new page, install themes and plugins from the WonderCMS web interface. For more information, you can check the WonderCMS documentation.
 However, if you are one of our Managed Ubuntu Hosting customers, or if you use one of our Managed VPS Hosting plans, you don’t have to install WonderCMS on your Ubuntu 18.04 VPS – simply ask our admins, sit back, and relax. Our admins will install WonderCMS on Ubuntu 18.04 (or any other OS that you have with us) for you immediately.
PS. If you liked this post about how to install WonderCMS on an Ubuntu 18.04 VPS, please share it with your friends on the social networks using the buttons below, or simply leave a comment in the comments section. Thanks.
great content thanks
Thanks for posting this tutorial. Any help to WonderCMS users is greatly appreciated.
Regards and hello from WonderCMS!