In this tutorial, we are going to explain how to configure PHP-fpm with Nginx on Ubuntu 22.04.
Nginx is a web server used for serving web requests on our website. It can be used as a reverse proxy, mail proxy, HTTP cache, or load balancer. Nginx is a free and open source software that can be configured with the PHP module PHP-fpm and improve the website loading and handle a huge amount of traffic in no time.
Configuring PHP-fpm with Nginx on Ubuntu 22.04 is a very easy and straightforward process that can take up to 15 minutes. Let’s get started!
Table of Contents
Prerequisites
- Fresh install of Ubuntu 22.04
- User privileges: root or non-root user with sudo privileges
Step 1. Update the System
A fresh installation of Ubuntu 22.04 needs a system update, and that’s why we need to execute the following commands.
sudo apt update -y && sudo apt upgrade -y
Step 2. Install Nginx webserver
The Nginx web server can be installed with the following command:
sudo apt install nginx -y
Once the installation is complete, start and enable the Nginx service:
sudo systemctl start nginx && sudo systemctl enable nginx
Step 3. Install PHP-FPM
Next is to install the php-fpm php extension along with other php extensions.
sudo apt install software-properties-common ca-certificates lsb-release apt-transport-https -y

LC_ALL=C.UTF-8 add-apt-repository ppa:ondrej/php

sudo apt update
Once the dependencies are installed, we are ready to install the PHP-FPM.
sudo apt install php8.1 php8.1-fpm php8.1-mysql php8.1-mbstring php8.1-xml php8.1-curl
Once installed, start and enable the php8.1-fpm.service
sudo systemctl start php8.1-fpm.service && sudo systemctl enable php8.1-fpm.service
To check if everything is OK, execute the following command:
sudo systemctl status php8.1-fpm.service
You should receive the following output:
root@host:/var/www/html# systemctl status php8.1-fpm
● php8.1-fpm.service - The PHP 8.1 FastCGI Process Manager
     Loaded: loaded (/lib/systemd/system/php8.1-fpm.service; enabled; vendor preset: enabled)
     Active: active (running) since Sat 2022-09-10 15:31:29 CEST; 1min 52s ago
       Docs: man:php-fpm8.1(8)
   Main PID: 16869 (php-fpm8.1)
     Status: "Processes active: 0, idle: 2, Requests: 0, slow: 0, Traffic: 0req/sec"
      Tasks: 3 (limit: 4575)
     Memory: 8.9M
        CPU: 482ms
     CGroup: /system.slice/php8.1-fpm.service
Step 4. Configure PHP-FPM with Nginx
This is the last and the most important step since, in this paragraph, we are going to explain how to configure the PHP-fpm with previously installed Nginx.
We need to create a virtual host file containing our domain name. Go into the Nginx configuration directory and create the file.
cd /etc/nginx/conf.d/ && sudo nano yourdomain.com.conf
Paste the following lines of code.
server {
            listen       80;
         server_name  yourdomain.com;
         root         /var/www/html/;

         access_log /var/log/nginx/yourdomain.com-access.log;
         error_log  /var/log/nginx/yourdomain.com-error.log error;
         index index.html index.htm index.php;

         location / {
                      try_files $uri $uri/ /index.php$is_args$args;
         }

         location ~ \.php$ {
            fastcgi_split_path_info ^(.+\.php)(/.+)$;
            fastcgi_pass unix:/var/run/php/php8.1-fpm.sock;
            fastcgi_index index.php;
            include fastcgi.conf;
    }
        }
}
Check the Nginx configuration syntax to see if it is OK.
nginx -t
You should receive the following output:
root@vps:/etc/nginx/conf.d# nginx -t
nginx: the configuration file /etc/nginx/nginx.conf syntax is ok
nginx: configuration file /etc/nginx/nginx.conf test is successful
Restart the Nginx service.
sudo systemctl restart nginx
Next is to create a custom pool in the configuration of the PHP8.1-FPM. The location of the pool configuration is /etc/php/8.1/fpm/pool.d The default pool configuration is www.conf, but we will not make changes to this file since it is recommended to use separate files for every new configuration and website.
First, we need to create a group and user, then add the user to the group
groupadd php_fpm_group

useradd -g php_fpm_group php_fpm_user
Next, we need to create a pool configuration for the website.
cd /etc/php/8.1/fpm/pool.d && touch yourdomain.conf
Open the file yourdomain.conf with your favorite editor and paste the following lines of code:
[pool_name]
user = php_fpm_user
group = php_fpm_group
listen = /var/run/php/php8.1-fpm.sock
listen.owner = www-data
listen.group = www-data
pm = dynamic
pm.max_children = 30
pm.start_servers = 5
pm.process_idle_timeout = 20s
Let’s explain the parameters in the file created above:
The pool name must be specific to every new pool configuration. The user and group must be the created user and group for our website, while the listen.owner and listen.group is the user and the group that Nginx is running on. The listen is the path of the PHP8.1 sock.
The pm.max_children is for setting the maximum number of children that can be alive at the same time. The pm.start_servers is the number of children created on startup. The pm.process_idle_timeout is used only if the pm is set to dynamic and is the number of desired maximum number idle server processes. The pm=dynamic means the number of child processes is set dynamically based on the following directives.
Remember that this configuration can be different according to your server resource and website needs.
The last thing is to create the phpinfo.php file into the document root of your website.
cd /var/www/html/ && sudo nano phpinfo.php
Once you open the file, paste the following lines of code:
<? php
phpinfo();
?>
Save the file, close it and access the following URL: http://yourdomain.com/phpinfo.php
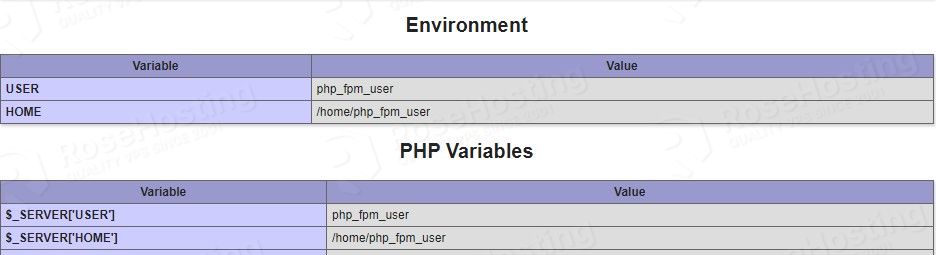
In the Environment and PHP Variables you can notice that the USER and HOME are set to php_fpm_user and /home/php_fpm_user, respectively. This is proof that the PHP-FPM is successfully configured with Nginx.
That’s it. If you find any difficulties while configuring this, you can simply contact our technical support by submitting a support ticket, and our admins will help you immediately. We are available 24/7.
If you liked this about configuring PHP-fpm with Nginx on Ubuntu 22.04, please share it with your friends on social networks or simply leave a reply below.
Once you create the new pool file for php-fpm, you need to restart php-fpm.