

We will show you how to configure system locale on Debian 9. The system locale defines the language and country-specific setting for the programs running on your system and the shell sessions. You can use locales to see the time and date, numbers, currency and other values formatted as per your language or country. Configuring system locale on Debian 9 is a fairly easy task and it should be configured in less than 10 minutes.
Table of Contents
1. Check the current system locale on Debian 9
The first thing you need to do is to connect to your Linux server via SSH. You can log in as root or if you have a system user with sudo privileges you can log in as that user. Once you log in, run the following command to check the current system locale:
locale
The output should be similar to the one below:
# locale
LANG=
LANGUAGE=
LC_CTYPE="en_US.UTF-8"
LC_NUMERIC="en_US.UTF-8"
LC_TIME="en_US.UTF-8"
LC_COLLATE="en_US.UTF-8"
LC_MONETARY="en_US.UTF-8"
LC_MESSAGES="en_US.UTF-8"
LC_PAPER="en_US.UTF-8"
LC_NAME="en_US.UTF-8"
LC_ADDRESS="en_US.UTF-8"
LC_TELEPHONE="en_US.UTF-8"
LC_MEASUREMENT="en_US.UTF-8"
LC_IDENTIFICATION="en_US.UTF-8"
LC_ALL=en_US.UTF-8
2. Check which system locales are enabled
By using the locale command you can see which locales are currently being used for your active terminal session. In the output above the system locale is set to en_US.UTF-8.
Before setting up a different system locale you can first check which locales are enabled and ready to use on your Debian 9 VPS. You can use the following command for that purpose:
locale -a
The output should be similar to the one below:
# locale -a
C
C.UTF-8
POSIX
en_US.utf8
3. Generate a system locale for the region you need
If you don’t have the locale that you need to be enabled on your system, it can simply be generated by using the locale-gen command. Just run the following command to generate a locale for the region you need:
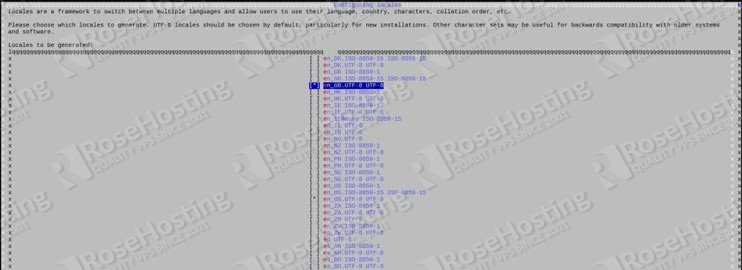
dpkg-reconfigure locales
Select the locale that you want to be enabled and press OK. On the image below you can see that we selected en_GB.UTF-8.
Once you press OK you should see the following output:
Generating locales (this might take a while)...
  en_GB.UTF-8... done
  en_US.UTF-8... done
Generation complete.
4. Verify is a system locale is enabled
This confirms that the locale you selected is generated and you can use it on your system. To verify that it is enabled you can run the locale -a command again.
# locale -a
C
C.UTF-8
POSIX
en_GB.utf8
en_US.utf8
The output should contain the system locale you selected and generated with the previous command.
5. Changing your locale manually
Editing the locale file is very easy. You can use your favorite text editor to edit the /etc/default/locale file. If this file does not exist, then no locale is currently set for your system. You can create one manually and enable a locale for your system. The output below shows how the file should look like:
cat /etc/default/locale
#  File generated by update-locale
LANG=en_US.UTF-8
LC_ALL=en_US.UTF-8
Replace en_US.UTF-8 with the locale you wish to have active on your system and save the file. Once you save the file, log out from your current session and then log back in, or open a new terminal, and your newly chosen locale will be active.
NOTE: This example file only sets the LANG variable for your system, which covers the locale for all parts of the system.
6. Changing your locale using the update-locale command
Another way of changing the locale on your system is to by using the update-locale command. For example, to set the system locale to en_GB.utf8 use the following command:
update-locale LANG=en_GB.utf8
Again, restart the session and check the currently active locale to make sure the one you want is properly set up.
# locale
LANG=en_GB.utf8
LANGUAGE=
LC_CTYPE="en_GB.utf8"
LC_NUMERIC="en_GB.utf8"
LC_TIME="en_GB.utf8"
LC_COLLATE="en_GB.utf8"
LC_MONETARY="en_GB.utf8"
LC_MESSAGES="en_GB.utf8"
LC_PAPER="en_GB.utf8"
LC_NAME="en_GB.utf8"
LC_ADDRESS="en_GB.utf8"
LC_TELEPHONE="en_GB.utf8"
LC_MEASUREMENT="en_GB.utf8"
LC_IDENTIFICATION="en_GB.utf8"
LC_ALL=
7. Changing the locale for specific parts of the operating system
Updating the LANG variable allows you to change the locale for the entire system at once. If you want to set up the locale for a specific part of the system you should edit the appropriate variable. Here are a few useful variables to know:
- LC_MESSAGES – Sets the language for system messages.
- LC_RESPONSE – Sets the language for dialogs shown on screen (e.g. “Yes” or “No” dialogs).
- LC_NUMERIC – Sets the format for numbers depending on the region (e.g. decimals and commas being switched in some countries).
- LC_TIME – Sets the format for the time and date.
- LC_COLLATE – Sets the alphabetical order for strings (e.g. file names).
- LC_MONETARY – Sets the currency name and symbol depending on the country.
- LC_NAME – Sets the format for names (e.g. last name displayed before the first name).
For a list of all available variables, you can check the locale man page.
See also: How to Set Up System Locale on Ubuntu 16.04 and How to Set Up System Locale on CentOS 7

Of course, you don’t have to configure system locale on Debian 9, if you use one of our Debian VPS Hosting services, in which case you can simply ask our expert Linux admins to set up system locale on Debian 9 for you. They are available 24×7 and will take care of your request immediately.
PS. If you liked this post on configuring system locale on Debian 9, please share it with your friends on the social networks using the buttons on the left or simply leave a reply below. Thanks.