In this tutorial, we’ll be covering the process of setting up a mail server with Postfix, Dovecot, Postfixadmin and MariaDB on an Ubuntu 20.04 VPS. But first, what is PostfixAdmin?
 PostfixAdmin is an open-source web-based application written in PHP that’s used to create virtual domains and email accounts for a Postfix mail server. Using PostfixAdmin, we can manage mailboxes & aliases, set quotas, configure vacation/out-of-the-office messages, and more. Plus, the web-based interface gives you the user-friendliness of a browser window with a UI.
PostfixAdmin allows us to use virtual email addresses and virtual mailboxes, so we do not need to create a new system user account for each email address. Considering all of these details, PostfixAdmin is a versatile tool and can be used for almost all of your mailing needs. This tutorial goes quite in-depth and may take some time to configure everything properly. Let’s get started with the installation steps.

Table of Contents
Hardware/Software Requirements
- An Ubuntu 20.04 server or VPS with root access enabled, or a user with sudo privileges. We provide all of our users will full root access on their VPSes.
- Postfix mail transfer agent (MTA) and Dovecot IMAP/POP3 Mail Delivery Agent need to be installed.
- A database server (MySQL/MariaDB, PostgreSQL or SQLite) needs to be installed.
- Apache web server needs to be installed with the
mod_rewritemodule enabled. - PHP 7.1 or greater must be installed with the
imap,mbstringandmysqlextensions all enabled.
Step 1. Getting Started
To begin, we’re going to need to log into our server using SSH. You can do that by entering this command:
ssh root@IP_Address -p Port_Number
Remember to replace “root” with your username if you are not using the root user. Change the values in red according to your server’s IP address and SSH port number (the default number is 22, so try that first unless your server uses a custom port number).
Once you are logged in, you should update all of your packages to their latest available versions.
apt-get update -y
apt-get upgrade -y
Once all the packages are up-to-date, restart your server to apply the configuration changes and ensure that all software is running on their latest versions.
Step 2. Create a System User Account
PostfixAdmin has the ability to create multiple virtual domains, users and aliases. This saves us the hassle of having to create new system users whenever we need a new email account added. For security reasons, we will create a new user named ‘vmail’ with permissions to store the emails in the /var/vmail directory:
useradd -r -u 150 -g mail -d /var/vmail -s /sbin/nologin -c "Virtual Mail User" vmail
mkdir -p /var/vmail
chmod -R 770 /var/vmail
chown -R vmail:mail /var/vmail
Step 3. Install PHP, Apache and Required Extensions
PHP 7.4 and Apache2 are included in the default Ubuntu repository for 20.04. We can install Apache 2, PHP 7.4 and the required PHP extensions using the following command. We also included the required PHP and Apache modules in the command:
apt-get install apache libapache2-mod-php php php-common php-mbstring php-imap php-mysql
Step 4. Install MariaDB Server
PostfixAdmin requires a database in order to be able to store the email account and domain information. For the purpose of this tutorial, we will use a MariaDB database system, an open-source version of MySQL that maintains feature parity. We can install the MariaDB server using the following command:
apt-get install mariadb-server mariadb-client mariadb-common
Start the MariaDB service and enable it to start on server boot using the following commands:
systemctl start mariadb
systemctl enable mariadb
In order to improve the security of your MariaDB installation, run the mysql_secure_installation script:
mysql_secure_installation
When prompted, you can set the MariaDB root password and safely answer ‘Y’ to all questions.
Enter current password for root (enter for none): Just press the [Enter] key since there is no default password
Set root password? [Y/n]: Y
New password: Enter a strong password
Re-enter new password: Repeat the same password from before
Remove anonymous users? [Y/n]: Y
Disallow root login remotely? [Y/n]: Y
Remove test database and access to it? [Y/n]: Y
Reload privilege tables now? [Y/n]: Y
If you followed the above steps, then you will have a password set for the MariaDB root user.
Run this command to access the MySQL console:
mysql -u root -p
And enter the root password you set previously using the mysql_secure_installation script. If you chose not to run that script, there is no password set, so you just need to press the [Enter] key once.
Next, create a MariaDB user and database for PostfixAdmin:
MariaDB [(none)]> CREATE USER 'postfixadmin'@'localhost' IDENTIFIED BY 'Strong_Password';
MariaDB [(none)]> CREATE DATABASE postfixadmin;
MariaDB [(none)]> GRANT ALL PRIVILEGES ON postfixadmin.* TO 'postfixadmin'@'localhost';
MariaDB [(none)]> FLUSH PRIVILEGES;
MariaDB [(none)]> \q
Do not forget to replace ‘Strong_Password‘ with a good and unique password.
Step 5. Install Postfix
Install Postfix and postfix-mysql packages by running the command below:
apt-get install postfix postfix-mysql
During the Postfix installation, you will be asked for the type of mail configuration. Select ‘Internet Site’ and click on OK to continue. Then, enter the server’s hostname in the ‘system mail name’ field.
Once the Postfix installation is complete, we have to create several Postfix configuration files. This will take a while as there are quite a few files that have to be made and configured.
mkdir -p /etc/postfix/sql/
Define the database connection settings for querying the virtual alias domain catchall maps by creating this file. We’re using vi, but you can use any text editor that you prefer:
vi /etc/postfix/sql/mysql_virtual_alias_domain_catchall_maps.cf
Once the file is created, insert these contents:
user = postfixadmin
password = Strong_Password
hosts = localhost
dbname = postfixadmin
query = SELECT goto FROM alias,alias_domain WHERE alias_domain.alias_domain = '%d' and alias.address = CONCAT('@', alias_domain.target_domain) AND alias.active = 1 AND alias_domain.active='1'
Create this file so we can set the database connection settings for querying the virtual alias domain mailbox maps:
vi /etc/postfix/sql/mysql_virtual_alias_domain_mailbox_maps.cf
Then insert these contents:
user = postfixadmin
password = Strong_Password
hosts = localhost
dbname = postfixadmin
query = SELECT maildir FROM mailbox,alias_domain WHERE alias_domain.alias_domain = '%d' and mailbox.username = CONCAT('%u', '@', alias_domain.target_domain) AND mailbox.active = 1 AND alias_domain.active='1'
After that, define the database connection settings for querying the virtual alias domain maps by creating this file:
vi /etc/postfix/sql/mysql_virtual_alias_domain_maps.cf
Add the following:
user = postfixadmin
password = Strong_Password
hosts = localhost
dbname = postfixadmin
query = SELECT goto FROM alias,alias_domain WHERE alias_domain.alias_domain = '%d' and alias.address = CONCAT('%u', '@', alias_domain.target_domain) AND alias.active = 1 AND alias_domain.active='1'
The next settings are for the database connection settings for querying the virtual alias maps. Create this file:
vi /etc/postfix/sql/mysql_virtual_alias_maps.cf
Add this text:
user = postfixadmin
password = Strong_Password
hosts = localhost
dbname = postfixadmin
query = SELECT goto FROM alias WHERE address='%s' AND active = '1'
There are a few more to go. Now, create a file for the database connection settings for querying the virtual domain maps:
vi /etc/postfix/sql/mysql_virtual_domains_maps.cf
Make sure you set the passwords on all of these files that you have been adding. Add the contents:
user = postfixadmin
password = Strong_Password
hosts = localhost
dbname = postfixadmin
query = SELECT domain FROM domain WHERE domain='%s' AND active = '1'
Onto the next file. Create it and add the database connection settings for querying the virtual mailbox limit maps:
vi /etc/postfix/sql/mysql_virtual_mailbox_limit_maps.cf
Insert this and change the password:
user = postfixadmin
password = Strong_Password
hosts = localhost
dbname = postfixadmin
query = SELECT quota FROM mailbox WHERE username='%s' AND active = '1'
Finally, create this file and add the database connection settings for querying the virtual mailbox maps:
vi /etc/postfix/sql/mysql_virtual_mailbox_maps.cf
user = postfixadmin
password = Strong_Password
hosts = localhost
dbname = postfixadmin
query = SELECT maildir FROM mailbox WHERE username='%s' AND active = '1'
NOTE: Do not forget to replace ‘Strong_Password‘ with your own password in all of the configuration files above.
Modify the main.cf Postfix configuration file, which is the core of the Postfix configuration. Run these commands to edit each setting:
postconf -e "myhostname = $(hostname -f)"
postconf -e "virtual_mailbox_domains = proxy:mysql:/etc/postfix/sql/mysql_virtual_domains_maps.cf"
postconf -e "virtual_alias_maps = proxy:mysql:/etc/postfix/sql/mysql_virtual_alias_maps.cf, proxy:mysql:/etc/postfix/sql/mysql_virtual_alias_domain_maps.cf, proxy:mysql:/etc/postfix/sql/mysql_virtual_alias_domain_catchall_maps.cf"
postconf -e "virtual_mailbox_maps = proxy:mysql:/etc/postfix/sql/mysql_virtual_mailbox_maps.cf, proxy:mysql:/etc/postfix/sql/mysql_virtual_alias_domain_mailbox_maps.cf"
postconf -e "smtpd_tls_cert_file = /etc/ssl/certs/ssl-cert-snakeoil.pem"
postconf -e "smtpd_tls_key_file = /etc/ssl/private/ssl-cert-snakeoil.key"
postconf -e "smtpd_use_tls = yes"
postconf -e "smtpd_tls_auth_only = yes"
postconf -e "smtpd_sasl_type = dovecot"
postconf -e "smtpd_sasl_path = private/auth"
postconf -e "smtpd_sasl_auth_enable = yes"
postconf -e "smtpd_recipient_restrictions = permit_sasl_authenticated, permit_mynetworks, reject_unauth_destination"
postconf -e "mydestination = localhost"
postconf -e "mynetworks = 127.0.0.0/8"
postconf -e "inet_protocols = ipv4"
postconf -e "inet_interfaces = all"
postconf -e "virtual_transport = lmtp:unix:private/dovecot-lmtp"
We can also install Certbot, then install a new Let’s encrypt SSL certificate for the server hostname and replace /etc/ssl/certs/ssl-cert-snakeoil.pem and /etc/ssl/private/ssl-cert-snakeoil.key with the newly created SSL certificate and public key files.
Then, edit the the master.cf Postfix configuration file, and modify it as follows:
vi /etc/postfix/master.cf
Add or change the contents so that the file looks like this:
smtp inet n - y - - smtpd
#smtp inet n - y - 1 postscreen
#smtpd pass - - y - - smtpd
#dnsblog unix - - y - 0 dnsblog
#tlsproxy unix - - y - 0 tlsproxy
submission inet n - y - - smtpd
-o syslog_name=postfix/submission
-o smtpd_tls_security_level=encrypt
-o smtpd_sasl_auth_enable=yes
# -o smtpd_reject_unlisted_recipient=no
# -o smtpd_client_restrictions=$mua_client_restrictions
# -o smtpd_helo_restrictions=$mua_helo_restrictions
# -o smtpd_sender_restrictions=$mua_sender_restrictions
# -o smtpd_recipient_restrictions=
# -o smtpd_relay_restrictions=permit_sasl_authenticated,reject
-o smtpd_client_restrictions=permit_sasl_authenticated,reject
-o milter_macro_daemon_name=ORIGINATING
smtps inet n - y - - smtpd
-o syslog_name=postfix/smtps
# -o smtpd_tls_wrappermode=yes
-o smtpd_sasl_auth_enable=yes
# -o smtpd_reject_unlisted_recipient=no
-o smtpd_client_restrictions=permit_sasl_authenticated,reject
# -o smtpd_client_restrictions=$mua_client_restrictions
# -o smtpd_helo_restrictions=$mua_helo_restrictions
# -o smtpd_sender_restrictions=$mua_sender_restrictions
# -o smtpd_recipient_restrictions=
# -o smtpd_relay_restrictions=permit_sasl_authenticated,reject
-o milter_macro_daemon_name=ORIGINATING
Enable the Postfix service to start on server boot and restart the Postfix service:
systemctl enable postfix
systemctl restart postfix
Postfix is finally installed and configured.
Step 6. Install Dovecot
Dovecot is a Mail Delivery Agent which allows a user to receive emails in complete security through IMAP and/or POP3 protocols. We can install Dovecot and the dovecot-mysql package using the command below:
apt-get install dovecot-core dovecot-lmtpd dovecot-imapd dovecot-pop3d dovecot-mysql
Edit the /etc/dovecot/conf.d/10-mail.conf file:
vi /etc/dovecot/conf.d/10-mail.conf
Insert this as the content:
mail_location = maildir:/var/vmail/%d/%n
mail_privileged_group = mail
mail_uid = vmail
mail_gid = mail
first_valid_uid = 150
last_valid_uid = 150
Open the /etc/dovecot/conf.d/10-auth.conf file:
vi /etc/dovecot/conf.d/10-auth.conf
Edit it so that the file looks like this:
auth_mechanisms = plain login
#!include auth-system.conf.ext
!include auth-sql.conf.ext
Then edit the dovecot-sql.conf.ext file, and add these lines:
vi /etc/dovecot/dovecot-sql.conf.ext
driver = mysql
connect = host=localhost dbname=postfixadmin user=postfixadmin password=Strong_Password
default_pass_scheme = MD5-CRYPT
password_query = SELECT username as user, password, '/var/vmail/%d/%n' as userdb_home, 'maildir:/var/vmail/%d/%n' as userdb_mail, 150 as userdb_uid, 8 as userdb_gid FROM mailbox WHERE username = '%u' AND active = '1'
user_query = SELECT '/var/vmail/%d/%u' as home, 'maildir:/var/vmail/%d/%u' as mail, 150 AS uid, 8 AS gid, concat('dirsize:storage=', quota) AS quota FROM mailbox WHERE username = '%u' AND active = '1'
Do not forget to replace Strong_Password with the actual password that you set previously in Step 4 when creating the MariaDB user.
Edit the /etc/dovecot/conf.d/10-ssl.conf file, and enable SSL support:
vi /etc/dovecot/conf.d/10-ssl.conf
ssl = yes
Save and close that file, then edit the /etc/dovecot/conf.d/15-lda.conf file and set the postmaster_address email address.
vi /etc/dovecot/conf.d/15-lda.conf
postmaster_address = postmaster@yourdomain.com
Make sure that you change yourdomain.com to the actual domain name that points to your server.
Edit the /etc/dovecot/conf.d/10-master.conf file, find the service lmtp section and replace it with the following lines:
vi /etc/dovecot/conf.d/10-master.conf
service lmtp {
     unix_listener /var/spool/postfix/private/dovecot-lmtp {
     mode = 0600
     user = postfix
     group = postfix
     }
}
Once that part is edited, find the service auth section and replace it with the following snippet:
service auth {
     unix_listener /var/spool/postfix/private/auth {
     mode = 0666
     user = postfix
     group = postfix
}

unix_listener auth-userdb {
     mode = 0600
     user = vmail

}
user = dovecot
}
Then change the service auth-worker section to the following:
service auth-worker {
user = vmail
}
Save and close the file.
Set the correct permissions of the Dovecot configuration files:
chown -R vmail:dovecot /etc/dovecot
chmod -R o-rwx /etc/dovecot
Enable the Dovecot service to start on server boot, and restart Dovecot so that all of these new configuration files are in effect:
systemctl enable dovecot
systemctl restart dovecot
Step 7. Install PostfixAdmin
Now that all of our required software is installed and configured, let’s install and configure PostfixAdmin and finish this tutorial.
Download the latest available version of PostfixAdmin from Github and extract it in the /var/www/html/postfixadmin directory.
apt-get install git
cd  /var/www/html/
git clone https://github.com/postfixadmin/postfixadmin.git
Edit the /var/www/html/postfixadmin/config.local.php file and add these lines:
vi /var/www/html/postfixadmin/config.local.php
<?php
$CONF['database_type'] = 'mysqli';
$CONF['database_host'] = 'localhost';
$CONF['database_user'] = 'postfixadmin';
$CONF['database_password'] = 'Strong_Password';
$CONF['database_name'] = 'postfixadmin';
$CONF['configured'] = true;
$CONF['encrypt'] = 'md5crypt';
?>
Replace Strong_Password with the MariaDB user password.
mkdir /var/www/html/postfixadmin/templates_c

chown -R www-data: /var/www/html/postfixadmin
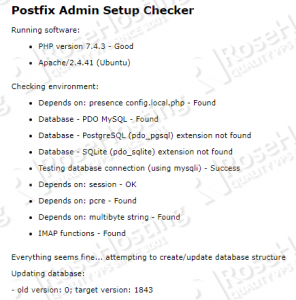
Open http://your_server_IP/postfixadmin/public/setup.php . Check if everything is okay and make sure that there are no errors:
Scroll down and enter your new setup password twice. Make sure to choose a strong one:
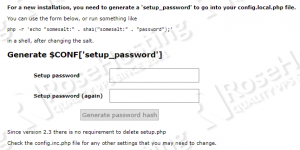
Then click on the ‘Generate password hash’ button.
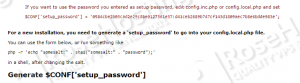
Edit the config.local.php file and add the generated hash to it:
$CONF['setup_password'] = '0584cbe2b03cad2e29c8be0127361e37:d41ceb2689b747cf143d1809aec7b8e6bdde983e';
Replace the hash shown in the example with the one generated for your instance.
Save the config.local.php file, open the setup page once again and create a PostfixAdmin admin user account. The setup password in that page is the same password you used in the previous step, so fill the other required fields such as the admin email address and password, then click on the ‘Add admin’ button.
That’s it! The PostfixAdmin installation is complete.
Open http://your_server_IP/postfixadmin/login.php in your preferred web browser. You’ll see the login page:

Log in as the admin user and add the domains hosted on the server:
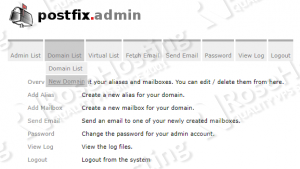
Once you do that, then you can create email addresses, set a mail quota, and so on:
 That is everything you’ll need to install, configure, and start using your PostfixAdmin install on your Ubuntu 20.04 VPS.
 This install process is very involved and is quite easy to mess up and end up with a botched install of Postfix, Dovecot, or both. However, if you have a Managed Ubuntu VPS hosting with us, you won’t need to do anything more than ask us to install it for you, Our team of support experts will completely install and configure all aspects of your server so that Postfix, Dovecot, and PostfixAdmin all work flawlessly. They can also help set up routine maintenance and optimize your server to maximize its speed.
We would appreciate you sharing this on social media if you found this tutorial useful. Or, you can write a comment letting us know how the install went, and if PostfixAdmin helped you manage your mail server more easily. Thanks!
I did everything, even cutting and pasting into the terminal and at the end I get:
The Postfix Admin directory layout changed.
Please update your webserver config so that the DocumentRoot or Alias points to the directory “public”.
You need to change your webserver configuration so the DocumentRoot is …/path/to/postfixadmin/public
Hi
Please can you shed some light on an issue I am getting?
After making sure everything works in the setup.php page and adding the hash and password to the file mentioned, and I go back to setup.php I am still on the same hash/password creation, how or where do I get to create the admin account to login on the login.php page?
After you generate a new hash password, a new option for creating a Superuser account will appear on the same setup.php page (without refreshing the page in your browser).
Add the new hash password in the config.local.php and then create the new Superuser account.
So if I refreshed or created a new setup password I will need to use that one instead, and then use the superuser option (without refreshing) as I did refresh it :(
Ok I tried it again just as you say and I am not getting a prompt or any link or option to create a superuser account.
I have not refreshed, I went to the same page on another tab nothing there, and nothing on the page I am on still.
Ok I am still not seeing it, I have gone over everything and made sure all steps are covered and all services are working.
When I generate the new hash, I simply do not get another option for creating a suerperuser or admin account, it is the only step now stopping from going further.
Please make sure that the folder permissions are properly setup.
hi,
howto configure thunerbird with dovecot, please ?
Click Tools -> Account Settings -> Account Actions -> Add Mail Account. Enter your e-mail credentials there, thunderbird will recognize the settings of your e-mail server.
I followed this instruction but when I tried to add an account to my thunderbird there is an error on the server
postfix/smtpd[2472]: improper command pipelining after EHLO from unknown[IP]: QUIT\r\n
what could be the possible solution for this?
Open the /etc/dovecot/conf.d/10-master.conf file and check the ports defined next to ‘inet_listener imap’.
Thanks for this instructions. I can’t authenticate with telnet or thunderbird. I think the password can’t read from sql-database.
telnet localhost imap
Trying 127.0.0.1…
Connected to localhost.
Escape character is ‘^]’.
* OK [CAPABILITY IMAP4rev1 SASL-IR LOGIN-REFERRALS ID ENABLE IDLE LITERAL+ STARTTLS AUTH=PLAIN AUTH=LOGIN] Dovecot (Ubuntu) ready.
login test@example.com test12
login BAD First parameter in line is IMAP’s command tag, not the command name. Add that before the command, like: a login user pass
Have you any idea?
Check your login format it should be “a login username password”.
I have exactly the same problem like before: postfix/smtpd[2472]: improper command pipelining after EHLO from unknown[IP]: QUIT\r\n
Then I have checked the /etc/dovecot/conf.d/10-master.conf file, but I don’t see any mistakes. Can you give me a tip?
Open the /etc/dovecot/conf.d/10-master.conf file and check the ports defined next to ‘inet_listener imap’.
Thank’s for your tip. Now the authentication failed, but I’m shure the password is correct.
>telnet localhost imap
Trying 127.0.0.1…
Connected to localhost.
Escape character is ‘^]’.
* OK [CAPABILITY IMAP4rev1 SASL-IR LOGIN-REFERRALS ID ENABLE IDLE LITERAL+ STARTTLS AUTH=PLAIN AUTH=LOGIN] Dovecot (Ubuntu) ready.
a login test@example.com start12
a NO [AUTHENTICATIONFAILED] Authentication failed.
Have you any idea?
Thank you for the tutorial, helped me a lot in configuring everything, but I have the same problem Daniel has.
With roundcube, I can’t logIn and when trying to login directly with telnet I do also recieve the message: a NO [AUTHENTICATIONFAILED] Authentication failed.
Maillog:
Aug 2 13:59:32 mein-host dovecot: imap-login: Disconnected (auth failed, 1 attempts in 2 secs): user=, method=PLAIN, rip=127.0.0.1, lip=127.0.1.1, session=
One thing to add:
I use my own certificate, created with certbot and loading the cert from within the dovecot configuration.
Output of dovecot -n:
https://pastebin.com/qWY5LPDu
dovecot -n Result:
https://pastebin.com/qWY5LPDu
I followed all the steps, when I try to enter the page,
http://localhost/postfixadmin/public/setup.php
it stays blank.
with the error in the apache
[client 127.0.0.1:42688] PHP Warning: require_once(/var/www/html/postfixadmin/vendor/autoload.php): failed to open stream: No such file or di>
php7:error] [pid 9261] [client 127.0.0.1:42688] PHP Fatal error: require_once(): Failed opening required ‘/var/www/html/postfixadmin/vendor/autoload.php’ (include_>
Can you help?
Please check the Apache virtual host for PostfixAdmin, and make sure that the /var/www/html/postfixadmin/vendor/autoload.php file actually exists.
vendor/autoload does not exist in the repository, although it’s clearly a dependency. Any idea why?
It seems that Postfixadmin GitHub repo was updated recently. To get this fixed, you can run install.sh in /var/www/html/postfixadmin/ then make sure that the permission is correct.
I followed these instructions as closely as I could with two exceptions–using apt to install postfixadmin (version 3.2.1-3), and setting the mail directory to /var/mail/vmail because that’s where the mail volume is mounted.
I’m having two problems that I suspect might be related. Thing one:
Feb 21 20:22:14 mailserver postfix/trivial-rewrite[2453]: warning: do not list domain republicofmean.com in BOTH virtual_alias_domains and virtual_mailbox_domains
This will eventually be a mail server for “rcousins.com” and a few other domains. Thus I have “petro@rcousins.com” set up as a main account:
MariaDB [postfixadmin]> select * from mailbox
-> ;
+——————–+————————————+——-+———————+——-+————+————–+———————+———————+——–+——-+——————+——-+———————+
| username | password | name | maildir | quota | local_part | domain | created | modified | active | phone | email_other | token | token_validity |
+——————–+————————————+——-+———————+——-+————+————–+———————+———————+——–+——-+——————+——-+———————+
| petro@rcousins.com | $1$removed | Petro | rcousins.com/petro/ | 0 | petro | rcousins.com | 2022-02-21 20:35:04 | 2022-02-21 20:35:04 | 1 | | petro@bounty.org | | 2022-02-21 20:35:04 |
+——————–+————————————+——-+———————+——-+————+————–+———————+———————+——–+——-+——————+——-+———————+
But I get:
Feb 21 20:36:25 mailserver postfix/error[2531]: 24B2E122C81: to=, orig_to=, relay=none, delay=0.07, delays=0.05/0.01/0/0.01, dsn=5.1.1, status=bounced (User unknown in virtual alias table)
I have tried this both with, and without a specific alias:
MariaDB [postfixadmin]> select * from alias;
+——————————-+——————————————-+——————–+———————+———————+——–+
| address | goto | domain | created | modified | active |
+——————————-+——————————————-+——————–+———————+———————+——–+
| petro@rcousins.com | petro@rcousins.com | rcousins.com | 2022-02-21 20:35:04 | 2022-02-21 20:35:04 | 1 |
| petro@republicofmean.com | petro@rcousins.com | republicofmean.com | 2022-02-21 20:46:42 | 2022-02-21 20:46:42 | 1 |
+——————————-+——————————————-+——————–+———————+———————+——–+
What did I miss?
Check the “mydestination” value set on /etc/postfix/main.cf. It should be like this “mydestination = localhost”. Please make sure to restart postfix whenever you made changes.
Already set to that:
mydestination = localhost
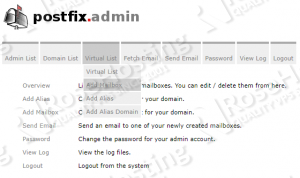
The “User unknown in virtual alias table” in one of the errors you provided means the mailbox does NOT exist on your server. You need to make sure it is created in the Postfixadmin panel by clicking Virtual List->Add Mailbox.
Thanks for the excellent guide
If anyone has with dovecot authenticating clients, note that current postconfig defaults to blowfish-crypt for user passwords, so you would need to change the default_pass_scheme line in /etc/dovecot/dovecot-sql.conf.ext to
default_pass_scheme = BLF-CRYPT
Hello good evening
I have a problem, I follow all the steps in the tutorial, but when I go to
http://your_server_IP/postfixadmin/public/setup.php
I get a blank screen and I can’t continue with the process.
Could you help me? Thank you so much.
Please check the logs and provide us with more information on the issue appearing on the logs.
Forgive my ignorance.
Where can I find the log about this type of failure?
I go to /var/log but I get several logs, which one should I look at?
Thank you
You can check the /var/log/apache2/error.log.
Okay thank you very much.
I just looked at the log file, and this is what I get.
I’m pretty new and I don’t understand anything from that log.
Attach the file:
[Thu May 19 00:00:42.303185 2022] [mpm_prefork:notice] [pid 767] AH00163: Apache/2.4.41 (Ubuntu) OpenSSL/1.1.1f configured — resuming normal operations
[Thu May 19 00:00:42.303263 2022] [core:notice] [pid 767] AH00094: Command line: ‘/usr/sbin/apache2’
[Thu May 19 00:30:09.362837 2022] [php7:error] [pid 2715] [client 193.106.191.48:38570] script ‘/var/www/html/index.php’ not found or unable to stat
[Thu May 19 01:46:58.549009 2022] [php7:error] [pid 2708] [client 46.161.27.204:37430] script ‘/var/www/html/wp-login.php’ not found or unable to stat
[Thu May 19 03:42:16.084648 2022] [php7:error] [pid 2714] [client 194.126.177.54:50360] script ‘/var/www/html/wp-login.php’ not found or unable to stat
[Thu May 19 03:42:16.713031 2022] [php7:error] [pid 2689] [client 194.126.177.54:51074] script ‘/var/www/html/wp-login.php’ not found or unable to stat
[Thu May 19 03:42:17.328379 2022] [php7:error] [pid 2693] [client 194.126.177.54:52074] script ‘/var/www/html/wp-login.php’ not found or unable to stat
[Thu May 19 04:08:51.873476 2022] [php7:error] [pid 2691] [client 52.176.136.47:56170] script ‘/var/www/html/xmlrpc.php’ not found or unable to stat
[Thu May 19 04:11:28.510507 2022] [php7:error] [pid 3956] [client 52.176.136.47:54474] script ‘/var/www/html/xmlrpc.php’ not found or unable to stat
[Thu May 19 04:51:10.658503 2022] [core:error] [pid 2714] [client 193.106.191.48:52700] AH00126: Invalid URI in request POST /cgi-bin/.%2e/.%2e/.%2e/.%2e/bin/sh HTTP/1.1
[Thu May 19 06:43:34.636146 2022] [php7:error] [pid 2714] [client 198.211.116.247:10112] script ‘/var/www/html/wp-login.php’ not found or unable to stat
[Thu May 19 08:42:12.001958 2022] [php7:error] [pid 2692] [client 188.166.241.4:55978] script ‘/var/www/html/system_api.php’ not found or unable to stat
[Thu May 19 08:42:13.323803 2022] [php7:error] [pid 2714] [client 188.166.241.4:48942] script ‘/var/www/html/system_api.php’ not found or unable to stat
[Thu May 19 09:30:21.724385 2022] [php7:error] [pid 2690] [client 193.106.191.48:55784] script ‘/var/www/html/index.php’ not found or unable to stat
[Thu May 19 12:16:40.839195 2022] [php7:error] [pid 2693] [client 172.68.146.36:14896] script ‘/var/www/html/xmlrpc.php’ not found or unable to stat
[Thu May 19 12:35:31.753302 2022] [php7:error] [pid 2691] [client 103.20.221.175:59808] script ‘/var/www/html/index.php’ not found or unable to stat
[Thu May 19 15:03:35.790083 2022] [php7:error] [pid 2715] [client 199.195.248.41:55712] script ‘/var/www/html/wp-comments-post.php’ not found or unable to stat
[Thu May 19 16:41:32.544560 2022] [php7:error] [pid 2714] [client 20.29.48.70:55723] script ‘/var/www/html/wp-plain.php’ not found or unable to stat, referer: www.google.com
[Thu May 19 16:41:36.267837 2022] [php7:error] [pid 2689] [client 20.29.48.70:53423] script ‘/var/www/html/ntypdvuj.php’ not found or unable to stat, referer: www.google.com
[Thu May 19 16:41:40.247524 2022] [php7:error] [pid 3956] [client 20.29.48.70:60800] script ‘/var/www/html/wp-plain.php’ not found or unable to stat, referer: www.google.com
[Thu May 19 16:41:43.566257 2022] [php7:error] [pid 2708] [client 20.29.48.70:58934] script ‘/var/www/html/ntypdvuj.php’ not found or unable to stat, referer: www.google.com
[Thu May 19 16:48:23.275687 2022] [php7:error] [pid 3956] [client 81.130.154.13:55594]
script ‘/var/www/html/xmlrpc.php’ not found or unable to stat
[Thu May 19 18:27:22.863696 2022] [php7:error] [pid 2715] [client 151.106.35.235:60270] script ‘/var/www/html/wp-login.php’ not found or unable to stat
[Thu May 19 18:41:26.250408 2022] [php7:error] [pid 2714] [client 185.104.44.58:21596] script ‘/var/www/html/wp-login.php’ not found or unable to stat
[Thu May 19 18:43:54.830532 2022] [php7:error] [pid 2690] [client 88.214.43.118:47160] script ‘/var/www/html/phpinfos.php’ not found or unable to stat
[Thu May 19 18:43:54.997445 2022] [php7:error] [pid 2693] [client 88.214.43.118:37858] script ‘/var/www/html/phpinfos.php’ not found or unable to stat
[Thu May 19 20:32:01.081383 2022] [php7:warn] [pid 2715] [client 83.42.83.73:59411] PHP Warning: require_once(/var/www/html/postfixadmin/vendor/autoload.php): failed to open stream: No such file or directory in /var/www/html/postfixadmin/common.php on line 3
[Thu May 19 20:32:01.081557 2022] [php7:error] [pid 2715] [client 83.42.83.73:59411] PHP Fatal error: require_once(): Failed opening required ‘/var/www/html/postfixadmin/vendor/autoload.php’ (include_path=’.:/usr/share/php’) in /var/www/html/postfixadmin/common.php on l>
The truth is that none of the hours that the log puts matches the hours of my connections.
Try these steps:
Go to the Postfixadmin Directory:
cd /var/www/html/postfixadmin/Execute this command:
bash install.shAfter the installation try to access your Postfixadmin setup page again.
Hello Goodnight
I just followed the steps you told me, apparently a php plugin was missing.
php extension ext-sqlite3.
I installed it and everything works fine.
problem solved following your steps
Thank you very much for your great help.
I believe I’ve followed every step correctly. I’m using 3.11 dev. I ran install.sh, then did the setup as per the READMEs and the instructions in setup.php as displayed.
When I add a user (either as a virtual user or as a regular one) it creates an Mbox in /var/mail named /var/mail/username – example /var/mail/johnson. What I want it to do is create /var/mail/virtualdomain and /var/mail/virtualdomain/username.
In all the instructions I’m not seeing something that would accomplish that for postfix or postfixadmin, only for dovecot. How do I debug / fix this?
Second, when I delete a user, /var/mail/username is not removed. How do I debug/fix this?
I have verified Maildir is set in MariaDB:
MariaDB [postfixadmin]> select username,maildir from mailbox;
+——————–+———————+
| username | maildir |
+——————–+———————+
| gavron@mydomain.com | mydomain.com/gavron/ |
+——————–+———————+
1 row in set (0.001 sec)
There are no errors in the access or error log, just seems normal: (ips redacted)
– – [26/May/2022:22:13:10 +0000] “GET /postfixadmin/public/list-virtual.php HTTP/1.1” 200 2802 “http://server-ip-here/postfixadmin/public/list-virtual.php?domain=arivaca.com” “Mozilla/5.0 (X11; Linux x86_64) AppleWebKit/537.36 (KHTML, like Gecko) Chrome/101.0.4951.64 Safari/537.36”
– – [26/May/2022:22:13:13 +0000] “GET /postfixadmin/public/edit.php?table=mailbox HTTP/1.1” 200 3039 “http://209.104.7.35/postfixadmin/public/list-virtual.php” “Mozilla/5.0 (X11; Linux x86_64) AppleWebKit/537.36 (KHTML, like Gecko) Chrome/101.0.4951.64 Safari/537.36”
– – [26/May/2022:22:14:03 +0000] “POST /postfixadmin/public/edit.php?table=mailbox HTTP/1.1” 302 368 “http://209.104.7.35/postfixadmin/public/edit.php?table=mailbox” “Mozilla/5.0 (X11; Linux x86_64) AppleWebKit/537.36 (KHTML, like Gecko) Chrome/101.0.4951.64 Safari/537.36”
– – [26/May/2022:22:14:04 +0000] “GET /postfixadmin/public/list-virtual.php HTTP/1.1” 200 3254 “http://209.104.7.35/postfixadmin/public/edit.php?table=mailbox” “Mozilla/5.0 (X11; Linux x86_64) AppleWebKit/537.36 (KHTML, like Gecko) Chrome/101.0.4951.64 Safari/537.36”
Any help would be greatly appreciated!
Thanks,
Ehud Gavron
Tucson Arizona
We are not sure what you want to accomplish but if you follow the guide thoroughly you should be able to set up a working mail server with Postfixadmin.