In this tutorial, we are going to provide you with step-by-step instructions on how to install as well as configure the CyberPanel control panel on an Ubuntu 18.04 VPS.
![]() CyberPanel is an open-source web hosting control panel that uses OpenLiteSpeed as a web server. CyberPanel is a next-generation web hosting platform specially designed for speed, security, and stability. CyberPanel is completely free and supports an unlimited number of domains/subdomains. CyberPanel comes with a wide range of features, including:
CyberPanel is an open-source web hosting control panel that uses OpenLiteSpeed as a web server. CyberPanel is a next-generation web hosting platform specially designed for speed, security, and stability. CyberPanel is completely free and supports an unlimited number of domains/subdomains. CyberPanel comes with a wide range of features, including:
- Built-in support for mod_security,
- One click SSL,
- Email limits,
- Rainloop Webmail, LSCache,
- Auto Installer,
- Git and many more.
Let’s begin with the installation.
Table of Contents
Prerequisites
- An Ubuntu 18.04 VPS with root access enabled or a user with sudo privileges. We’ll be using our SSD 2 VPS for this.
- Minimum of 1 GB RAM (2 GB RAM is recommended)
- Minimum 10 GB free disk space (about 40 GB of free disk space is recommended)
Step 1: Connect via SSH and Update the OS
Log in to our Ubuntu server using SSH as the root user (or as a user with sudo privileges). You can do that by entering this command:
ssh root@Server_IP_Address -p Port_Number
Remember to replace ‘root’ with your username if you are not using the root user. Also, replace Server_IP_Address and Port_Number with your actual server IP address and SSH port number.
Once you are logged in, you should update all of your OS packages to their latest available version.
apt-get update
apt-get upgrade
Step 2: Download and Install CyberPanel
It is recommended to have a minimal install base of OS packages, so stop and uninstall Apache, MySQL, Postfix, Dovecot, etc. and delete their configuration files:
systemctl stop apache2
systemctl stop mysql
systemctl stop postfix
systemctl stop dovecot
apt-get purge apache2* libapache2* mysql-client* mysql-common* mysql-server* postfix* dovecot*
apt-get autoremove
apt-get clean
rm -rf /var/lib/mysql
You can now download the latest version of CyberPanel installer script with:
cd /opt
wget -O installer.sh https://cyberpanel.net/install.sh
chmod 755 installer.sh
After downloading the installer script, run the command below to begin the installation:
sh installer.sh
During the installation, you should see a series of prompts. Choose the appropriate options to finish the installation:
Checking root privileges...
You are runing on root...
Checking OS...
Detecting Ubuntu 18.x...
Pre-flight check completed...
Process check completed...
CyberPanel Installer v2.0

1. Install CyberPanel.

2. Install Addons.

3. Exit.


Please enter the number[1-3]: 1
Now, enter the number “1” and hit [ENTER].
The next step will look as follows:
CyberPanel Installer v2.0

RAM check : 108/985MB (10.96%)

Disk check : 4/30GB (15%) (Minimal 10GB free space)

1. Install CyberPanel with OpenLiteSpeed.

2. Install Cyberpanel with LiteSpeed Enterprise.

3. Exit.

Please enter the number[1-3]: 1
Enter the number “1” and hit [ENTER] once again.
After that, the script should start downloading and installing the packages that you’re about to choose.
Install minimal service for CyberPanel? This will skip PowerDNS, Postfix and Pure-FTPd.
Minimal installation [y/N]: N

Do you wish to install Postfix?
Postfix installation [Y/n]: Y

Do you wish to install PowerDNS?
PowerDNS installation [Y/n]: Y

Do you wish to install Pure-FTPd?
Pure-FTPd installation [Y/n]: Y

Please choose to use default admin password 1234567, randomly generate one (recommended) or specify the admin password?
Choose [d]efault, [r]andom or [s]et password: [d/r/s] d

Admin password will be set as 1234567

Replace JS/CSS files to JS Delivr?
This may improve panel loading speed in Asia Pacific region...
Please select [y/N]: y

Install Memcached extension for PHP?
Please select [y/N]: y

Install LiteSpeed Memcached?
Please select [y/N]: y

Install Redis extension for PHP?
Please select [y/N]: y

Install Redis?
Please select [y/N]: y
Once the installation has been completed, you should see a screen similar to the below with the administrator logon details:
###################################################################
CyberPanel Successfully Installed

Current Disk usage : 6/30GB (24%)

Current RAM usage : 258/985MB (26.19%)

Installation time : 0 hrs 56 min 53 sec

Visit: https://your_server_IP:8090
Panel username: admin
Panel password: 1234567

Please change your default admin password
If you need to reset your panel password, please run:
adminPass YOUR_NEW_PASSWORD

If you change mysql password, please modify file in
/etc/cyberpanel/mysqlPassword with new password as well

Website : https://www.cyberpanel.net
Forums : https://forums.cyberpanel.net
Wikipage: https://docs.cyberpanel.net

Enjoy your accelerated Internet by
CyberPanel & OpenLiteSpeed
###################################################################
Step 3: Access CyberPanel
Point your preferred web browser to https://your_server_IP:8090 and log in with your admin account. You are now ready to start using CyberPanel.
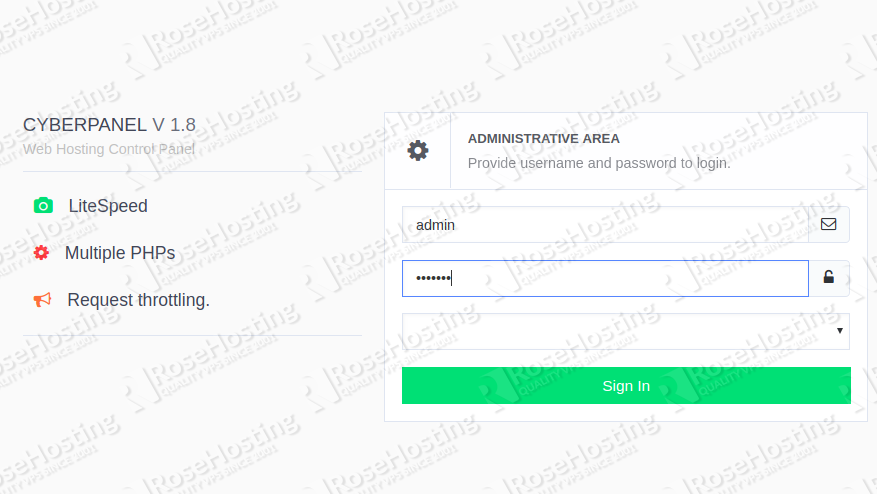
NOTE: Do not forget to reset your admin password – use a strong password.
From the above dashboard, you can add domains, create email accounts, databases, FTP accounts, add/modify DNS records, and so on.
![]() Of course, if you are one of our Managed Ubuntu Hosting customers, you don’t have to install and configure CyberPanel on your server – simply ask our admins, sit back, and relax. Our admins will install and configure CyberPanel on your server for you immediately.
Of course, if you are one of our Managed Ubuntu Hosting customers, you don’t have to install and configure CyberPanel on your server – simply ask our admins, sit back, and relax. Our admins will install and configure CyberPanel on your server for you immediately.
PS. If you liked this post on How to Install and Configure CyberPanel on an Ubuntu 18.04 VPS, please share it with your friends on the social networks using the buttons under the post, or simply leave a reply below. Thanks.
Thank You !
It’s working.