
In this tutorial, we will show you how to install and set up Apache Cassandra on a CentOS 7 VPS.

Apache Cassandra is a free and open-source, high performance, highly scalable distributed NoSQL database management system designed to handle a high volume of structured data across many commodity servers, providing high availability with no single point of failure. Cassandra is an excellent choice when downtime or data loss is unacceptable, where redundancy is key. Let’s begin with the installation.
Table of Contents
Prerequisites
- A Server running CentOS 7. For the purposes of this tutorial, we’ll be using one of our Managed CentOS 7 VPSes with 4GB of memory.
- SSH access with root privileges, or access to the “root” user itself.
For more information about the hardware requirements of Cassandra, please refer to their official website.
Step 1: Log in via SSH and Update
Log in to your CentOS 7 VPS with SSH as the root user:
ssh root@IP_Address -p Port_number
Replace “root” with a user that has sudo privileges if necessary. Additionally, replace “IP_Address” and “Port_Number” with your server’s respective IP address and SSH port.
Once that is done, you can check whether you have the proper CentOS 7 version installed on your server with the following command:
# cat /etc/redhat-release
You should get this output:
CentOS Linux release 7.6.1810 (Core)
Then, run the following command to make sure that all installed packages on the server are updated to their latest available versions:
# yum update
This ensures compatibility between packages.
Step 2: Install Java
Apache Cassandra requires Java, so we’ll need to install Java first.
# yum install java nano -y
Now, let’s check and confirm the Java installation result.
[root@centos2019 ~]# java -version
openjdk version "1.8.0_212"
OpenJDK Runtime Environment (build 1.8.0_212-b04)
OpenJDK 64-Bit Server VM (build 25.212-b04, mixed mode)
Step 3: Install Cassandra
The easiest way to install Apache Cassandra is from their official repository. Add the Apache repository of Cassandra to /etc/yum.repos.d/, for the latest 3.11 version. We’ll do this by opening a new file using nano (you can use a different text editor if you like):
# nano /etc/yum.repos.d/cassandra.repo
Then, add the following lines to the file:
[cassandra]
name=Apache Cassandra
baseurl=https://www.apache.org/dist/cassandra/redhat/311x/
gpgcheck=1
repo_gpgcheck=1
gpgkey=https://www.apache.org/dist/cassandra/KEYS
Don’t forget to save and exit the file to proceed with the installation.
# yum install cassandra
Accept all GPG key import when prompted.
The new packages have been automatically added, so let’s enable Apache Cassandra to automatically run on boot, and then run the service.
# systemctl enable cassandra
# systemctl start cassandra
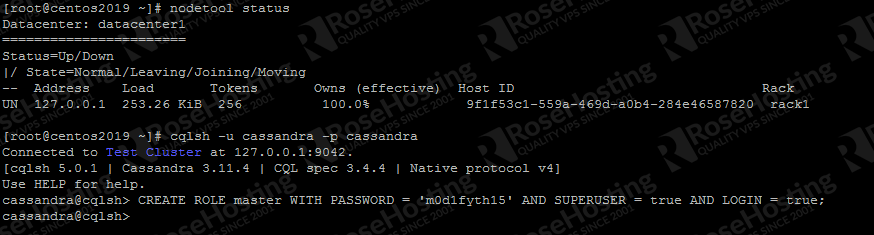
Check the status of the Cassandra cluster. We will use the nodetool program to show the status of Apache Cassandra:
[root@centos2019 ~]# nodetool status
Datacenter: datacenter1
=======================
Status=Up/Down
|/ State=Normal/Leaving/Joining/Moving
-- Address Load Tokens Owns (effective) Host ID Rack
UN 127.0.0.1 103.65 KiB 256 100.0% 9f1f53c1-559a-469d-a0b4-284e46587820 rack1
If you see UN in the output, then the cluster is working properly.
Step 4: Configure Apache Cassandra
Secure Cassandra
By default, you can log in to the cqlsh shell without a password, and for security purposes, we will change the configuration so that it requires a password.
# nano /etc/cassandra/conf/cassandra.yaml
Find and replace the authenticator value from “AllowAllAuthenticator” to “PasswordAuthenticator”
Don’t forget to restart Cassandra after saving and exiting the file.
# systemctl restart cassandra
Then, log in with the following command. You will then be able to add a new user:
# cqlsh -u cassandra -p cassandra

Now, let’s create a super administrator user, let’s run this command in cassandra shell
cassandra@cqlsh> CREATE ROLE master WITH PASSWORD = 'm0d1fyth15' AND SUPERUSER = true AND LOGIN = true;
cassandra@cqlsh> quit
With the command above, you created a super user named ‘master’ with ‘m0d1fyth15‘ as its password. Please replace the password to a stronger, more secure password when running the command.
Once a new super user is created, you can delete Cassandra’s default user by logging in to cqlsh using the newly created super user account. Once logged in, enter these commands:
master@cqlsh> ALTER ROLE cassandra WITH PASSWORD = 'cassandra' AND SUPERUSER = false AND LOGIN = false;
master@cqlsh> REVOKE ALL PERMISSIONS ON ALL KEYSPACES FROM cassandra;
Rename the Cluster
By default, Cassandra has “Test Cluster” as the cluster name. You can change the cluster name by doing the followings:
1. Run this command in your cqlsh shell:
UPDATE system.local SET cluster_name = '[Your_desired_cluster_name]' WHERE KEY = 'local';
2. Edit the /etc/cassandra/conf/cassandra.yaml file and replace the value in the ‘cluster_name’ with the one you like to set.
3. Invoke the command nodetool flush system from your CentOS shell, not the cqlsh shell.
4. Restart Cassandra with the command systemctl restart cassandra.
5. Log in to the cqlsh shell with the super user account to check and verify the cluster name changes.
That’s it. You have successfully installed and configured Apache Cassandra on a CentOS 7 machine. For more information about Apache Cassandra, you can follow their documentation at http://cassandra.apache.org/doc/latest/.
Follow this guide for installing Apache Cassandra on Ubuntu 20.04

Of course, you don’t have to know how to install Apache Cassandra on CentOS 7 if you have a CentOS 7 VPS hosted with us. If you do, you can simply ask our support team to install Apache Cassandra on CentOS 7 for you. They are available 24/7 and will be able to help you with the installation of Apache Cassandra, as well as any additional requirements that you may have. You might also want to consider our new guide: How to Install Apache Cassandra on CentOS 8.
PS. If you enjoy reading this blog post on how to install Apache Cassandra on CentOS 7, feel free to share it on social networks by using the shortcuts below or simply leave a comment down in the comments section. Thank you.