
In this tutorial, we’ll show you how to install Icinga 2, Icinga Web 2 and all the required components on a Debian 9 VPS.
 Icinga 2 is a modern open-source network monitoring application which can be used to monitor the network infrastructure and check the health of servers and their services. Icinga 2 is a branch of Nagios rewritten from scratch in C++. It is backwards-compatible with all existing Nagios plugins, add-ons, and the Nagios user interface. Icinga 2 has a user-friendly web interface, but it also comes with a command line interface that can be used to monitor networks, servers and services with specific commands.
Table of Contents
Prerequisites:
- For the purposes of this tutorial, we will use a Debian 9 virtual server.
- Full SSH root access or a user with sudo privileges is also required.
Step 1: Connect via SSH
Connect to your server via SSH as the root user using the following command:

ssh root@IP_ADDRESS -p PORT_NUMBER
Remember to replace “IP_ADDRESS” and “PORT_NUMBER” with your actual server IP address and SSH port number. Replace “root” with your admin username if you’re not planning on using the root account.
Step 2: Update the OS packages
Before starting with the installation, we need to update the OS packages to their latest versions.
We can do this by running the following commands:
apt-get update
apt-get upgrade
Once the upgrade is complete, we can move on to the next step.
Step 3: Install Icinga 2
We can install Icinga 2 from the Debian 9 package repository.
Run the following commands to install Icinga 2 on the server:
apt-get update
apt-get install icinga2 icinga2-studio vim-icinga2 monitoring-plugins-basic monitoring-plugins-common
Enable Icinga 2 to start on server boot:
systemctl enable icinga2.service
Run the following command to check the Icinga 2 version:
icinga2 --version
Output:
icinga2 - The Icinga 2 network monitoring daemon (version: r2.6.0-1)

Copyright (c) 2012-2016 Icinga Development Team (https://www.icinga.org/)
License GPLv2+: GNU GPL version 2 or later <http://gnu.org/licenses/gpl2.html>
This is free software: you are free to change and redistribute it.
There is NO WARRANTY, to the extent permitted by law.

Application information:
Installation root: /usr
Sysconf directory: /etc
Run directory: /run
Local state directory: /var
Package data directory: /usr/share/icinga2
State path: /var/lib/icinga2/icinga2.state
Modified attributes path: /var/lib/icinga2/modified-attributes.conf
Objects path: /var/cache/icinga2/icinga2.debug
Vars path: /var/cache/icinga2/icinga2.vars
PID path: /run/icinga2/icinga2.pid

System information:
Platform: Debian GNU/Linux
Platform version: 9 (stretch)
Kernel: Linux
Kernel version: 4.9.0-8-amd64
Architecture: x86_64

Build information:
Compiler: GNU 6.3.0
Build host: x86-ubc-01
In order to check if the Icinga 2 service is up and running, run the following command:
systemctl status icinga2.service
We should receive an output similar to this:
● icinga2.service - Icinga host/service/network monitoring system
Loaded: loaded (/lib/systemd/system/icinga2.service; enabled; vendor preset: enabled)
Active: active (running) since Sun 2019-05-26 02:53:29 EDT; 1min 5s ago
Main PID: 28688 (icinga2)
CGroup: /system.slice/icinga2.service
├─28688 /usr/lib/x86_64-linux-gnu/icinga2/sbin/icinga2 --no-stack-rlimit daemon -e /var/log/icinga2/error.log
└─28711 /usr/lib/x86_64-linux-gnu/icinga2/sbin/icinga2 --no-stack-rlimit daemon -e /var/log/icinga2/error.log
As we can see from the output, the Icinga 2 error log file is located in the /var/log/icinga2/ directory. The ‘error.log’ log file can be used to help troubleshoot problems with Icinga 2 configuration files, locate the cause of any crashes, etc.
Step 4: Install Icinga 2 CLI
We can install the Icinga 2 CLI tool from the Debian repository easily with just one command:
apt-get install icingacli
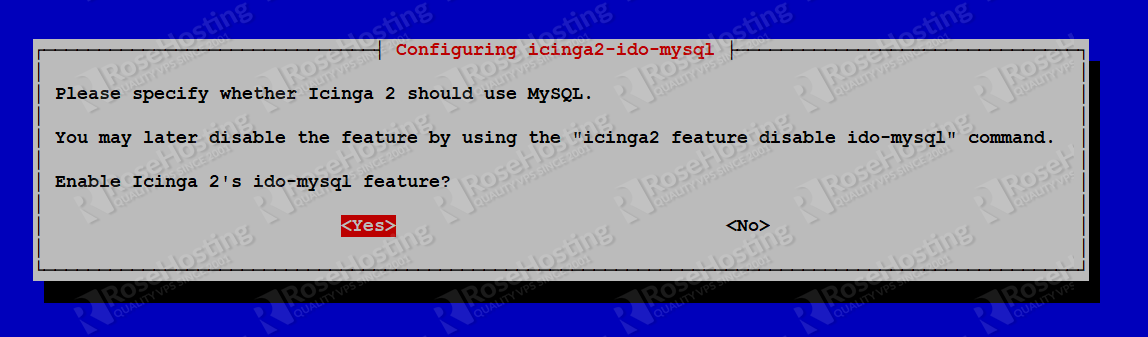
Step 5: Install MariaDB and IDO (Icinga Data Output) modules for MySQL/MariaDB
Install MariaDB and IDO modules for MySQL/MAriaDB:
apt-get install mariadb-common mariadb-server
apt-get install icinga2-ido-mysql
Restart the Icinga 2 service for the changes to take effect:
systemctl restart icinga2.service
Step 6: Create a Database for Icinga 2
Create a MariaDB database for Icinga 2:
mysql -u root -p
MariaDB [(none)]> CREATE DATABASE icinga2db;
MariaDB [(none)]> GRANT ALL PRIVILEGES ON icinga2db.* TO 'icinga2user'@'localhost' IDENTIFIED BY 'StrongPassword';
MariaDB [(none)]> FLUSH PRIVILEGES;
MariaDB [(none)]> exit;
Don’t forget to replace ‘StrongPassword’ with an actual strong password.
Step 7: Install Apache, PHP and Required PHP extensions
The default PHP version available from the official Debian 9 repository is PHP 7.0. Install PHP 7.0, along with some PHP extensions that are required for Icinga Web 2 to function correctly:
sudo apt-get update
sudo apt-get install apache2 libapache2-mod-php php7.0 php7.0-common php7.0-curl php7.0-gd php7.0-curl php7.0-dom php7.0-mysql php7.0-intl php-imagick
sudo a2enmod php7.0
Step 8: Configure PHP
Locate the PHP configuration file:
php -c /etc/php/7.0/apache2/ -i |grep "Loaded Configuration File"
The output should be something like this:
Loaded Configuration File => /etc/php/7.0/apache2/php.ini
Edit the php.ini configuration file using your preferred text editor:
vi /etc/php/7.0/apache2/php.ini
Add/modify the following options:
memory_limit = 256M
file_uploads = On
allow_url_fopen = On
allow_url_include = Off
post_max_size 32M
upload_max_filesize = 64M
max_execution_time = 300
default_charset = "UTF-8"
date.timezone = "America/Chicago"
Restart the Apache service for the changes to take effect:
systemctl restart apache2.service
Step 9: Install Icinga Web 2
Install the Icinga Web 2 PHP framework:
apt-get install icingaweb2
Create a system group named “icingaweb2”:
addgroup --system icingaweb2
Set the user ‘www-data’ as a member of the system group ‘icingaweb2’ so that Apache can have access to the files:
usermod -a -G icingaweb2 www-data
Generate a new setup token:
icingacli setup config directory --group icingaweb2
icingacli setup token create
Open http://server_IP/icingaweb2/setup (replace server_IP with your server’s public IP address) in your preferred web browser and follow the easy instructions:
- Enter the generated setup token and click on the ‘Next’ button.
- Select the modules that you need installed.
- Check if all of the requirements are met.
- Choose how you want to authenticate when accessing Icinga Web 2 (database, LDAP or external). For the purposes of this tutorial, we used database authentication, so on the next page, enter the MariaDB database name, username and password. After entering the data, click the ‘Validate Configuration’ button and if everything is OK, click ‘Next’.
- Select a backend name for the Icinga 2 web interface.
- Set a new administrative account or group for Icinga Web 2.
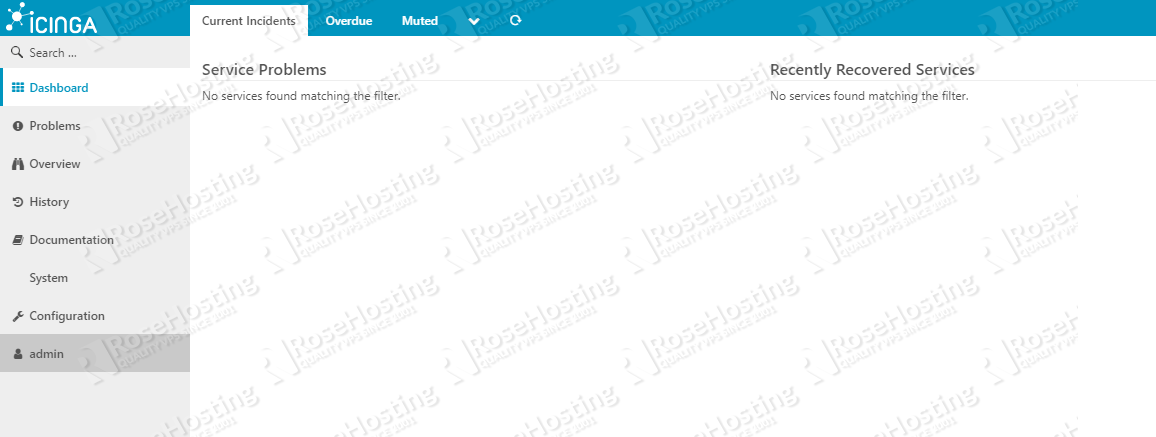
That is it – the Icinga 2 installation is now complete.
 Of course, you don’t have to install Icinga 2 on Debian 9 if you use one of our Managed Debian VPS Hosting services, in which case you can simply ask our expert Linux admins to install and configure Icinga 2 on Debian 9. They are available 24×7 and will take care of your request immediately.
PS. If you found this post on how to install Icinga 2 on Debian 9 helpful, please share it with your friends on the social networks using the share shortcuts below, or simply leave a comment down in the comments section. Thanks.