Dokuwiki is an open-source wiki software written in PHP, and it doesn’t require a database. It was developed by Andreas Gohr in 2004. Dokuwiki works on plain text files, and its syntax is similar to the one used by MediaWiki. With its simple yet powerful syntax, users can create structured texts easily, and it ensures the data files remain readable outside the wiki. In this tutorial, we will show you how to install Dokuwiki on Ubuntu 22.04.
Table of Contents
Prerequisites
- An Ubuntu 22.04 VPS
- SSH root access or a user with sudo privileges
Step 1. Log in to your server via SSH
First, you will need to log in to your Ubuntu 22.04 VPS via SSH as the root user:
ssh master@IP_Address -p Port_number
You will need to replace ‘IP_Address’ and ‘Port_number’ with your server’s respective IP address and SSH port number. Additionally, replace ‘master’ with the username of the system user with sudo privileges or ‘root.’
You can check whether you have the proper Ubuntu 22.04 installed on your server with the following command:
$ lsb_release -a
It will return an output like this.
No LSB modules are available.
Distributor ID: Ubuntu
Description: Ubuntu 22.04 LTS
Release: 22.04
Codename: jammy
Step 1. Install Nginx and PHP
We need to install the web server and PHP to proceed with installing Dokuwiki. In this post, we will use Nginx instead of Apache. So, let’s run the command below to install them. Also, according to Dokuwiki documentation at https://www.dokuwiki.org/requirements, using the latest version of the 7.4.x branch or 8.x is highly recommended to run a Dokuwiki website. Since the default PHP version in Ubuntu 22.04 is 8.1, we can proceed with the installation now.
$ sudo apt install wget unzip nginx-full php-{bcmath,cli,curl,fpm,gd,gmp,json,mbstring,snmp,xml,zip}
On Ubuntu 22.04, Nginx is configured to start running upon installation; you can check them by running this command:
$ sudo systemctl status nginx --lines=0
Please note unlike any other wiki software, Dokuwiki does not need a database server. All data are stored in PHP files, and this speeds up the website itself.
Step 2. Download Dokuwiki
To download the latest stable version, you can check their download page at https://download.dokuwiki.org/
Execute the commands below to download the Dokuwiki file and extract it.
$ sudo wget https://download.dokuwiki.org/src/dokuwiki/dokuwiki-stable.tgz -O /tmp/dokuwiki.tgz
$ sudo mkdir /var/www/html/dokuwiki
$ sudo tar xvf /tmp/dokuwiki.tgz --strip-components=1 -C /var/www/html/dokuwiki
Next, let’s give the directory and its contents the correct permission.
$ sudo chown -R www-data. /var/www/html/dokuwiki
Step 3. Install Certbot
We are going to host our Dokuwiki website in HTTPS and in this step we will show you how to install a free SSL certificate from Let’s Encrypt using cerbot.
$ sudo apt install python3-certbot-nginx
Next, let’s invoke this command below. Make sure to replace wiki.yourdomain.com with your actual domain or subdomain name.
$ sudo certbot certonly -d wiki.yourdomain.com
It should look like this:
master@wiki:~$ sudo certbot certonly -d wiki.yourdomain.com
Saving debug log to /var/log/letsencrypt/letsencrypt.log

How would you like to authenticate with the ACME CA?
- - - - - - - - - - - - - - - - - - - - - - - - - - - - - - - - - - - - - - - -
1: Nginx Web Server plugin (nginx)
2: Spin up a temporary webserver (standalone)
3: Place files in webroot directory (webroot)
- - - - - - - - - - - - - - - - - - - - - - - - - - - - - - - - - - - - - - - -
Select the appropriate number [1-3] then [enter] (press 'c' to cancel): 1
Enter email address (used for urgent renewal and security notices)
(Enter 'c' to cancel): you@yourdomain.com

- - - - - - - - - - - - - - - - - - - - - - - - - - - - - - - - - - - - - - - -
Please read the Terms of Service at
https://letsencrypt.org/documents/LE-SA-v1.2-November-15-2017.pdf. You must
agree in order to register with the ACME server. Do you agree?
- - - - - - - - - - - - - - - - - - - - - - - - - - - - - - - - - - - - - - - -
(Y)es/(N)o: y

- - - - - - - - - - - - - - - - - - - - - - - - - - - - - - - - - - - - - - - -
Would you be willing, once your first certificate is successfully issued, to
share your email address with the Electronic Frontier Foundation, a founding
partner of the Let's Encrypt project and the non-profit organization that
develops Certbot? We'd like to send you email about our work encrypting the web,
EFF news, campaigns, and ways to support digital freedom.
- - - - - - - - - - - - - - - - - - - - - - - - - - - - - - - - - - - - - - - -
(Y)es/(N)o: n
Account registered.
Requesting a certificate for wiki.yourdomain.com

Successfully received certificate.
Certificate is saved at: /etc/letsencrypt/live/wiki.yourdomain.com/fullchain.pem
Key is saved at: /etc/letsencrypt/live/wiki.yourdomain.com/privkey.pem
This certificate expires on 2022-11-11.
These files will be updated when the certificate renews.
Certbot has set up a scheduled task to automatically renew this certificate in the background.

- - - - - - - - - - - - - - - - - - - - - - - - - - - - - - - - - - - - - - - -
If you like Certbot, please consider supporting our work by:
* Donating to ISRG / Let's Encrypt: https://letsencrypt.org/donate
* Donating to EFF: https://eff.org/donate-le
- - - - - - - - - - - - - - - - - - - - - - - - - - - - - - - - - - - - - - - -
master@wiki:~$
As seen in the output, we need these paths below to configure our Dokuwiki nginx server block.
Certificate is saved at: /etc/letsencrypt/live/wiki.yourdomain.com/fullchain.pem
Key is saved at: /etc/letsencrypt/live/wiki.yourdomain.com/privkey.pem
Step 4. Configure Nginx
Nginx has a default server block, and we are going to delete it and create a new server block for our Dokuwiki website.
$ sudo rm /etc/nginx/sites-enabled/default -f
$ sudo nano /etc/nginx/sites-enabled/dokuwiki.conf
Paste the following in to the file. Again, make sure to replace wiki.yourdomain.com with your actual domain or subdomain name.
server {
listen 80;
server_name wiki.yourdomain.com;
return 301 https://$server_name$request_uri;
}

server {
listen 443 ssl;
ssl_certificate /etc/letsencrypt/live/wiki.yourdomain.com/fullchain.pem;
ssl_certificate_key /etc/letsencrypt/live/wiki.yourdomain.com/privkey.pem;

server_name wiki.yourdomain.com;

# Maximum file upload size is 4MB - change accordingly if needed
client_max_body_size 4M;
client_body_buffer_size 128k;

root /var/www/html/dokuwiki;
index doku.php;

#Remember to comment the below out when you're installing, and uncomment it when done.
#location ~ /(conf/|bin/|inc/|vendor/|install.php) { deny all; }

#Support for X-Accel-Redirect
location ~ ^/data/ { internal ; }

location ~ ^/lib.*\.(js|css|gif|png|ico|jpg|jpeg)$ {
expires 365d;
}

location / { try_files $uri $uri/ @dokuwiki; }

location @dokuwiki {
# rewrites "doku.php/" out of the URLs if you set the userwrite setting to .htaccess in dokuwiki config page
rewrite ^/_media/(.*) /lib/exe/fetch.php?media=$1 last;
rewrite ^/_detail/(.*) /lib/exe/detail.php?media=$1 last;
rewrite ^/_export/([^/]+)/(.*) /doku.php?do=export_$1&id=$2 last;
rewrite ^/(.*) /doku.php?id=$1&$args last;
}

location ~ \.php$ {
try_files $uri $uri/ /doku.php;
include fastcgi_params;
fastcgi_param SCRIPT_FILENAME $document_root$fastcgi_script_name;
fastcgi_param REDIRECT_STATUS 200;
fastcgi_pass unix:/var/run/php/php7.4-fpm.sock;
}
}
Save the file then restart nginx
$ sudo systemctl restart nginx
Step 5. Install Dokuwiki
This is the last step. We can do the Dokuwiki installation through the web installer. Open your favorite web browser, then navigate to https://wiki.yourdomain.com/install.php
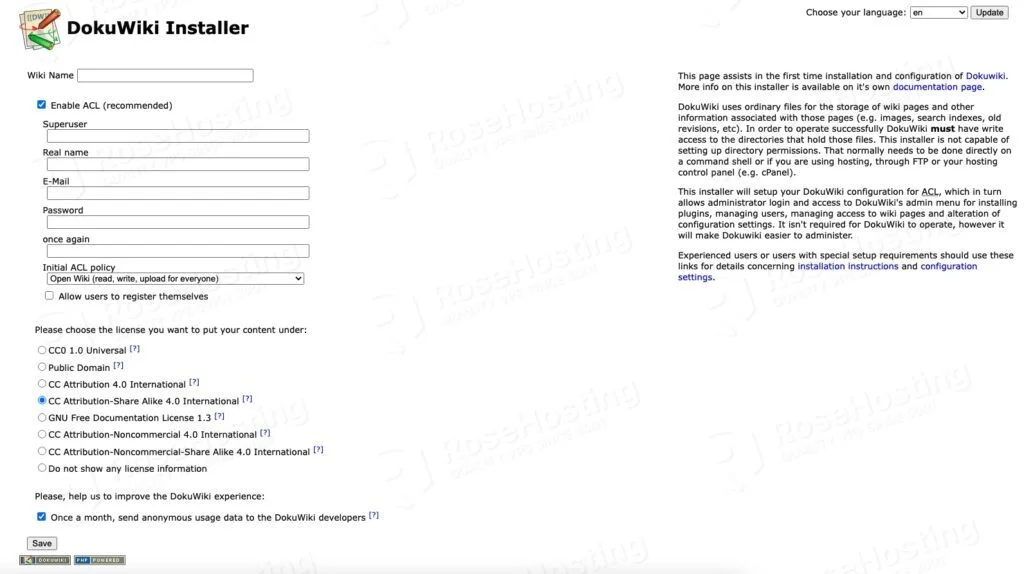
Fill the required fields then click on Save button.
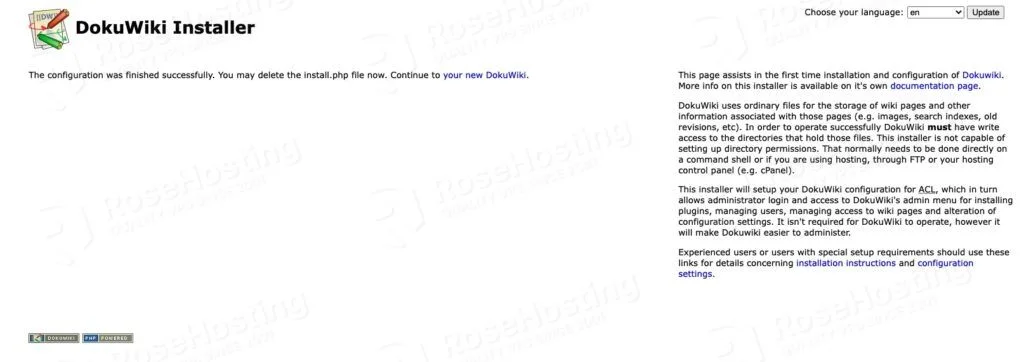
That’s it, you finished the installation.
Once completed, you would want to restrict the access to some of your Dokuwiki files. We need to edit the nginx server block for our wiki.yourdomain.com
$ sudo nano /etc/nginx/sites-enabled/dokuwiki.conf
Find this line
#location ~ /(conf/|bin/|inc/|vendor/|install.php) { deny all; }
Uncomment it, and it should look like this
location ~ /(conf/|bin/|inc/|vendor/|install.php) { deny all; }
Save the file then reload nginx
$ sudo systemctl reload nginx
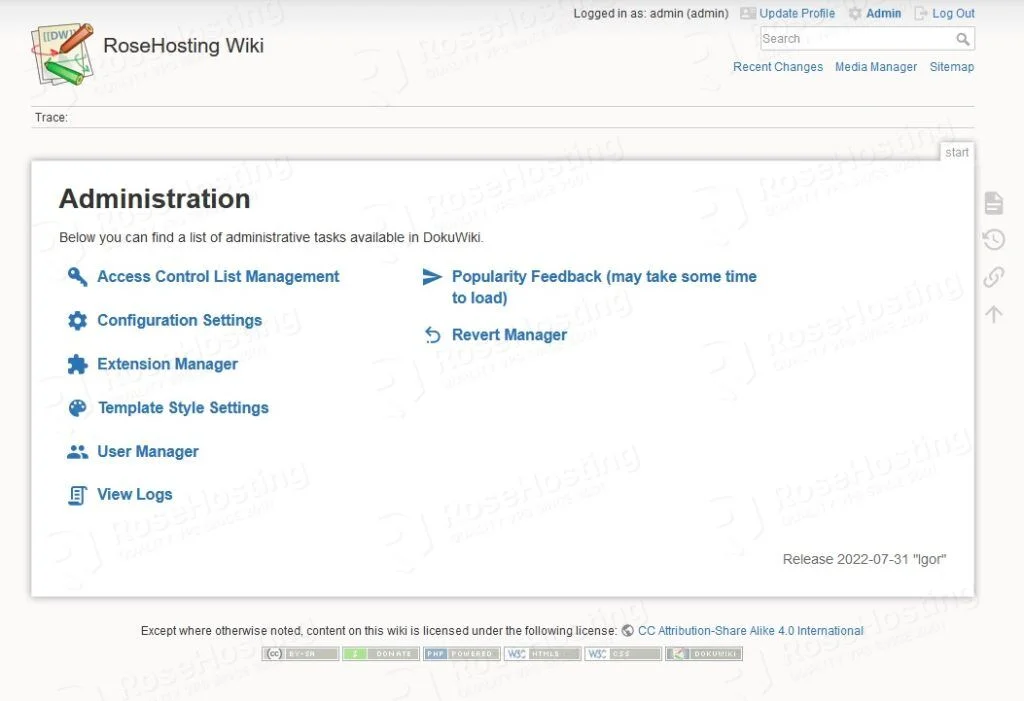
You can now start creating pages by logging in to the admin section of the website.
Congratulations! You have successfully installed Dokuwiki on Ubuntu 22.04.
Of course, if you are one of our Ubuntu Hosting customers, you don’t have to install Dokuwiki on Ubuntu 22.04 on your own – simply ask our admins, sit back, and relax. Our admins will install Dokuwiki on Ubuntu 22.04 for you immediately, along with many useful optimizations that we can do for you. Installing Dokuwiki on Ubuntu 22.04 is not just about the work, we can also help you with optimizing your Dokuwiki instance if you have a VPS with us.
If you liked this post about how to Install Dokuwiki on Ubuntu 22.04, please share it with your friends on social networks or simply leave a comment in the comments section. Thanks.