ERPNext is an open-source ERP (Enterprise Resource Planning) system aimed at small and medium-sized businesses. Frappé Technologies develops the software.
It includes modules like accounting, CRM, purchasing, sales, website, e-commerce, POS, inventory, project management, etc.
This web-based application helps small and medium-sized businesses manage their accounting, sales, purchase, and inventory tasks.
This tutorial will show you how to install ERPNext on Ubuntu 22.04.
Table of Contents
Prerequisites
- An Ubuntu 22.04 VPS with at least 2GB of RAM
- root access or a user with sudo privileges
- A fully qualified domain or subdomain name
Step 1: Log in to your server via SSH
First, you will need to log in to your Ubuntu 22.04 VPS via SSH:
ssh root@IP_Address -p Port_number
You will need to replace ‘IP_Address’ and ‘Port_number’ with your server’s respective IP address and SSH port number. Additionally, replace ‘root’ with the username of the system user with sudo privileges.
You can check whether you have the proper Ubuntu version installed on your server with the following command:
# lsb_release -a
It will return an output like this.
No LSB modules are available.
Distributor ID: Ubuntu
Description: Ubuntu 22.04 LTS
Release: 22.04
Codename: jammy
In this article, we will use ‘root’ used to execute the shell commands. If you want to use your regular user with sudo privileges to run the commands, make sure to append ‘sudo’ in front of the commands.
Step 2: Update the system
Before starting, let’s ensure that all Ubuntu 22.04 packages installed on the server are up to date. You can do this by running the following commands:
# apt update
# apt upgrade
Step 3. Create System User
In this step, we are going to create a new system user for our ERPNext installation.
# useradd -m -d /opt/erpnext -U -r -s /bin/bash erpnext
Let’s give sudo privileges to the user.
# usermod -aG sudo erpnext
Step 4. Install Dependencies
Several packages will be installed on the system before we can start installing other applications.
# apt install python3-pip python3-dev python3.10-venv python3-testresources libffi-dev libssl-dev wkhtmltopdf gcc g++ make redis-server -y
Step 5. Install NodeJS
First, add the Node Source repository to our Ubuntu 22.04 system with the following command:
# curl -sL https://deb.nodesource.com/setup_16.x | bash -
Then, install NodeJS.
# apt install nodejs -y
Once installed, you can check nodejs and npm with this command:
# node -v; npm -v
Finally, we can install YARN now.
# npm install -g yarn
Step 6. Install MariaDB
We do not need to add the MariaDB repository to our Ubuntu system, and we can install it because MariaDB is already available on the default Ubuntu base repository.
# apt install mariadb-server mariadb-client
Let’s modify the default MariaDB configuration file.
# nano /etc/mysql/mariadb.conf.d/50-server.cnf
Find the string collation-server = utf8mb4_general_ci and replace it with collation-server = utf8mb4_unicode_ci
Then, add the following anywhere under [mysqld]
innodb-file-format=barracuda
innodb-file-per-table=1
innodb-large-prefix=1
To apply the changes, restart the MariaDB server.
# systemctl restart mariadb
Next, we need to create a MySQL root password. Let’s invoke this command.
# mysql_secure_installation
You will be asked a few questions. Answer all prompted questions with YES (Y), and remember your new MySQL root password; you will need this password later.
Step 7. Install ERPNext
We have successfully installed all requirements, and it is time to install ERPNext. In this step, we are going to use the new system user we created earlier in the previous step.
# su - erpnext
The command above means we are switching to user ‘erpnext’. Then edit the .bashrc file.
$ nano ~/.bashrc
Append the following line to the file:
PATH=$PATH:~/.local/bin/
Save the file, then activate the environment variable with the following command below:
$ source ~/.bashrc
Next, create a directory for ERPNext with the following command:
$ sudo mkdir /opt/bench
Then, set the ownership to the erpnext user:
$ sudo chown -R erpnext: /opt/bench
At this point, we can go to the directory /opt/bench and clone the bench repository from GitHub:
$ cd /opt/bench
$ git clone https://github.com/frappe/bench bench-repo
Finally, install the bench repo using the pip3 command:
$ pip3 install -e bench-repo
Once installed, initialize the bench directory with the frappe framework using the following command:
$ bench init erpnext
It will take some time to complete, as it will set up a virtual environment, install frappe and initialize bench erpnext. It will show you a successful message once completed.
The next step is to go to erpnext directory and then create a new ERPNext website with the following command:
$ cd /opt/bench/erpnext
$ bench new-site erpnext.yourdomain.com
Make sure to replace yourdomain.com above with your actual domain/subdomain name and your domain or subdomain name’s DNS record is already pointed to your server.
You will be asked for your MariaDB root password and Administrator password for your ERPNext website as shown below:
MySQL root password:

Installing frappe...
Updating DocTypes for frappe : [========================================] 100%
Updating country info : [========================================] 100%
Set Administrator password:
Re-enter Administrator password:
*** Scheduler is disabled ***
Current Site set to erpnext.yourdomain.com
Step 8. Configure ERPNext
In this step, we are going to configure Nginx as a reverse proxy.
$ sudo apt install supervisor nginx -y
Now, let’s install the frappe-bench, and run this command below.
$ sudo pip3 install frappe-bench
Next, navigate to /opt/bench/erpnext and set up the production environment:
$ cd /opt/bench/erpnext
$ sudo /opt/erpnext/.local/bin/bench setup production erpnext
Again, it will take some time to complete, as it will configure nginx, redis, and supervisor and run those services.
Finally, you should be able to access ERPNext at http://erpnext.yourdomain.com using any web browser. You will be redirected to the login page.
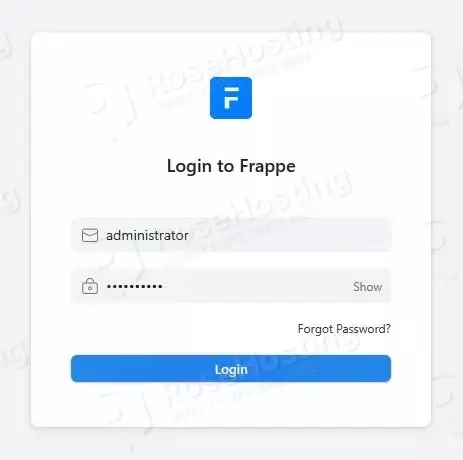
User administrator as username and password you created earlier to log in.
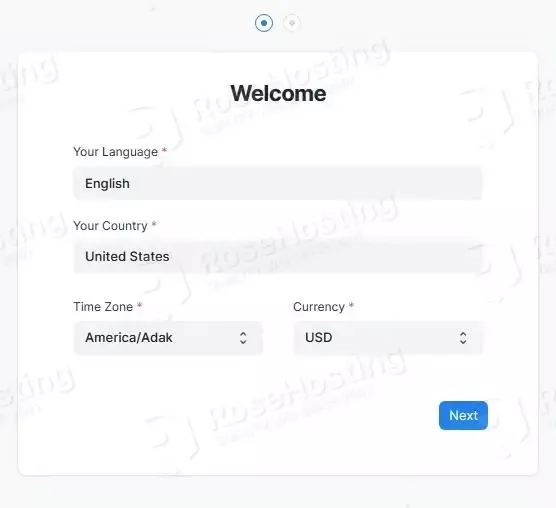
In this step, you can choose your language, country, timezone, and currency.
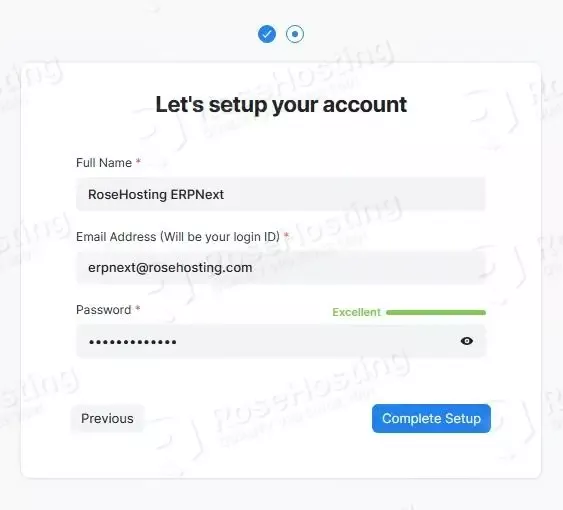
Set up a new account and complete the installation.
That’s it! You will be brought to your ERPNext website dashboard.
Of course, you don’t have to install ERPNext on Ubuntu 22.04 if you have an Ubuntu VPS with us. You can ask our support team to install ERPNext on Ubuntu 22.04. They are available 24/7 and will be able to help you with the installation.
If you enjoyed reading this blog post on How to Install ERPNext on Ubuntu 22.04, feel free to share it on social networks or simply leave a comment in the comments section. Also, feel free to check out how to install ERPNext on an older version of Ubuntu – 20.04. Thanks.
Hello, I made everything and it worked. Till the last step, i cant open the webpage… not from domain nor IP… What i have to change?
You need to check the log files on your server for more information about this.