In this tutorial, we are going to install the basic LAMP stack on Ubuntu 22.04 OS.
The LAMP is a shortcut to Linux, Apache, MySQL, and PHP. The Linux operating system in this tutorial will be the latest Ubuntu 22.04. Apache is an HTTP web server used to serve the requests, MySQL is a relational database management system used for storing data, and PHP is the website’s language. The LAMP stack is used for creating websites and web applications. We are going to explain in more detail how these four software are connected to each other.
Installing the LAMP stack on Ubuntu 22.04 VPS can take up to 15 minutes. Let’s get started!
Table of Contents
Prerequisites
- A server with Ubuntu 22.04 as OS
- User privileges: root or non-root user with sudo privileges
Step 1. Update the System
Before we start to install the software we need to update the system packages to the latest versions available.
sudo apt-get update -y && sudo apt-get upgrade -y
Step 2. Install Apache Web Server
The Apache web server is written and developed in C and used to accept requests from clients and send a response that the client requested before. To install the Apache Web server execute the following command:
sudo apt install apache2
Once, installed start and enable the service.
sudo systemctl enable apache2 && sudo systemctl start apache2
Check if the service is up and running:
sudo systemctl status apache2
You should receive the following output:
root@vps:~# sudo systemctl status apache2
● apache2.service - The Apache HTTP Server
     Loaded: loaded (/lib/systemd/system/apache2.service; enabled; vendor preset: enabled)
     Active: active (running) since Sat 2022-05-14 14:26:56 UTC; 2 days ago
       Docs: https://httpd.apache.org/docs/2.4/
   Main PID: 660 (apache2)
      Tasks: 8 (limit: 4566)
     Memory: 21.3M
        CPU: 21.761s
     CGroup: /system.slice/apache2.service
             ├─  660 /usr/sbin/apache2 -k start
             ├─35101 /usr/sbin/apache2 -k start
             ├─35102 /usr/sbin/apache2 -k start
             ├─35103 /usr/sbin/apache2 -k start
             ├─35104 /usr/sbin/apache2 -k start
             ├─35105 /usr/sbin/apache2 -k start
             ├─35106 /usr/sbin/apache2 -k start
             └─35108 /usr/sbin/apache2 -k start

May 14 14:26:56 host.test.vps systemd[1]: Starting The Apache HTTP Server...
Step 3. Install PHP8.1 with dependencies
The Next software of the LAMP stack is the PHP along with its extensions. To install the PHP8.1 along with extensions execute the following command:
sudo apt-get install php8.1 php8.1-cli php8.1-common php8.1-imap php8.1-redis php8.1-snmp php8.1-xml php8.1-zip php8.1-mbstring php8.1-curl libapache2-mod-php
Step 4. Install MariaDB database server
To install the MariaDB database server, execute the command below.
sudo apt install mariadb-server
Start and enable the mariadb.service with the following commands:
sudo systemctl start mariadb && sudo systemctl enable mariadb
Check the status of the mariadb.service
sudo systemctl status mariadb
You should receive the following output:
root@vps:~# sudo systemctl status mariadb
● mariadb.service - MariaDB 10.6.7 database server
     Loaded: loaded (/lib/systemd/system/mariadb.service; enabled; vendor preset: enabled)
     Active: active (running) since Mon 2022-05-16 19:40:12 UTC; 33s ago
       Docs: man:mariadbd(8)
             https://mariadb.com/kb/en/library/systemd/
   Main PID: 42716 (mariadbd)
     Status: "Taking your SQL requests now..."
      Tasks: 16 (limit: 4566)
     Memory: 57.2M
        CPU: 3.249s
     CGroup: /system.slice/mariadb.service
             └─42716 /usr/sbin/mariadbd
To check the installed MariaDB database version you can execute the following command:
mysql -V
You should receive the following output:
root@vps:~# mysql -V
mysql  Ver 15.1 Distrib 10.6.7-MariaDB, for debian-linux-gnu (x86_64) using  EditLine wrapper
Step 5. Create Apache Virtual Host File with PHPInfo file
Since we completed the LAMP stack, in this last step we are going to create Apache virtual host file, with document root and PHP info file within. This is simply to check the functionality of the previously installed Apache Web server and PHP extensions.
First, create the configuration file with the following command:
touch /etc/apache2/sites-available/test.conf
Open the file, and paste the following lines of code:
<VirtualHost *:80>
ServerName yourdomain.com
DocumentRoot /var/www/html/

ErrorLog /var/log/apache2/yourdomain.com.error_log
CustomLog /var/log/apache2/yourdomain.com.access_log common
</VirtualHost>
Enable the Apache2 configuration file and other modules:
sudo a2ensite test.conf

sudo a2enmod rewrite
Check the syntax of the Apache2 configuration.
apachectl -t
You should receive the following output:
root@host:~# apachectl -t
Syntax OK
If you receive this output you can safely restart the Apache service.
sudo systemctl restart apache2
Next, is to create a PHP info file in the document root of the Apache webserver.
cd /var/www/html

sudo nano phpinfo.php
Paste the following lines of code.
<?php
phpinfo();
?>
Restart the apache service again:
sudo systemctl restart apache2
Now, you can access your website at http://YourDomainName/phpinfo.php
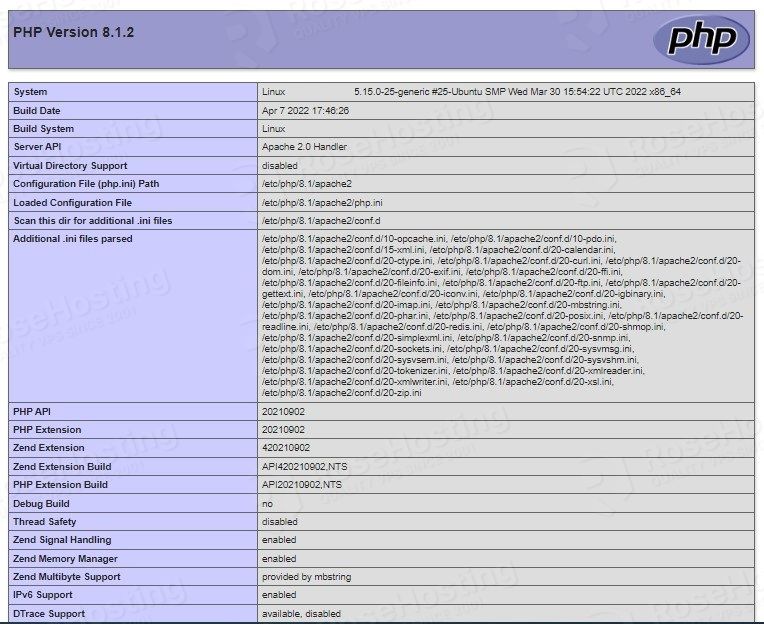
As you can see the Apache and PHP modules are loaded with their respective versions. Now, you can start developing your application using the LAMP stack.
That’s it. You successfully installed the LAMP stack on Ubuntu 22.04. Of course, if you find it difficult to set up the LAMP stack with many services and modules, you can always RoseHosting technical support and they will do the rest. We are available 24/7.
If you liked this post on how to install LAMP stack on Ubuntu 22.04, please share it with your friends on social networks or simply leave a reply below. Thanks.