This blog post is about installing Magento 2.4 with OpenLiteSpeed as a web server on Ubuntu 20.04 OS.
Magento is an open-source e-commerce platform written in PHP that uses multiple PHP frameworks such as Symfony and Laminas. OpenLiteSpeed is an open-source web server that offers high performance, security and can be used for handling huge traffic for the website. Magento with a combination of OpenLiteSpeed can provide a very powerful and fast website performance.
For this setup, we will need about 30 minutes for everything to be configured properly. Let’s get started!
Table of Contents
Prerequisites
- Fresh install of Ubuntu 20.04
- User privileges: root or non-root user with sudo privileges
- VPS with at least 4GB of RAM (Our SSD 4 VPS plan)
Step 1.Update the System
Before we start with installing the webserver and Magento we need to update the system:
sudo apt update -y && sudo apt upgrade -y
Step 2. Install OpenLiteSpeed
Before we can install the OpenLiteSpeed web server we need to install the required dependencies.
sudo apt-get install build-essential libexpat1-dev libgeoip-dev libpcre3-dev zlib1g-dev libssl-dev libxml2-dev rcs libpng-dev
Once, the dependencies are installed we need to add manually the repo of OpenLiteSpeed for Ubuntu 20.04
wget -O - http://rpms.litespeedtech.com/debian/enable_lst_debian_repo.sh | sudo bash
Once, the repo is added you should receive the output below:
 update the repo
Hit:1 http://us.archive.ubuntu.com/ubuntu focal InRelease
Get:2 http://us.archive.ubuntu.com/ubuntu focal-updates InRelease [114 kB]
Ign:3 http://rpms.litespeedtech.com/debian focal InRelease
Get:4 http://rpms.litespeedtech.com/debian focal Release [1,646 B]
Get:5 http://rpms.litespeedtech.com/debian focal Release.gpg [836 B]
Get:6 http://us.archive.ubuntu.com/ubuntu focal-backports InRelease [108 kB]
Get:7 http://us.archive.ubuntu.com/ubuntu focal-security InRelease [114 kB]
Get:8 http://rpms.litespeedtech.com/debian focal/main amd64 Packages [16.3 kB]
Fetched 355 kB in 5s (68.8 kB/s)
Reading package lists... Done
 All done, congratulations and enjoy !
Now, when repo is added successfully, you can proceed to install the OpenLiteSpeed:
sudo apt install openlitespeed
Once, the OpenLiteSpeed is installed you can access it on port 7080at “https:your_ip_address:7080″. But before accessing it you need to set the username and the password with the following command:
sudo /usr/local/lsws/admin/misc/admpass.sh
After successfully setting the username and password you should receive the following output:
root@vps:~# sudo /usr/local/lsws/admin/misc/admpass.sh

Please specify the user name of administrator.
This is the user name required to login the administration Web interface.

User name [admin]: Your_admin_username

Please specify the administrator's password.
This is the password required to login the administration Web interface.

Password:Your_strong_password
Retype password:Retype_Your_strong_password
Administrator's username/password is updated successfully!
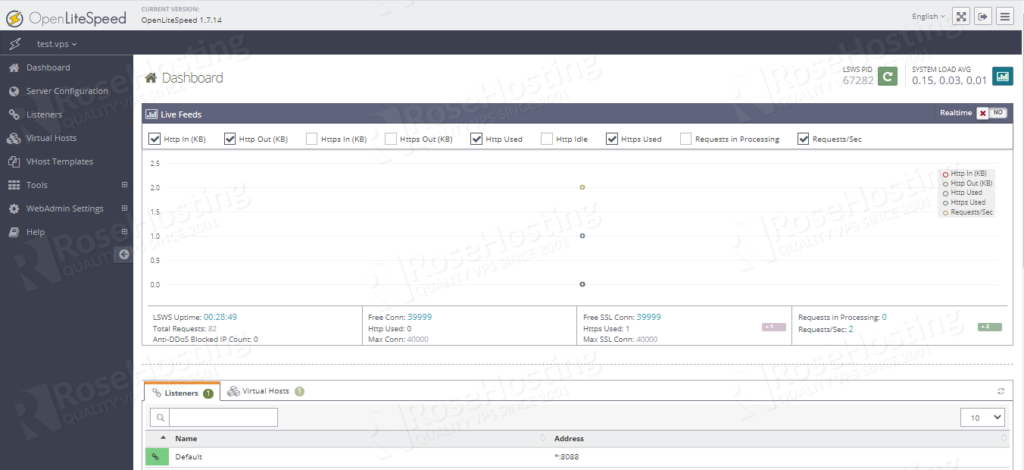
If everything is set up as in the previous steps, you should see the following screen after successful login:
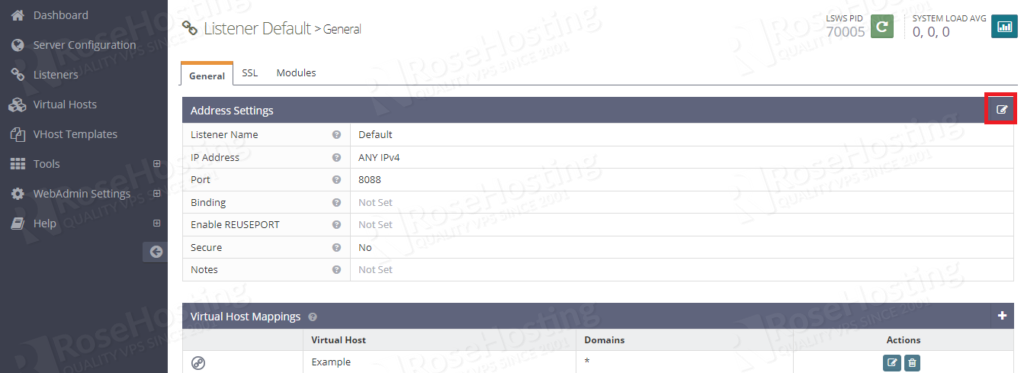
Step 3. Change the HTTP port
By default the newly installed OpenLiteSpeed, is using the port “8080”. To change this port to the default HTTP port 80 do the following:
On the left menu click on “Listeners” and on the Actions tab on the table, click on the “View” button.

Then click on the “Edit” button:
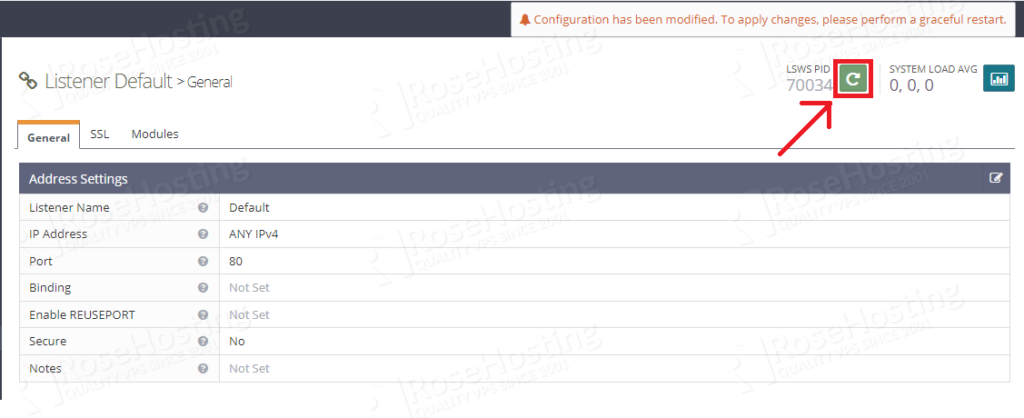
Change the port from 8088 to 80. Once changed save the changes as described in the picture below:
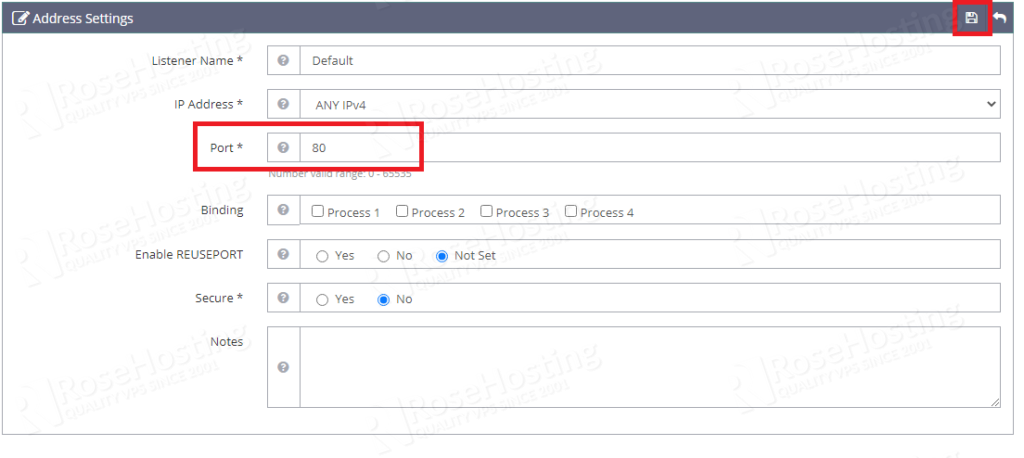
When the changes will be made you need to restart the OpenLiteSpeed service by clicking on the green restart button.
Step 4. Install PHP8.0
Now we need to install PHP8.0 along with the extensions because Magento 2.4 is a PHP framework and can not be operative without them.
sudo apt-get install lsphp80 lsphp80-mysql lsphp80-common lsphp80-opcache lsphp80-curl -y
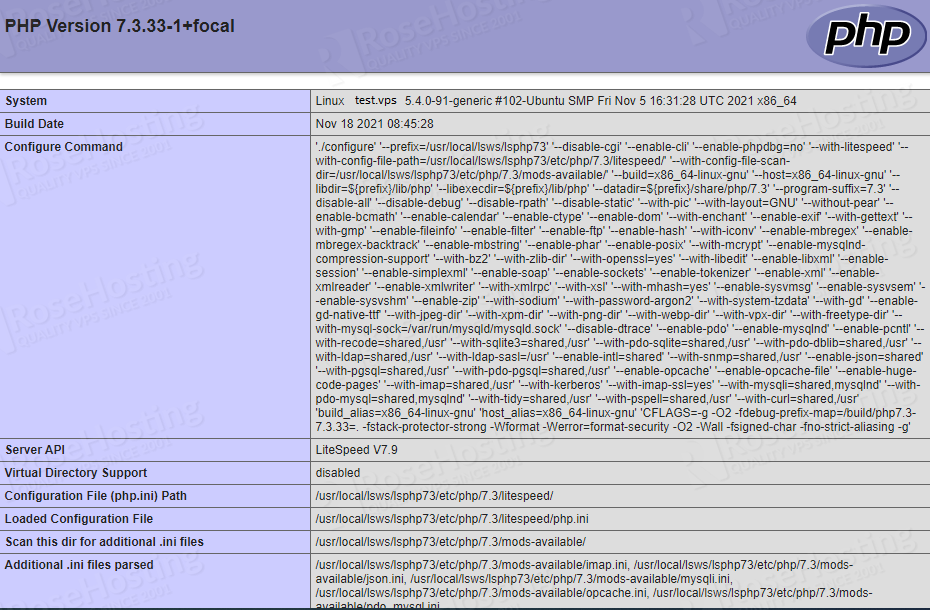
By default the OpenLiteSpeed is using the PHP7.3 version. To check this simply access the following URL:
http://your_ip_address/phpinfo.php
You should receive the following screen:
For OpenLiteSpeed to use the newly installed PHP8.0 version you need to open the “/usr/local/lsws/conf/httpd_config.conf” file
sudo nano /usr/local/lsws/conf/httpd_config.conf
Then find the “lsphp73/bin/lsphp” and replace it with “lsphp80/bin/lsphp”. Save the file and close it.
You need to restart the OpenLiteSpeed service as described in Step 3. Now the OpenLiteSpeed will use the PHP8.0 as default PHP version.
Step 5. Install MariaDB
To install the MariaDB database server execute the following command:
sudo apt install mariadb-server
To verify that the MariaDB is installed successful, execute the command below:
systemctl status mariadb.service
You should receive the following output
root@vps:~# systemctl status mariadb.service
● mariadb.service - MariaDB 10.3.32 database server
     Loaded: loaded (/lib/systemd/system/mariadb.service; enabled; vendor preset: enabled)
     Active: active (running) since Fri 2021-12-24 18:42:18 UTC; 3min 43s ago
       Docs: man:mysqld(8)
             https://mariadb.com/kb/en/library/systemd/
   Main PID: 71030 (mysqld)
     Status: "Taking your SQL requests now..."
      Tasks: 31 (limit: 4608)
     Memory: 67.9M
     CGroup: /system.slice/mariadb.service
             └─71030 /usr/sbin/mysqld
To enable the MariaDB service to start on system reboot execute the following command:
systemctl enable mariadb.service
Step 6. Install Elasticsearch
We need to install Elasticsearch, because without it we can not install the Magento in the next steps.
Add the GPG Key and Elastic source list to the sources.list.d
curl -fsSL https://artifacts.elastic.co/GPG-KEY-elasticsearch | sudo apt-key add -

echo "deb https://artifacts.elastic.co/packages/7.x/apt stable main" | sudo tee -a /etc/apt/sources.list.d/elastic-7.x.list
Update the repo and install the Elasticsearch with the following command:
sudo apt update && sudo apt install elasticsearch
Start and enable the service.
sudo systemctl start elasticsearch && sudo systemctl enable elasticsearch
Step 7. Create Magento Database and User
Next, we need to create a Magento database, the Magento user, and grant the permissions for that user to the database.
 CREATE USER 'magento'@'localhost' IDENTIFIED BY 'StrongPassword123';
 CREATE DATABASE magento;
 GRANT ALL PRIVILEGES ON magento.* TO 'magento'@'localhost';
 FLUSH PRIVILEGES;
 EXIT;
Step 8. Create Magento Virtual Host in OpenLiteSpeed
To create a virtual host, execute the following commands on your server:
cd /usr/local/lsws
mkdir Magento2
mkdir Magento2/{conf,html,logs}
chown lsadm:lsadm Magento2/
Next, go to the WebAdmin console click on “Virtual Hosts” -> “Add”.
–
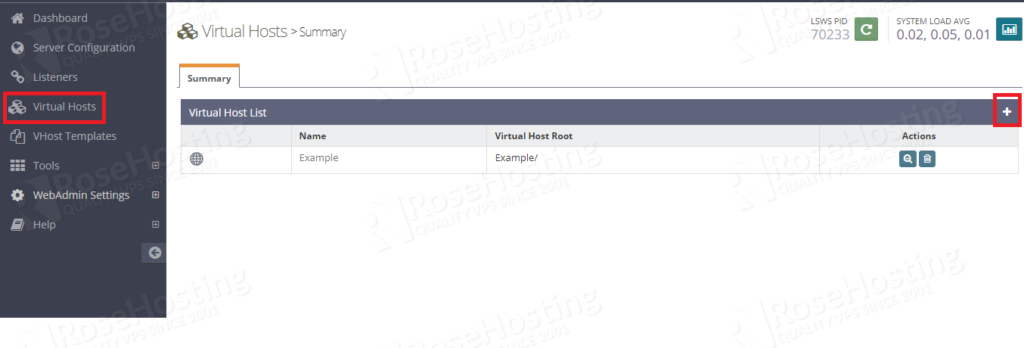
Enter the virtual host’s name, the virtual host root file, and the virtual host configuration file.
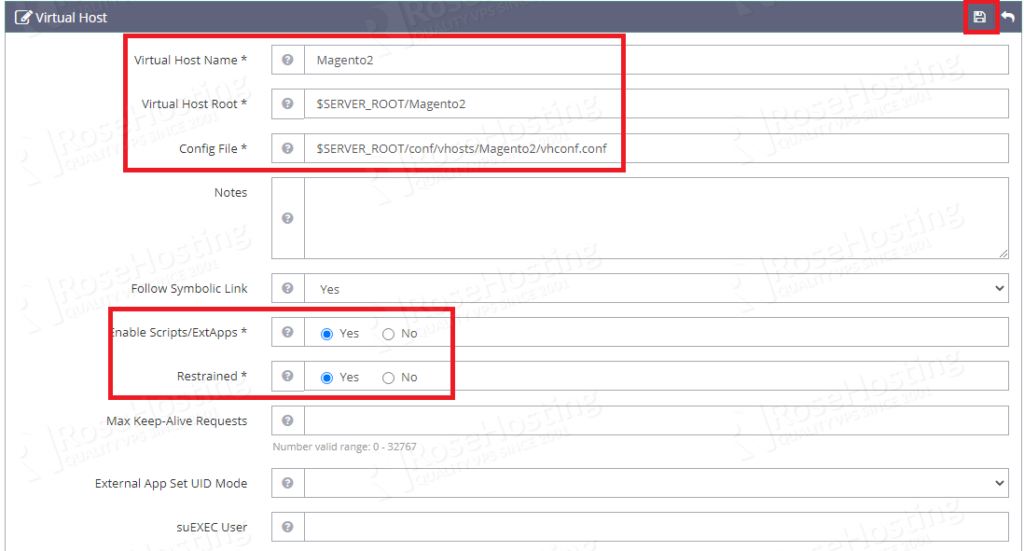
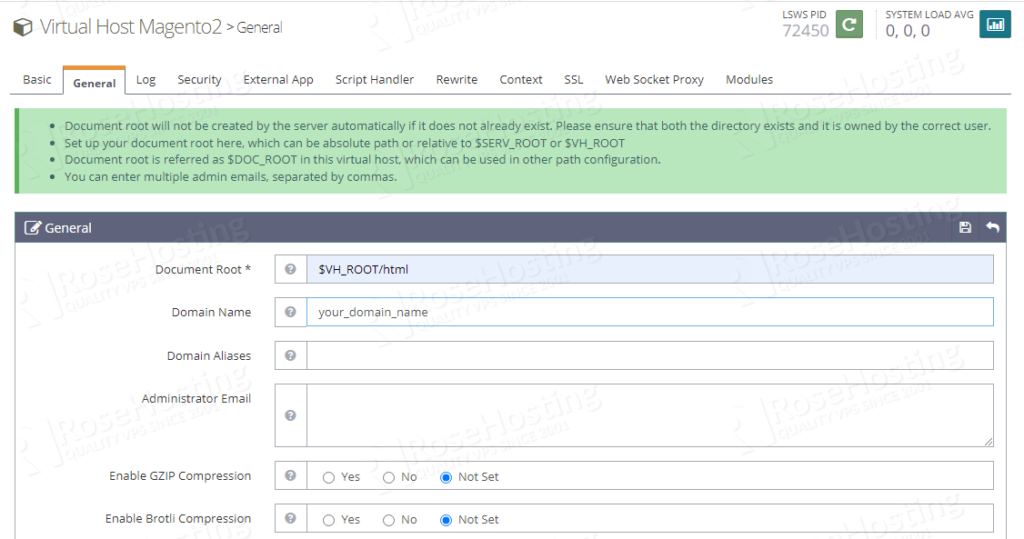
Next step is to set the Virtual Host, document root and enter the domain name. Click on the newly created virtual host and in the “General” tab you will notice the “Document Root” field.
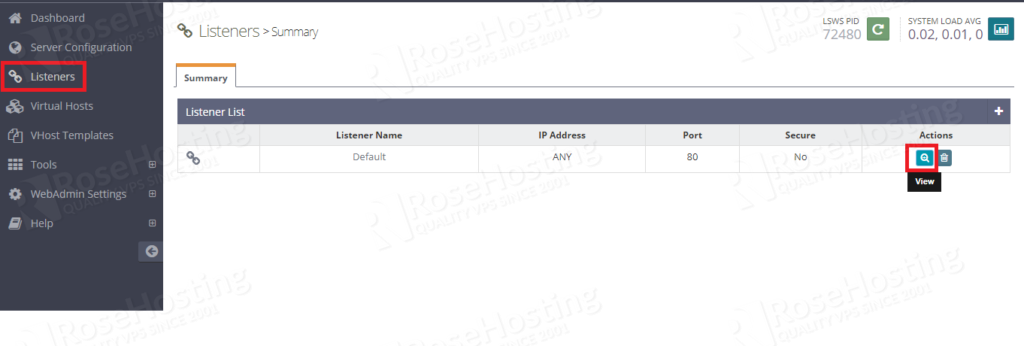
Step 9. Create a Listener in OpenLiteSpeed
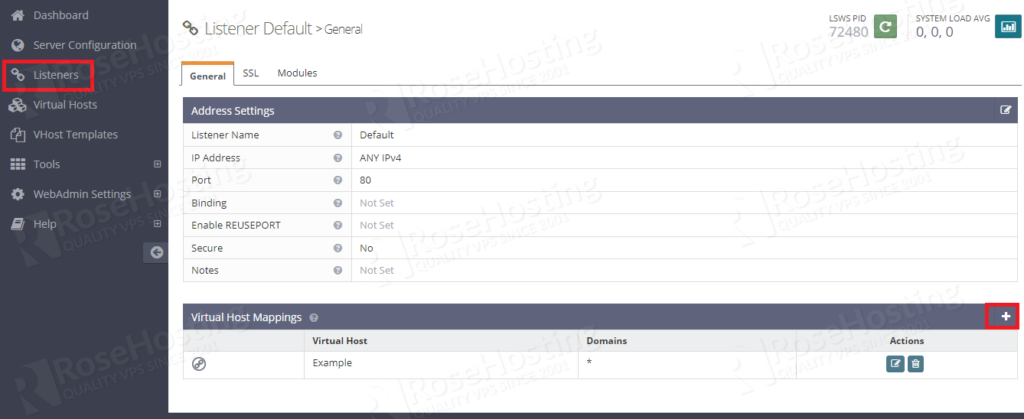
To create a listener click on “Listeners” and on the “View” button.
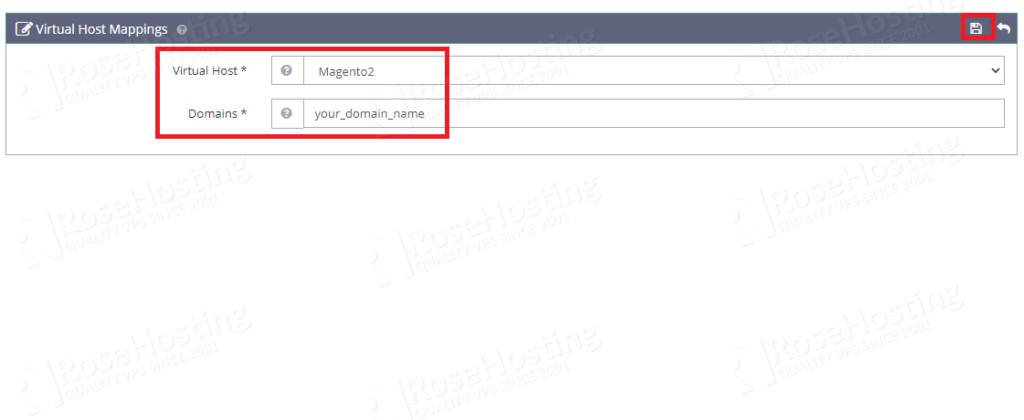
Once, clicked on the newly opened window, in the “Virtual Host Mappings” click on “Add”.
Select your newly created Virtual Host and the domain name. Save the changes and restart the OpenLiteSpeed service.
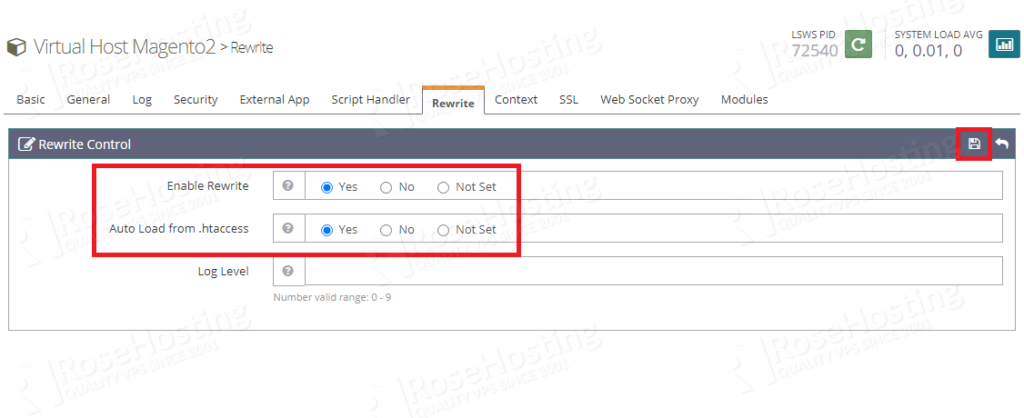
Step 10. Enable the Rewrite and Auto Load from .htaccess
This is a very important step if you want your Magento to load properly. To do this click on the “Virtual Host” and from the Virtual Host List click on “Magento2”. In the “Rewrite” tab enable these options and save the changes as described in the picture below. Then you will need to restart the OpenLiteSpeed service.
Step 11. Download and Install Magento 2.4
Before we start with the installation process we need to install the Composer responsible for installing all the Magento components.
curl -sS https://getcomposer.org/installer | php -- --install-dir=/usr/bin --filename=composer
Once, composer is installed go into the document root directory of your virtual host.
cd /usr/local/lsws/Magento2/html
Clone the Magento2.4 from GitHub with the following command:
git clone https://github.com/magento/magento2.git /usr/local/lsws/Magento2/html/
Install the dependencies with composer.
composer install
Next step is to execute this long command with your previous created database credentials and URL and the Magento2 will be installed in a few seconds:
bin/magento setup:install --base-url=http://yourdomain.com/ --db-host=localhost --db-name=magento --db-user=magento --db-password=1strongPassword --admin-firstname=FirstName --admin-lastname=LastName --admin-email=your@emailaddress.com --admin-user=magentoadmin --admin-password=1strongPassword --language=en_US --currency=USD --timezone=America/Chicago --use-rewrites=1
Once, the installation is completed you should receive the Magento Admin URL as output. Please make sure to save it.
[Progress: 848 / 851]
Disabling Maintenance Mode:
[Progress: 849 / 851]
Post installation file permissions check...
For security, remove write permissions from these directories: '/usr/local/lsws/Magento2/html/app/etc'
[Progress: 850 / 851]
Write installation date...
[Progress: 851 / 851]
[SUCCESS]: Magento installation complete.
[SUCCESS]: Magento Admin URI: /admin_19gqwc
Nothing to import.
Congratulations you successfully installed Magento2.4 with OpenLiteSpeed webserver on Ubuntu 20.04 OS.
If you find it difficult to install all this stuff, you can order a VPS submit a support ticket and our admins will do the rest. Do not hesitate to contact us anytime you want. We are available 24/7.
If you liked this post on how to install Magento2.4 with OpenLiteSpeed on Ubuntu 20.04, please share it with your friends on the social networks using the buttons on the left or simply leave a reply below. Thanks.
How does this handle the hole-punching issue? eg. add to/remove from cart etc.
You can use the LiteMage extension on Magento which uses Edge Side Includes (ESI) to punch holes in pages where information changes from visitor to visitor. The remaining content is saved to cache. This extension is currently only available on LiteSpeed Enterprise.
Will LiteMage work with OpenLiteSpeed? We were never able to get OpenLiteSpeed working with Magento due to hole punching.