
Nextcloud is an open-source, flexible, and self-hosted cloud storage service. It is a fork of Owncloud and very similar to DropBox and other cloud storage services. With Nextcloud, you can share and sync files, contacts, and data across your devices. It supports two-factor authentication and protects the public links with a password.
Nextcloud comes with a rich set of features including, an Online document editor, Calendar Management, Video calls with chat, File sync and sharing, Media Playing, Contact management, and many more.
In this tutorial, we will show you how to install Nextcloud 18 with Apache on an Ubuntu 20.04 VPS.
Table of Contents
Prerequisites
- A Ubuntu 20.04 VPS with root access enabled or a user with sudo privileges.
- MySQL or MariaDB
- PHP 7.0 +
- Apache 2.4 with mod_php module
Step 1: Log in via SSH and Update your System
First, you will need to log in to your Ubuntu 20.04 VPS via SSH as the root user:
ssh root@IP_ADDRESS -p PORT_NUMBERNext, run the following commands to upgrade all installed packages on your VPS:
apt-get upgrade -yapt-get update -yStep 2 : Install Apache and PHP
Nextcloud runs on the webserver and PHP-based application. So you will need to install the Apache webserver, PHP and other required PHP extensions in your server. You can install all of them with the following command:
apt-get install php7.4 libapache2-mod-php7.4 php7.4-xml php7.4-cli php7.4-cgi php7.4-mysql php7.4-mbstring php7.4-gd php7.4-curl php7.4-zip php-imagick php7.4-json php7.4-intl -yOnce all the packages are installed, verify the PHP version using the following command:
php -v
You should see the following output:
 PHP 7.4.3 (cli) (built: May  5 2020 12:14:27) ( NTS )
 Copyright (c) The PHP Group
 Zend Engine v3.4.0, Copyright (c) Zend Technologies
 with Zend OPcache v7.4.3, Copyright (c), by Zend Technologies
Step 3 : Install and Configure MariaDB
Nextcloud uses MariaDB to store information. You can install the MariaDB server and other packages with the following command:
apt-get install mariadb-server mariadb-client unzip wget -y Once installed, secure the MariaDB installation by running the following command:
mysql_secure_installationAnswer all the questions as shown below to set the MariaDB root password and secure the installation:
 Enter current password for root (enter for none):
 Set root password? [Y/n] Y
 New password:
 Re-enter new password:
 Remove anonymous users? [Y/n] Y
 Disallow root login remotely? [Y/n] Y
 Remove test database and access to it? [Y/n] Y
 Reload privilege tables now? [Y/n] Y
Once the MariaDB is secured, log in to the MariaDB console with the following command:
mysql -u root -pProvide your root password when prompt then create a database and user for NextCloud with the following command:
MariaDB [(none)]> CREATE DATABASE nextclouddb;
MariaDB [(none)]> GRANT ALL PRIVILEGES ON nextclouddb.* TO 'nextcloud'@'localhost' IDENTIFIED BY 'your-password';
Next, flush the privileges and exit from the MariaDB console with the following command:
MariaDB [(none)]> FLUSH PRIVILEGES;
MariaDB [(none)]> EXIT;
Step 4 : Install Nextcloud
At the time of writing this article, the latest version of Nextcloud is 18.0.4. You can download it from the Nextcloud’s official website using the following command:
wget https://download.nextcloud.com/server/releases/nextcloud-18.0.4.zipOnce the download is completed, unzip the downloaded file to the Apache root directory:
unzip nextcloud-18.0.4.zip -d /var/www/html/Next, change the ownership of the nextcloud directory to www-data:
chown -R www-data:www-data /var/www/html/nextcloudStep 5 : Configure Apache for Nextcloud
Next, create a new Apache virtual host configuration file to serve the Nextcloud:
nano /etc/apache2/sites-available/nextcloud.confAdd the following content:
 <VirtualHost *:80>
 DocumentRoot "/var/www/html/nextcloud"
 ServerName your-domain.com
 ErrorLog ${APACHE_LOG_DIR}/nextcloud.error
 CustomLog ${APACHE_LOG_DIR}/nextcloud.access combined
 <Directory /var/www/html/nextcloud/>
 Require all granted
 Options FollowSymlinks MultiViews
 AllowOverride All
 <IfModule mod_dav.c>
 Dav off
 </IfModule>
 SetEnv HOME /var/www/html/nextcloud
 SetEnv HTTP_HOME /var/www/html/nextcloud
 Satisfy Any
 </Directory>
 </VirtualHost>
Save and close the file. Then, enable the Apache virtual host configuration file with the following command:
a2ensite nextcloud.confNext, enable the required Apache modules with the following command:
a2enmod rewrite headers env dir mime setenvif sslFinally, reload Apache for the changes to take effect.
systemctl restart apache2Step 6 : Access Nextcloud Web UI
At this point, Nextcloud is installed and configured. Now, open your web browser and type the URL http://your-domain.com . You will be redirected to the following screen:
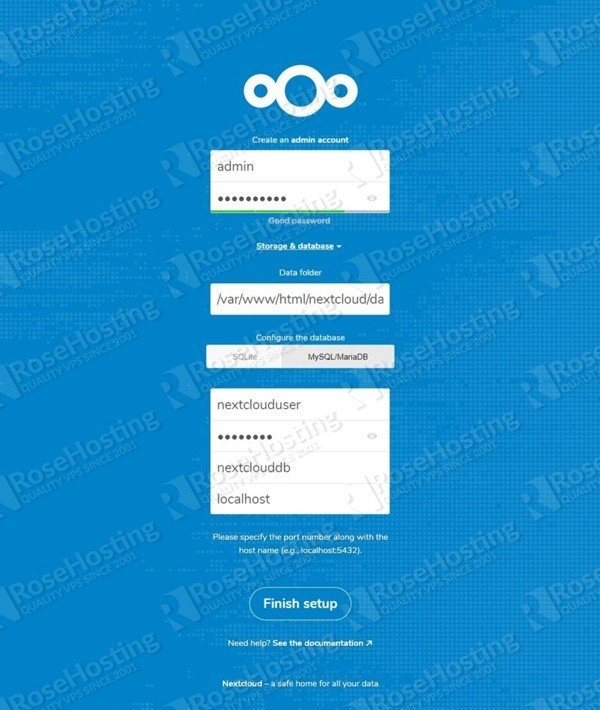
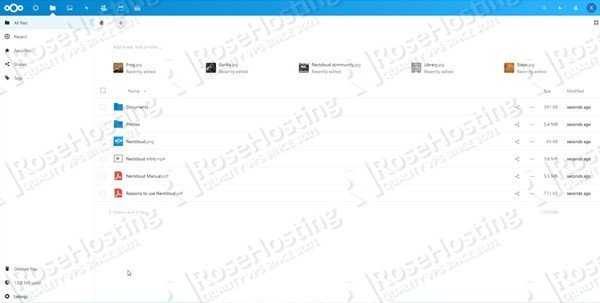
Set your Nextcloud admin username, password, data folder, database name, database username, password, and click on the Finish setup button. Once the installation has been finished, you should see the Nextcloud dashboard in the following screen:
Congratulations! you have successfully installed Nextcloud 18 on Ubuntu 20.04 VPS. For more information, visit the Nextcloud official documentation.

Of course, you don’t need to install Nextcloud 18 on Ubuntu 20.04 yourself if you use one of our Nextcloud Hosting services, in which case you can simply ask our expert Linux admins to install and set this up for you. They are available 24×7 and will take care of your request immediately.
PS. If you liked this post on How To Install Nextcloud 18 on Ubuntu 20.04, please share it with your friends on the social networks by using the buttons on the left, or simply leave a reply below. Thanks.
Hi,
Thank you for this manual.
I followed all the steps, but now when logging into my localhost for this server I’m getting the default apache2 webpage, and not the nextcloud one.
It says:
” If you can read this page, it means that the Apache HTTP server installed at this site is working properly. You should replace this file (located at /var/www/html/index.html) before continuing to operate your HTTP server.”
Can you please help me figure out what I’m doing wrong?
Thanks.
Avi
Please check Step 5 ‘Configure Apache for Nextcloud’ and follow it closely.
Hi,
I did follow step 5.
Twice.
Still I’m getting the default apache2 for Ubuntu.
Avi
After doing a little searching I found the answer:
I changed string in file /etc/apache2/sites-enabled/default-ssl.conf
from
DocumentRoot /var/www/html
to
DocumentRoot /var/www/html/nextcloud
This resolved the problem.
Avi