In this tutorial, we are going to explain how to Install Nginx with Engintron on a server with WHM/cPanel control panel installed.
Engintron is a free WHM/cPanel plugin that can be used for installing the Nginx web server as a reverse proxy of the default Apache webserver. The reason for using the Nginx as a reverse proxy of Apache on our WHM/cPanel server is that the Apache will server the dynamic content such as PHP, Perl and etc, and the Nginx will be responsible for serving the static content like CSS, Javascript, and images.
Installing Nginx with Engintron to your cPanel server can take a few minutes and is a very easy process. Let’s get to work!
Table of Contents
Prerequisites
- A server with at least 2GB of RAM
- Full SSH root access or a user with sudo privileges is also required.
- Installed WHM/cPanel control panel on the server
Update the System
Before we start with installation we need to update the system to be up to date
sudo yum update -y && sudo yum upgrade -y

sudo /usr/local/cpanel/scripts/upcp
Installing the Engintron plugin
Once, the system is updated we can proceed with the installation process. First, go into the “root” directory on your server remove the old “engintron.sh” script if exists, and download the latest installation script:
cd /
rm -f engintron.sh
wget --no-check-certificate https://raw.githubusercontent.com/engintron/engintron/master/engintron.sh
Once, the script is downloaded You will need to execute the script and allow some time for the installation process to be completed:
bash engintron.sh install
If the installation is successful, you will see on the screen how services such as apache, tailwatchd, apache_php_fpm, and nginx are being restarted. You should see the following output at the end of the installation:
httpd started successfully.
Redirecting to /bin/systemctl restart httpd.service
Redirecting to /bin/systemctl restart nginx.service

**************************************
*       Installation Complete        *
**************************************
You can notice now, the Apache is listening on ports 8080 and 8443, and Nginx is set to ports 80 and 443. This tells us again that the installation of the Engintron is successful. To see this execute the command below:
netstat -tunlp | grep httpd && netstat -tunlp | grep nginx
Engintron CLI
To check the usage of Engintron, execute the following command on your server:
bash /engintron.sh
You should receive the following output:
[root@test.vps /]# bash /engintron.sh
    _______   _____________   ____________  ____  _   __
   / ____/ | / / ____/  _/ | / /_  __/ __ \/ __ \/ | / /
  / __/ /  |/ / / __ / //  |/ / / / / /_/ / / / /  |/ /
 / /___/ /|  / /_/ // // /|  / / / / _, _/ /_/ / /|  /
/_____/_/ |_/\____/___/_/ |_/ /_/ /_/ |_|\____/_/ |_/

                 https://engintron.com

Engintron (v1.16.0) is the easiest way to integrate Nginx on your cPanel/WHM server.

Usage: /engintron.sh [command] [flag]

Main commands:
    install          Install, re-install or update Engintron (enables Nginx by default).
                     Add optional flag "mainline" to install Nginx mainline release.
    remove           Remove Engintron completely.
    enable           Set Nginx to ports 80/443 & Apache to ports 8080/8443
    disable          Set Nginx to ports 8080/8443 & switch Apache to ports 80/443
    purgecache       Purge Nginx's "cache" & "temp" folders,
                     then restart both Apache & Nginx
    purgelogs        Purge Nginx's access & error log files

Utility commands:
    res              Restart web servers only (Apache & Nginx)
    res force        Restart Apache & force restart Nginx (kills all previous Nginx processes)
    resall           Restart Cron, CSF & LFD (if installed), Munin (if installed),
                     MySQL, Apache, Nginx
    80               Show active connections on port 80 sorted by connection count & IP,
                     including total concurrent connections count
    443              Show active connections on port 443 sorted by connection count & IP,
                     including total concurrent connections count
    fixaccessperms   Change file & directory access permissions to 644 & 755 respectively
                     in all user /public_html directories
    fixownerperms    Fix owner permissions in all user /public_html directories
    restoreipfwd     Restore Nginx IP forwarding in Apache
    cleanup          Cleanup Mac or Windows specific metadata & Apache error_log files
                     in all user /public_html directories
    info             Show basic system info

~~ Enjoy Engintron! ~~
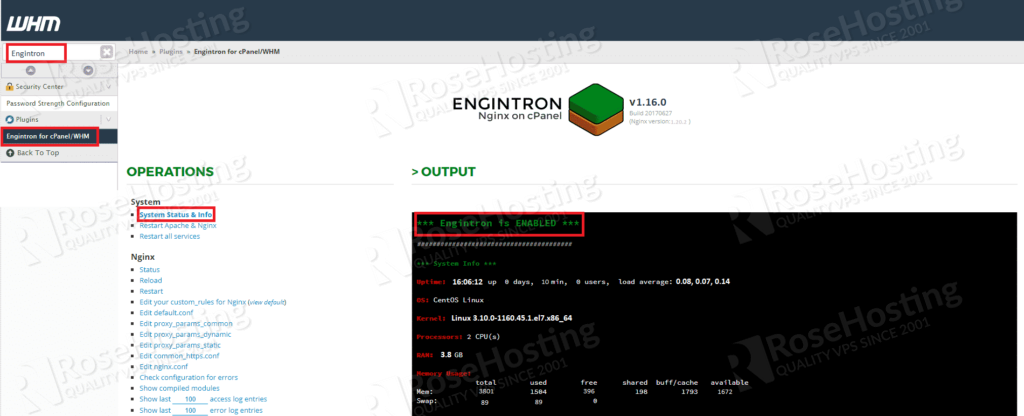
Engintron in WHM/cPanel GUI
After the installation, the Engintron plugin can be accessed via the WHM/cPanel GUI. Visit the WHM on the URL at “https://your_ip_address:2087”
Once, visited in the search input field on the top left type “Engintron“. There will be a “Engintron for cPanel/WHM” option that you will need to click on. Once, clicked there will be information about the installed Engintron and its status.
That’s All. You successfully installed the Nginx via the Engintron plugin on WHM/cPanel server. Of course, you don’t have to install it if you find it difficult.You can use one of our VPS hosting services, in which case you can simply ask our expert Linux VPS hosting admins to install this plugin for you. They are available 24/7 and will take care of your request immediately.
PS. If you liked this post on how to install Nginx on WHM/cPanel please share it with your friends on the social networks using the buttons on the left or simply leave a reply below. Thanks.