
Today we will guide you through the steps of installing Odoo 10 on CentOS 7. We will also install Nginx and configure it as a reverse proxy. Odoo (formerly known as OpenERP) is a simple and intuitive suite of open-source enterprise management applications such as Website Builder, eCommerce, CRM, Accounting, Manufacturing, Project and Warehouse Management, Human Resources, Marketing and many more. Odoo comes in two editions, Community edition which is free and Enterprise edition. In our case we will install and use the Community edition. Installing Odoo 10 on CentOS 7 with Nginx as a Reverse Proxy is fairly easy task, and it shouldn’t take more then 10 minutes to complete.
In this tutorial, we will install Odoo 10 version and configure Nginx as a reverse proxy so you can access your Odoo app using your domain name and without typing the port number in your web browser, on an CentOS 7 VPS machine. Let’s get started!
Table of Contents
Requirements
- CentOS 7 VPS
- SSH access with root privileges
- PostgreSQL server
- Nginx
1. Log in to your server via SSH:
# ssh root@IP_Address -p Port_number
Before starting, enter the command below to check whether you have the proper version of CentOS installed on your machine:
# cat /etc/redhat-release
which should give you the underneath output:
CentOS Linux release 7.5.1804 (Core)
2. Update the system
Make sure your server is fully up to date:
# yum update
If your system has not been updated for a while, it will take a few minutes to completed.
# yum install -y epel-release
3. Install PostgreSQL
Odoo uses PostgreSQL, therefore let’s install it along with some much-needed dependencies. Execute the following command:
# yum install postgresql-server fontconfig libpng libX11 libXext libXrender xorg-x11-fonts-Type1 xorg-x11-fonts-75dpi wkhtmltopdf yum-utils
Now initialize the PostgreSQL database:
# postgresql-setup initdb
Enable PostgreSQL to start on boot and start the service using:
# systemctl enable postgresql

# systemctl start postgresql
4. Install Odoo 10
Add the Odoo repository:
# yum-config-manager --add-repo=https://nightly.odoo.com/10.0/nightly/rpm/odoo.repo

Update the package index and install Odoo 10:
# yum update && yum install odoo
Once the installation is completed, enable Odoo to start on boot:
# systemctl enable odoo
Start Odoo:
# systemctl start odoo
Check if Odoo is working:
# ps aux |grep odoo
Odoo’s default master password is set to ‘admin‘. For security reason, we need to change this to a strong password. Open the configuration file for Odoo with your favorite text editor. We are using nano:
# nano /etc/odoo/odoo.conf
Uncomment (delete ;) the admin_passwd line and set your new master password. Be sure to use a strong password. You can generate one through the command line. Save and close the file. Restart Odoo for the changes to take effect:
# systemctl restart odoo
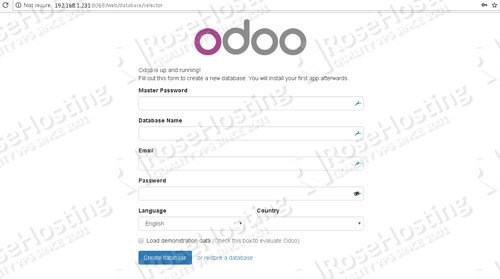
Now, you can navigate to your server’s IP address using any web browser you like.
Install Nginx web server and configure reverse proxy
Well, Odoo 10 has been successfully installed on its default port, 8069.
To access it using your domain name and without typing the port number in your web browser, we need to configure nginx as a reverse proxy.
If you have apache installed, let’s uninstall or disable it then install nginx to proceed
# systemctl disable httpd
# systemctl stop httpd
# yum install nginx
Enable nginx to start on boot
# systemctl enable nginx
Create an nginx configuration file.
# nano /etc/nginx/conf.d/yourdomain.com.conf
Paste the following lines in to the file.
upstream odoo10 {
    server 127.0.0.1:8069;
}
server {
    listen      80 default;
    server_name yourdomain.com;

    access_log  /var/log/nginx/yourdomain.com.access.log;
    error_log   /var/log/nginx/yourdomain.com.error.log;

    proxy_buffers 16 64k;
    proxy_buffer_size 128k;

    location / {
        proxy_pass  http://odoo10;
        proxy_next_upstream error timeout invalid_header http_500 http_502 http_503 http_504;
        proxy_redirect off;

        proxy_set_header    Host            $host;
        proxy_set_header    X-Real-IP       $remote_addr;
        proxy_set_header    X-Forwarded-For $proxy_add_x_forwarded_for;
        proxy_set_header    X-Forwarded-Proto https;
    }

    location ~* /web/static/ {
        proxy_cache_valid 200 60m;
        proxy_buffering on;
        expires 864000;
        proxy_pass http://odoo10;
    }
}
Check nginx configuration and if everything is okay, restart it.
# nginx -t
# systemctl restart nginx
Now you should be able to access Odoo with your domain name at http://yourdomain.com, create your first Odoo database using the master password we set earlier in this tutorial, and start working on your project. For more information about Odoo 10, its features and configuration, please check their official documentation.
 Of course, you don’t have to know how to install Odoo 10 on CentOS 7 with Nginx as a Reverse Proxy if you have a Odoo VPS Hosting with us. You can simply ask our support team to install Odoo 10 on CentOS 7 for you. They are available 24/7 and will be able to help you with the installation of Odoo 10 on CentOS 7. You might also want to consider reading our updates on both How to Install Odoo 10 on CentOS 7 with Nginx as a Reverse Proxy, How to Install Odoo 14 on CentOS 8 with Nginx as a Reverse Proxy, or how to install Odoo 11 on CentOS 7.
PS. If you enjoy reading this blog post on How to Install Odoo 10 on CentOS 7 with Nginx as a Reverse Proxy, feel free to share it on social networks using the shortcuts below, or simply leave a comment.
hi,
When I run “nginx -t” command , it shows “nginx: configuration file /etc/nginx/nginx.conf test is successful”
my configuration file is not “/etc/httpd/conf.d/mydomain.com.conf
This output shows that the test is successful and there aren’t any configuration errors in /etc/nginx/nginx.conf
Also, ‘mydomain.com.conf’ nginx configuration should be located in the /etc/nginx/conf.d/ directory.