
PHP is one of the most popular server scripting languages used for creating dynamic pages. Many popular CMS is written in PHP including, WordPress, Laravel, Magento, and many more.
The PHP 7.4 version was officially released on November 28th, 2019 with a number of new features. It has also few incompatibilities so you should take care before upgrading from the previous version.
In this tutorial, we will show you how to install PHP7.4 with Nginx on our managed Ubuntu server. Also, feel free to learn more about how to install and configure PHP applications using the Nginx webserver on our cloud environment.
Table of Contents
Prerequisites
- An Ubuntu 20.04 VPS (we’ll be using our NVMe 2 VPS plan)
- Access to the root user account (or access to an admin account with root privileges)
Log in to the Server & Update the Server OS Packages
First, log in to your Ubuntu 20.04 server via SSH as the root user:
ssh root@IP_Address -p Port_number
You will need to replace ‘IP_Address‘ and ‘Port_number‘ with your server’s respective IP address and SSH port number. Additionally, replace ‘root’ with the username of the admin account if necessary.
Before starting, you have to make sure that all Ubuntu OS packages installed on the server are up to date. You can do this by running the following commands:
apt-get update -y
apt-get upgrade -y
Install Nginx
By default, the latest version of Nginx is available in the Ubuntu 20.04 default repository. You can install it with the following command:
apt-get install nginx -y
After installing Nginx, start the Nginx service and enable it to start at system reboot with the following command:
systemctl start nginx
systemctl enable nginx
You can also verify the installed version of Nginx using the following command:
nginx -v
You should get the following output:
nginx version: nginx/1.18.0 (Ubuntu)
Install PHP7.4
By default, Ubuntu 20.04 ships with PHP 7.4 in its upstream repositories. You can install it easily by just running the following command:
apt-get install php7.4 -y
Once the PHP is installed, verify the installed version with the following command:
php --version
You should get the following output:
PHP 7.4.3 (cli) (built: Oct  6 2020 15:47:56) ( NTS )
Copyright (c) The PHP Group
Zend Engine v3.4.0, Copyright (c) Zend Technologies
    with Zend OPcache v7.4.3, Copyright (c), by Zend Technologies
PHP configurations related to Nginx is stored in /etc/php/7.4/fpm/php.ini file. You can modify it for better performance.
Install PHP7.4-FPM and Other Extensions
Nginx does not contain native PHP processing. So you will need to install PHP-FPM for processing the PHP files. FPM is an alternative PHP FastCGI implementation with some additional features useful for heavy-loaded sites.
You can install PHP7.4-FPM with other necessary extensions by running the following command:
apt-get install php7.4-fpm php7.4-cli php7.4-mysql php7.4-curl php7.4-json -y
Once all the packages are installed, start the PHP7.4-FPM service and enable it to start at system reboot:
systemctl start php7.4-fpm
systemctl enable php7.4-fpm
Configure Nginx to Process PHP Files
Next, you will need to configure Nginx to process PHP files.
To do so, create a new Nginx virtual host configuration file with the following command:
nano /etc/nginx/sites-available/example
Add the following lines:
server {
        listen 80;
        server_name test.example.com;
        root /var/www/html;
        index info.php;

    location ~ \.php$ {
        include snippets/fastcgi-php.conf;
        fastcgi_pass unix:/run/php/php7.4-fpm.sock;
    }
}
Save and close the file then enable the Nginx virtual host configuration file with the following command:
ln -s /etc/nginx/sites-available/example /etc/nginx/sites-enabled/
Next, verify the Nginx for any syntax error with the following command:
nginx -t
You should get the following output:
nginx: the configuration file /etc/nginx/nginx.conf syntax is ok
nginx: configuration file /etc/nginx/nginx.conf test is successful
Finally, restart the Nginx service to apply the configuration changes:
systemctl restart nginx
Next, create a info.php file to verify the PHP version:
nano /var/www/html/info.php
Add the following code:
<?php phpinfo();
Save and close the file when you are finished.
Verify PHP
At this point, Nginx is configured to process PHP files. Its time to test it.
Open your web browser and type the URL http://test.example.com. You should see the following screen:
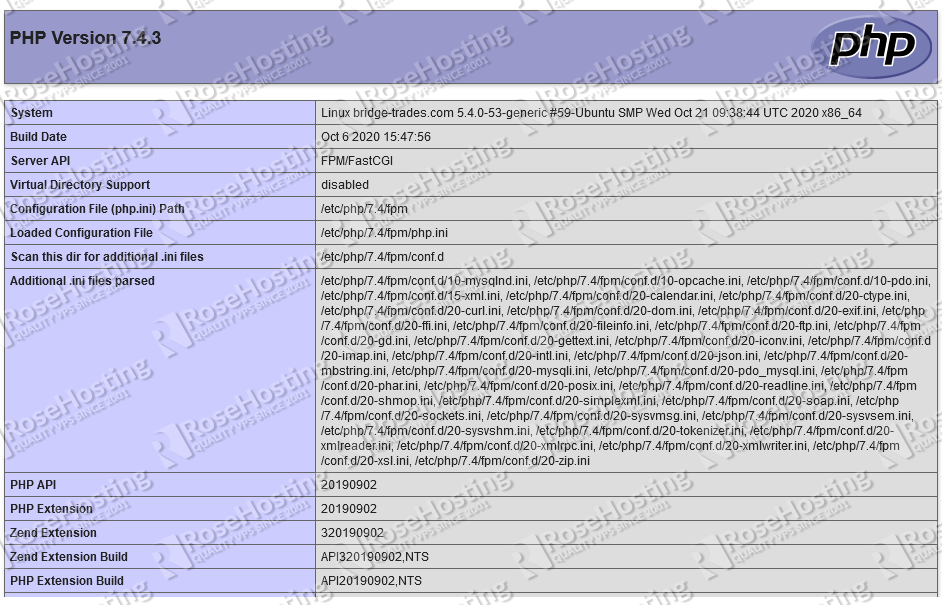
On the above page, you can check the PHP7.4 version, installed PHP extensions, PHP configuration options etc.

Of course, you don’t have to do any of this if you use one of our Nginx VPS Hosting services, in which case you can simply ask our expert Linux admins to setup this for you. They are available 24×7 and will take care of your request immediately.
PS. If you liked this post please share it with your friends on the social networks using the buttons on the left or simply leave a reply below. Thanks.
I have a problem with php files. Instead of opening the page, php file is downloaded.
Is php7.4-fpm running?
Did you configure Nginx to process PHP Files?
the same thing was happening to me – in the nginx default file – i specified server_name when i used the name i specified instead of IP address it worked.
when i open ttp://test.example.com, i can’t see anything. no local connection
You can add the domain “test.example.com” in the /etc/hosts file on your server so you can access it locally.
i have a problem too
I didn’t have any changes
What issue did you encounter in installing PHP 7.4 with Nginx?
It is bad advice to suggest calling ‘apt-get upgrade -y’. It can be disastrous for users. There is no guarantee that upgraded packages will be compatible with existing software that wasn’t installed via mainline apt repositories, and most definitely software that wasn’t installed by apt at all such as npm or any other package manager, or software manually compiled. If you call ‘apt upgrade’ you always need to view packages that will be upgraded and consider how it may effect your system.
And then manually accept if comfortable with the outcome. The -y flag accepts automatically.