In this tutorial, we will be installing WordPress using the LEMP stack (Linux, Nginx, MySQL, and PHP) on a CentOS 8 VPS.

WordPress is a free and open-source CMS based on the PHP programming language, with MySQL being used for the backend where the data is stored. Used by millions of people, it is the world’s most popular content management system (or CMS for short). You can extend the functionality of WordPress site with the help of its free and premium plugins and themes.
With thousands of plugins available, you can morph your website to be anything you need it to – blogs, online stores, almost anything! WordPress is also the most user-friendly CMS compared to other content management systems, with many years of experience leading to tweaks that make tasks take just a few clicks. The installation is pretty easy, too – all you need is to closely follow the steps in this tutorial. Let’s get started.
Table of Contents
Step 1 – Log in and Update any out-of-date Server Packages
Log in to your CentOS 8 server via SSH as the root user:
ssh root@IP_Address -p Port_number
where ‘IP_Address‘ and ‘Port_number‘ are the actual IP address of your server and the SSH port (the default port is 22)
Next, run the following commands to upgrade all installed packages on your VPS:
dnf update -y
Updating packages regularly is a good idea because it improves the security and feature set of your Linux VPS.
Step 2 – Install the Nginx Web Server
WordPress needs a web server with PHP support to run and render the web pages dynamically. For this, we will install and use the Nginx web server, a popular and highly customizable web server. It can easily be installed using the following command:
dnf -y install nginx
Once the installation is completed, start Nginx and enable it to start automatically after a reboot:
systemctl start nginx
systemctl enable nginx
You can check if the web server is running with this command:
systemctl status nginx
The output should look something like this:
● nginx.service - The nginx HTTP and reverse proxy server
   Loaded: loaded (/usr/lib/systemd/system/nginx.service; enabled; vendor preset: disabled)
  Drop-In: /usr/lib/systemd/system/nginx.service.d
           └─php-fpm.conf
   Active: active (running)
 Main PID: 31987 (nginx)
    Tasks: 5 (limit: 24007)
   Memory: 10.7M
   CGroup: /system.slice/nginx.service
           ├─31987 nginx: master process /usr/sbin/nginx
           ├─31988 nginx: worker process
           ├─31989 nginx: worker process
           ├─31990 nginx: worker process
           └─31991 nginx: worker process
You can also verify if Nginx is running by accessing http://Server_IP_Address in your preferred web browser.
Step 3 – Install and Configure PHP
The version of PHP supplied by default in CentOS 8 from the AppStream repository is 7.2.11 – this is the latest version at the time of this article being written. The following command will install the latest version of PHP and essential PHP extensions required by WordPress in order for it to function properly:
dnf install php php-common php-mbstring php-gd php-intl php-xml php-json php-mysqlnd php-fpm
Once all the packages are installed, open the php.ini file and tweak some settings (nano is our text editor of choice, you can use your own if you wish):
nano /etc/php.ini
Make the following changes:
post_max_size = 64M
memory_limit = 256M
max_execution_time = 300
upload_max_filesize = 32M
date.timezone = America/Chicago
Save and close the file.
Now open the /etc/php-fpm.d/www.conf configuration file:
sudo nano /etc/php-fpm.d/www.conf
Look for the user and group directives. Make the following changes from apache to nginx:

Save and close the file, then restart the PHP-FPM service to apply the configuration changes:
systemctl restart php-fpm
Step 4 – Install the MySQL Database Server and Create a Database
The next step will be to install the MySQL database server (one of the most popular database servers in the world) and create a user and database in MySQL for the WordPress installation. CentOS 8 is distributed with MySQL 8.0 at the time of this article being written.
MySQL 8 server can be installed using the following command:
dnf install mysql-server
After the installation is completed, start MySQL and enable it to start automatically after a reboot:
systemctl start mysqld
systemctl enable mysqld
After the installation completes, you can check the version of the installed MySQL database server:
mysql -V
mysql Ver 8.0.17 for Linux on x86_64 (Source distribution)
Additionally, you can run the mysql_secure_installation post-installation script to strengthen the security of the database server.
Next, log in to the MySQL server as user root:
mysql -u root -p
Provide your root password when prompt then create a new MySQL user and database with the following command:
mysql> CREATE DATABASE wordpress;
mysql> CREATE USER 'wpuser'@'localhost' IDENTIFIED BY 'strong_password';
mysql> GRANT ALL PRIVILEGES ON wordpress.* TO 'wpuser'@'localhost';
mysql> FLUSH PRIVILEGES;
mysql> exit;
Don’t forget to replace ‘strong_password’ with an actual, strong password. You can also replace ‘wp-user‘ with a username of your choice, if you wish.
Step 5 – Download and Install WordPress
Now that we have our prerequisites installed and configured for WordPress, we can start with its installation. The latest release of WordPress can be downloaded from their official website. At the moment of writing this article, it is version 5.4.1. It can easily be downloaded onto your CentOS 8 server using the following command (this downloads the latest version):
wget https://wordpress.org/latest.zip
Once the downloading of the WordPress archive is completed, unpack it to the document root directory of your web server (/var/www/html/):
unzip latest.zip -d /var/www/html/
Copy your wp-sample-config.php file to wp-config.php.
cp /var/www/html/wordpress/wp-config-sample.php /var/www/html/wordpress/wp-config.php
Open your config file and update the database information.
nano /var/www/html/wordpress/wp-config.php
You need to modify entries according to the created database, user, and password. Leave the ‘localhost’ field intact – this is because our MySQL server is running on the same host as the WordPress instance.
// ** MySQL settings - You can get this info from your web host ** //
/** The name of the database for WordPress */
define( 'DB_NAME', 'wordpress' );

/** MySQL database username */
define( 'DB_USER', 'wpuser' );

/** MySQL database password */ d
efine( 'DB_PASSWORD', 'strong_password' );

/** MySQL hostname */
define( 'DB_HOST', 'localhost' );
We now need to make the Nginx user as the owner of the WordPress directory, so that it has access and is able to serve the files.
This will create a new ‘wordpress’ directory which will contain all files of the WordPress installation.
chown -R nginx:nginx /var/www/html/wordpress
Step 6 – Configure Nginx
Next, we will need to create a virtual block configuration file for WordPress. You can create a new virtual block configuration file with the following command:
nano /etc/nginx/conf.d/wordpress.conf
Add the following lines:
server {
listen 80;

server_name yourdomain.com www.yourdomain.com;
root /var/www/html/wordpress;
index index.php index.html index.htm;

location / {
try_files $uri $uri/ /index.php?$args;
}

location = /favicon.ico {
log_not_found off;
access_log off;
}

location ~* \.(js|css|png|jpg|jpeg|gif|ico)$ {
expires max;
log_not_found off;
}

location = /robots.txt {
allow all;
log_not_found off;
access_log off;
}

location ~ \.php$ {
include /etc/nginx/fastcgi_params;
fastcgi_pass unix:/run/php-fpm/www.sock;
fastcgi_index index.php;
fastcgi_param SCRIPT_FILENAME $document_root$fastcgi_script_name;
}
}
NOTE: Don’t forget to replace yourdomain.com with your unique registered domain name.
You can test if everything is properly configured using the following command:
nginx -t

nginx: the configuration file /etc/nginx/nginx.conf syntax is ok
nginx: configuration file /etc/nginx/nginx.conf test is successful
Once you confirm that everything is OK, restart Nginx for the changes to take effect:
systemctl restart nginx.service
Step 7 – Complete the WordPress installation
Once all steps above are done, the installation from the command line is completed. You can open your favorite web browser and point it to http://yourdomain.com. You should get the following screen:
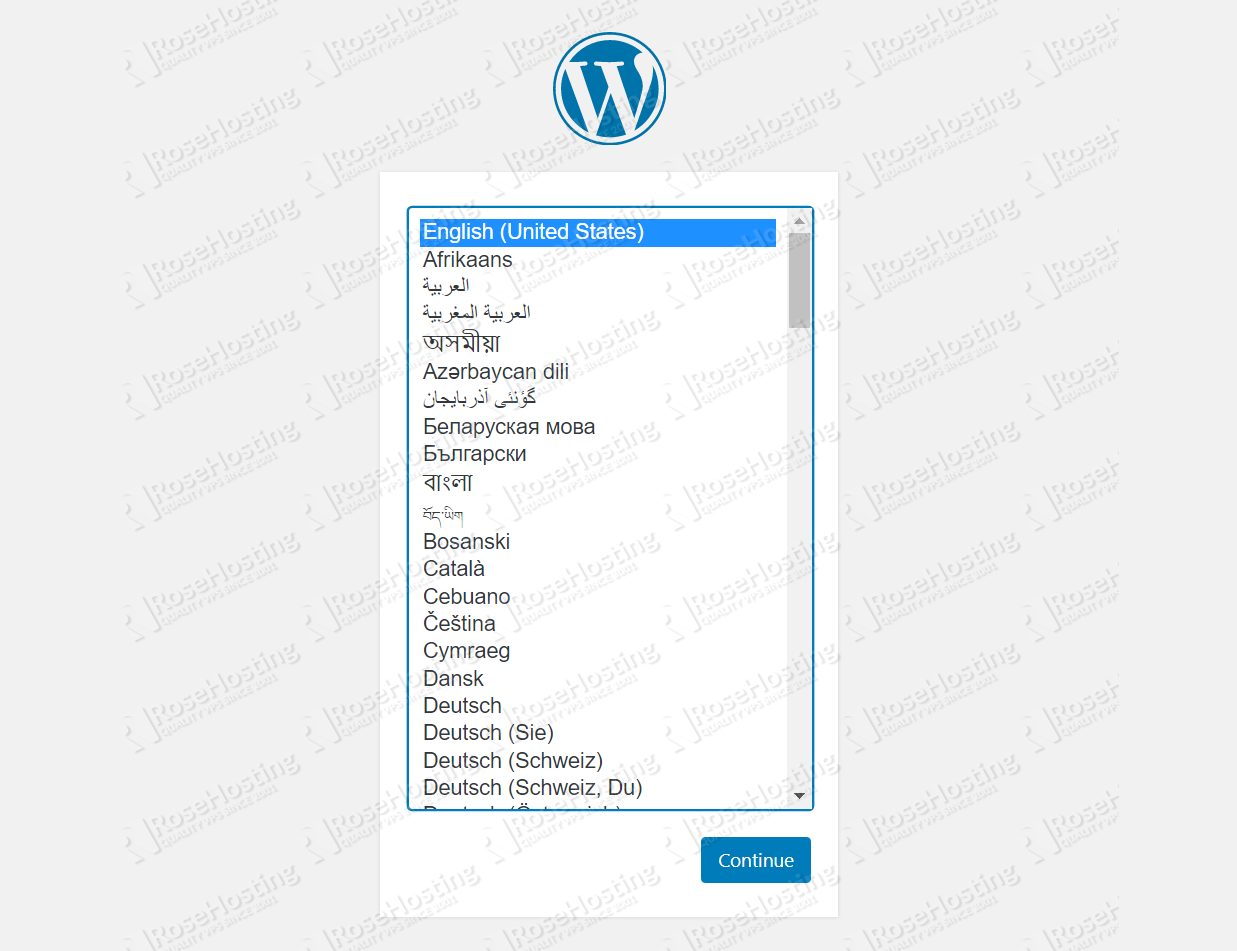
Select your language and follow the installation wizard to complete the WordPress installation and create your administrative account. Congratulations, you now have WordPress installed on CentOS 8 with a LEMP stack.

Of course, if you are one of our Managed WordPress Hosting customers, you don’t have to install WordPress with LEMP Stack on CentOS 8, simply ask our admins, sit back, and relax. Our admins will install WordPress with LEMP Stack on your CentOS 8 VPS for you immediately, configuring it to your exact specifications.
PS. If you liked this post on how to install WordPress with LEMP Stack on CentOS 8, please share it with your friends on the social networks using the buttons below, or simply leave a comment in the comments section. Thank you.
You have to open ports 80 and 443:
# firewall-cmd –zone=public –add-service=http
# firewall-cmd –zone=public –add-service=https
Note, the above firewald commands will open HTTP and HTTPS port only temporarily.
Open port 80 and port 443 port permanently. Execute the below commands to open both ports permanently, hence, make the settings persistent after reboot:
# firewall-cmd –zone=public –permanent –add-service=http
# firewall-cmd –zone=public –permanent –add-service=https
# firewall-cmd –reload