Status: This OS is no longer supported
This article, “How to monitor your server’s resource usage with Munin on CentOS 6,” covers a version of CentOS that reached end of life (EOL). It is no longer supported. As such, this guide is no longer maintained. If you are currently operating a server running CentOS 6, we highly recommend contacting RoseHosting’s fully managed support. They can upgrade or migrate you to a supported version of AlmaLinux.
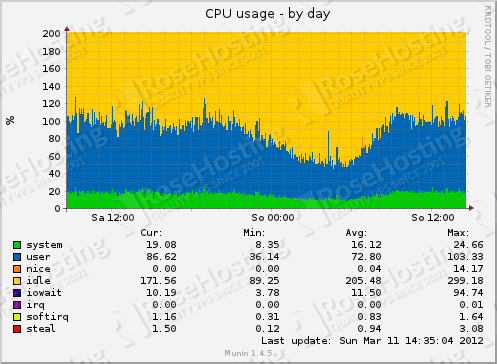 In the following article, we will show you how to install Munin on a CentOS 6 VPS so you can monitor your virtual servers resource usage.
Munin is a networked resource monitoring tool that can help analyze resource usage of servers and services. It has a master/slave architecture in which the master connects to all the slaves at regular intervals and asks them for data.
It is written in Perl and is very fast and robust monitoring tool.
Table of Contents
Let’s Begin
Before proceeding further, initiate a screen session by executing:
## screen -U -S munin-screen
Then, make sure your CentOS VPS is fully up-to-date by executing:
## yum update
Next, we assume you already have the LAMP Stack up and working on your Linux VPS. If not, please proceed with our article on how to install LAMP (Linux, Apache, MySQL and PHP) on CentOS 6
Since Munin is available as a package in the EPEL repository, we are going to add EPEL to our CentOS 6 VPS using the following commands:
## wget -P /tmp http://mirror.itc.virginia.edu/fedora-epel/6/x86_64/epel-release-6-8.noarch.rpm
## rpm -Uvh /tmp/epel-release-6-8.noarch.rpm
## rm -f /tmp/epel-release-6-8.noarch.rpm
Install Munin using the command below:
## yum install munin*
Proceed with editing Munin’s configuration file. Make sure you add/edit the following:
## vim /etc/munin/munin.conf

dbdir /var/lib/munin
htmldir /var/www/html/munin
logdir /var/log/munin
rundir /var/run/munin
tmpldir /etc/munin/templates

includedir /etc/munin/conf.d

graph_strategy cron
cgiurl_graph /munin-cgi/munin-cgi-graph
html_strategy cron

[localhost]
    address 127.0.0.1
    use_node_name yes
add user to munin using htpasswd by running:
## htpasswd -c /etc/munin/munin-htpasswd administrator
ommit the ‘-c’ argument if adding additional users.
restart apache and munin using the following commands:
## service munin-node restart
## service httpd restart
Finally, access your munin at http://$your_ip and log in using ‘administrator’ as username and your administrator’s password as password
Conclusion
Of course, if you are one of our Linux VPS Hosting customers, you don’t have to do any of this, simply ask our admins, sit back and relax. Our admins will set this up for you immediately.
PS. If you liked this post, please share it with your friends or leave a reply below. Thanks.