
Rsync stands for “remote synchronization”. Rsync is the most robust, versatile and flexible tool to transfer files if compared to other alternatives like SCP. It is a great tool for daily server operations like backup and restore, and general file operations between two or more local and remote machines. In this article, we will show you how to send and download files using rsync.
Table of Contents
1. Syntax of Rsync
The following syntax is most likely the most common form of rsync command that you will see.
# rsync [options] /source /destination
These are the commonly used options

-v, --verbose increase verbosity, provide more information about what the command is doing
-q, --quiet suppress non-error messages
-c, --checksum skip based on checksum, not mod-time and size
-a, --archive archive mode; equals -rlptgoD (no -H,-A,-X)
-r, --recursive recurse into directories
-u, --update skip files that are newer on the receiver
-d, --dirs transfer directories without recursing
-p, --perms preserve permissions
-E, --executability preserve executability
-A, --acls preserve ACLs (implies -p)
-X, --xattrs preserve extended attributes
-o, --owner preserve owner (super-user only)
-g, --group preserve group
-D same as --devices --specials
-t, --times preserve modification times
-S, --sparse handle sparse files efficiently
-n, --dry-run perform a trial run with no changes made
-W, --whole-file copy files whole (w/o delta-xfer algorithm)
-x, --one-file-system don't cross filesystem boundaries
-B, --block-size=SIZE force a fixed checksum block-size
-e, --rsh=COMMAND specify the remote shell to use
-P same as --partial --progress
For example, we are going to sync files from /var/www/html/ to /opt/backup/. To complete this, we can run this command:
# rsync -Wav /var/www/html/ /opt/backup/
Let’s break the command above down. The options are archive (-a), which tells rsync to copy files recursively and to preserve group and user ownership when it copies files. This option is actually a combination of option (-rlptgoD) that includes recursive transfer, the transfer of file modification times, file permissions, symbolic links, etc.
With this (-W) option, the delta-transfer algorithm is not used and the whole file is sent as-is instead. This is the default when both the source and destination are specified as local paths, but only if no batch-writing option is in effect.
The verbose option (-v) tells rsync to print more information about what it is doing to the terminal.
2. How to Download Files Using Rsync
In the previous step, we learned how to copy files from one location to another using rsync. Now, we are going to download files from a remote server using rsync. Basically, the command is the same, we only need to replace the source with an SSH username of the remote server because the transfer will use an SSH connection.
# rsync [-options] user@SOURCE_IP_ADDRESS:/SOURCE /DESTINATION
For example, we want to download or copy a directory from our server at IP address 1.2.3.4 to another server at 5.6.7.8. Let’s say we are going to download or copy /var/www/html/ to /home/master/
We need to log in to our server at 5.6.7.8 and run this command.
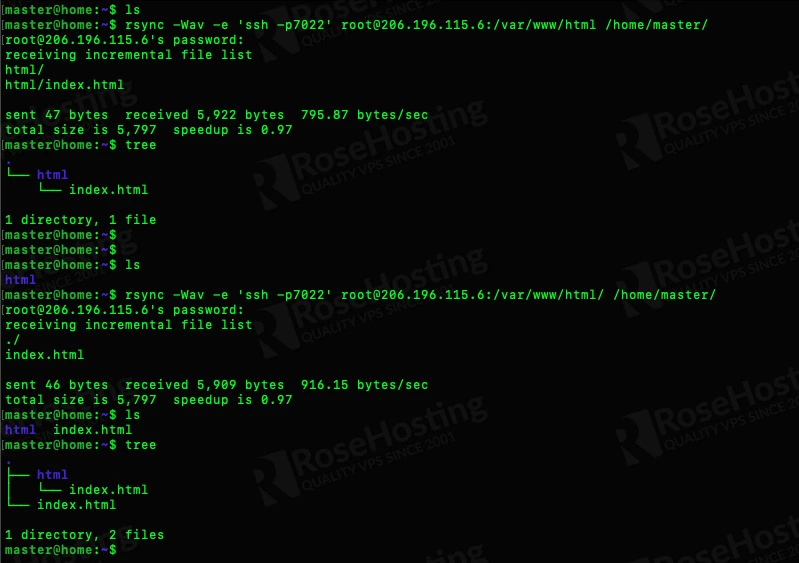
# rsync -Wav -e 'ssh -p 7022' username@1.2.3.4:/var/www/html/ /home/master/
As you can see, we added an option (-e). This option is used to specify the remote shell to use and what port we are going to connect to. Since the SSH on the remote server is listening on port 7022, we can add it as ‘ssh -p 7022’. If the remote server’s SSH port is the default port 22, you can simply use ‘-e ssh’ as the option in the rsync command syntax.
The last one, pay attention to the trailing slash in the source (/var/www/html/). If you want to download or copy ONLY the contents of html directory without the html directory itself, do not forget to add a trailing slash. If you do not add a trailing slash, then the command will copy the html directory and its contents.
3. How to Send Files Using Rsync
This time, the destination will be a remote system while the source is local, so it is considered as sending files. You can specify a remote user account if it’s different than the one you use to send the files using rsync. Then the said user account should have written permission in the remote server.
The command will look like this
# rsync [-options] /SOURCE user@DESTINATION_IP_ADDRESS:/DESTINATION
# rsync -Wav -e 'ssh -p 7022' /home/master/ username@1.2.3.4:/var/www/html/
Of course, the user account you are referencing on the remote server will need to have the correct permissions to write to the destination directory.
That’s it. You have learned how to send and download files using rsync. To learn more about the available options, you can run man rsync while in your terminal. The command will show you rsync manual.
Of course, you don’t have to send and download files using rsync if you use one of our Linux VPS Hosting services, in which case you can simply ask our expert Linux admins to send and download files using rsync for you. They are available 24×7 and will take care of your request immediately.
PS. If you liked this post on how to send and download files using rsync, please share it with your friends on social networks or simply leave a reply in the comments sections. Thanks.