
BIND (Berkeley Internet Name Domain) is a freely available DNS server software widely utilized on Unix/Linux because of its reliability and excellent standard.
It was initially created by UC Berkeley, and subsequently, in 1994, its advancement was transferred to Internet Systems Consortium, Inc (ISC).
It’s available on most Linux distributions and provides additional tools for diagnostics and testing of the DNS server.

Bind can serve as both an authoritative DNS server and a DNS resolver at the same time. In this tutorial, we will show how to set up a private DNS server with Bind on AlmaLinux 9; it will act as a local DNS resolver.
Table of Contents
Prerequisites
- An AlmaLinux VPS
- root SSH access or a regular user with sudo privileges
Step 1. Log in to your server via SSH
First, you will need to log in to your AlmaLinux 8 VPS via SSH as the root user:
ssh root@IP_Address -p Port_number
You will need to substitute ‘IP_Address’ and ‘Port_number’ with your server’s corresponding IP address and SSH port number—furthermore, substitute ‘root’ with the username of the system user with sudo privileges.
You can verify whether you have the correct AlmaLinux version installed on your server with the subsequent command:
# cat /etc/almalinux-release
You should see an output like this:
AlmaLinux release 9.2 (Turquoise Kodkod)
In this article, we are using ‘root’ to execute the shell commands. If you want to use your regular user with sudo privileges to run the commands, make sure to append ‘sudo’ in front of the commands.
Step 2. Install Bind
Execute the following command to install Bind 9 on your AlmaLinux 9 from its default repository. Bind 9 is the most recent version, while Bind 10 is the obsolete project.
# dnf update
# dnf install bind bind-utils
Once installed, we can check the Bind version information.
# named -v
Sample output:
BIND 9.16.23-RH (Extended Support Version)
To check the Bind version number and build options, execute this command
# named -V
It will show you an output similar to this:
BIND 9.16.23-RH (Extended Support Version)
running on Linux x86_64 5.14.0-284.11.1.el9_2.x86_64 #1 SMP PREEMPT_DYNAMIC Tue May 9 05:49:00 EDT 2023
built by make with '--build=x86_64-redhat-linux-gnu' '--host=x86_64-redhat-linux-gnu' '--program-prefix=' '--disable-dependency-tracking' '--prefix=/usr' '--exec-prefix=/usr' '--bindir=/usr/bin' '--sbindir=/usr/sbin' '--sysconfdir=/etc' '--datadir=/usr/share' '--includedir=/usr/include' '--libdir=/usr/lib64' '--libexecdir=/usr/libexec' '--sharedstatedir=/var/lib' '--mandir=/usr/share/man' '--infodir=/usr/share/info' '--with-python=/usr/bin/python3' '--with-libtool' '--localstatedir=/var' '--with-pic' '--disable-static' '--includedir=/usr/include/bind9' '--with-tuning=large' '--with-libidn2' '--with-maxminddb' '--with-dlopen=yes' '--with-gssapi=yes' '--with-lmdb=yes' '--without-libjson' '--with-json-c' '--enable-dnstap' '--enable-fixed-rrset' '--enable-full-report' 'build_alias=x86_64-redhat-linux-gnu' 'host_alias=x86_64-redhat-linux-gnu' 'CC=gcc' 'CFLAGS= -O2 -flto=auto -ffat-lto-objects -fexceptions -g -grecord-gcc-switches -pipe -Wall -Werror=format-security -Wp,-D_FORTIFY_SOURCE=2 -Wp,-D_GLIBCXX_ASSERTIONS -specs=/usr/lib/rpm/redhat/redhat-hardened-cc1 -fstack-protector-strong -specs=/usr/lib/rpm/redhat/redhat-annobin-cc1 -m64 -march=x86-64-v2 -mtune=generic -fasynchronous-unwind-tables -fstack-clash-protection -fcf-protection' 'LDFLAGS=-Wl,-z,relro -Wl,--as-needed -Wl,-z,now -specs=/usr/lib/rpm/redhat/redhat-hardened-ld -specs=/usr/lib/rpm/redhat/redhat-annobin-cc1 ' 'LT_SYS_LIBRARY_PATH=/usr/lib64:' 'PKG_CONFIG_PATH=:/usr/lib64/pkgconfig:/usr/share/pkgconfig'
compiled by GCC 11.3.1 20221121 (Red Hat 11.3.1-4)
compiled with OpenSSL version: OpenSSL 3.0.1 14 Dec 2021
linked to OpenSSL version: OpenSSL 3.0.7 1 Nov 2022
compiled with libuv version: 1.42.0
linked to libuv version: 1.42.0
compiled with libxml2 version: 2.9.13
linked to libxml2 version: 20913
compiled with json-c version: 0.14
linked to json-c version: 0.14
compiled with zlib version: 1.2.11
linked to zlib version: 1.2.11
linked to maxminddb version: 1.5.2
compiled with protobuf-c version: 1.3.3
linked to protobuf-c version: 1.3.3
threads support is enabled

default paths:
named configuration: /etc/named.conf
rndc configuration: /etc/rndc.conf
DNSSEC root key: /etc/bind.keys
nsupdate session key: /var/run/named/session.key
named PID file: /var/run/named/named.pid
named lock file: /var/run/named/named.lock
geoip-directory: /usr/share/GeoIP
Bind has been installed at this point, but it’s not automatically running. Let’s run this command to start Bind and configure it to run automatically upon reboot.
# systemctl enable --now named
Step 3. Configure Bind
By default, the BIND9 server on CentOS/RHEL offers recursive functionality exclusively for the localhost. External requests will be rejected. Modify the main configuration file of BIND, located at /etc/named.conf.
# nano /etc/named.conf
Find these two lines
   listen-on port 53 { 127.0.0.1; };
   listen-on-v6 port 53 { ::1; };
Then, comment on them, and it should look like these
#listen-on port 53 { 127.0.0.1; };
#listen-on-v6 port 53 { ::1; };
You can also modify this line
allow-query { localhost; };
To something like this
allow-query { localhost; 192.168.0.0/24; 10.10.10.0/24; };
Or, if you want to make some tests before allowing specific IP ranges, simply comment on the lines; it should be like this:
#allow-query { localhost; };
Save the file, then exit and restart Bind.
# systemctl restart named
Now, the Bind service is listening to your server’s interfaces, not only localhost.
Step 4. Create Zones
Append the following lines while modifying the domain name as per your needs at the end of the document.
zone "yourdomain.com" {
    type master;
    file "/var/named/yourdomain.com";
};
Save the file, then exit
Now create a BIND zone configuration file /var/named/yourdomain.com
# nano /var/named/yourdomain.com
Then add these lines.
$TTL 1d
@               IN      SOA     dns1.yourdomain.com.    hostmaster.yourdomain.com. (
                1        ; serial
                6h       ; refresh after 6 hours
                1h       ; retry after 1 hour
                1w       ; expire after 1 week
                1d )     ; minimum TTL of 1 day


@               IN      NS      ns1.yourdomain.com.
@				IN 		NS 		ns2.yourdomain.com.

ns1             IN      A       192.168.0.1
ns2				IN      A       192.168.0.1

yourdomain.com.    IN      MX      0      mail.yourdomain.com.
mail            IN      A       192.168.0.1
www             IN      CNAME       yourdomain.com.
blog            IN      A       192.168.0.1
Save the file, then exit.
Please ensure that you always include a dot at the end of the domain name when using it in the zone file. You have the flexibility to modify or add the records as per your requirements using the provided template.
This line signifies:
@ – The domain mentioned in the named.conf.local file, which is yourdomain.com, will be substituted here.
IN – Records of INTERNET type in this case.
SOA – This is the Start Of Authority record, which is the authoritative record for this domain.
ns1.yourdomain.com. – The nameserver DNS record. – The server that handles the domain's DNS.
hostmaster.yourdomain.com. – The email address of the nameserver's manager. The @ symbol is replaced with a dot.
You can add more zones and follow the steps above, and note that every time you modify Bind configuration files, make sure to execute this command:
# named-checkconf
If there is no message after executing the command, then the configuration is okay, and we can restart the Bind service.
# systemctl restart named
At this point, you should be able to use your server as the DNS server. For example, we can try to query mail.yourdomain.com
# dig mail.yourdomain.com @127.0.0.1
The command above will return an output like this:
; <<>> DiG 9.16.23-RH <<>> mail.yourdomain.com @127.0.0.1
;; global options: +cmd
;; Got answer:
;; ->>HEADER<<- opcode: QUERY, status: NOERROR, id: 933
;; flags: qr aa rd ra; QUERY: 1, ANSWER: 1, AUTHORITY: 0, ADDITIONAL: 1

;; OPT PSEUDOSECTION:
; EDNS: version: 0, flags:; udp: 1232
; COOKIE: 86b765bc5dc202110100000064a7606f61c60bf02ed52508 (good)
;; QUESTION SECTION:
;mail.yourdomain.com. IN A

;; ANSWER SECTION:
mail.yourdomain.com. 86400 IN A 192.168.0.1

;; Query time: 2 msec
;; SERVER: 127.0.0.1#53(127.0.0.1)
;; WHEN: Thu Jul 06 19:46:39 CDT 2023
;; MSG SIZE rcvd: 92
As you can see, mail.yourdomain.com is pointing to 192.168.0.1
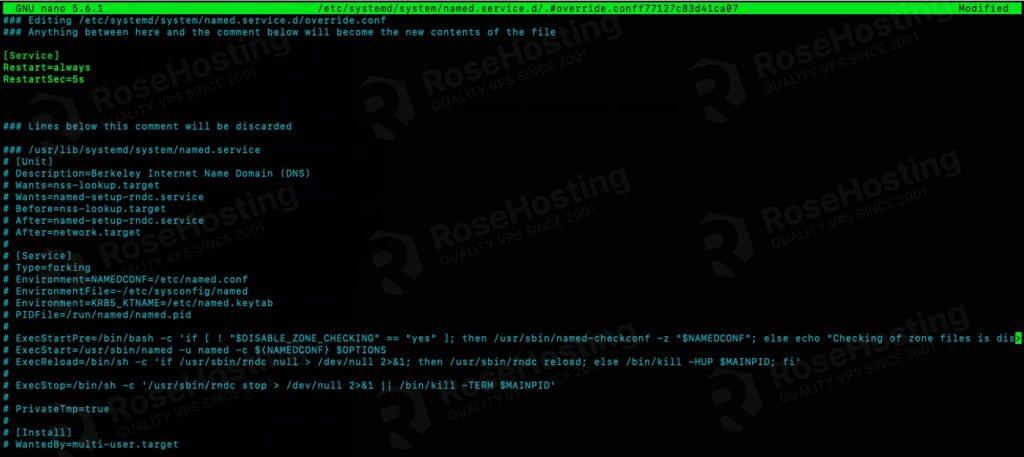
Step 5. Configure Systemd
To make the Bind service always up and running, we can modify the systemd file.
# systemctl edit named
Add these two lines to the file, and make sure to put them in the correct place.
[Service]
Restart=always
RestartSec=5s
Save the file, then exit.
Now, let’s reload it and try to kill the Bind service
# systemctl daemon-reload
# pkill named
Then check the Bind status. You will see that the Bind service automatically restarted.
# systemctl status named
Congratulations! You have successfully set up a private DNS server with Bind on AlmaLinux 9.
If you are one of our web hosting customers and use our managed Linux Hosting, you don’t have to follow this tutorial and install a private DNS server with Bind on AlmaLinux 9 yourself. Our Linux admins will set up and configure a private DNS server VPS for you. They are available 24×7 and will take care of your request immediately; all you need to do is submit a ticket.
PS. If you liked this post, please share it with your friends on social networks or simply leave a reply below. Thanks.
wonderful article. I followed the instructions and my local DNS server works flawlessly