Status: This OS is no longer supported
This article, “How to set-up TT-RSS (tiny-tiny RSS) on CentOS 6,” covers a version of CentOS that reached end of life (EOL) and is no longer supported. As such, this guide is no longer maintained. If you are currently operating a server running CentOS 6, we highly recommend contacting RoseHosting’s fully managed support to upgrade or migrate to a supported version of AlmaLinux.
 The following article aims to teach you how you can install and configure TT-RSS (tiny-tiny RSS) on CentOS 6.
We are using one of our blazing fast CentOS 6 VPS, but the procedure applies to any other CentOS 6 based machine.

What is Tiny Tiny RSS?
It is an open source, web-based news feed (RSS/Atom) reader and aggregator, designed to allow you to read news from any location, while feeling as close to a real desktop application as possible.
Table of Contents
Features of Tiny Tiny RSS:
- Server-side AJAX-powered application, user only needs a web browser
- Free software, licensed under GNU GPL
- Supports feed aggregation / syndication,
- Supports keyboard shortcuts
- Supports OPML import/export
- Supports sharing arbitrary content through tt-rss
- Supports mobile device
and many more….
You need to have a web/php server and a database server set-up on your CentOS 6 so you can run Tiny Tiny RSS. Since we are using one of our LAMP CentOS 6 Virtual Servers we can continue with the set-up of Tiny Tiny RSS.
If you’re starting up with a minimal CentOS 6 installation you can follow our article on how to install LAMP (Apache MySQL and PHP) on CentOS 6 .
Make sure your system is up-to-date
# yum update
TT-RSS requires some PHP extensions to be installed and enabled. These are:
- JSON
- mbstring
- iconv
- CURL (not required, but highly recommended) OR support for remote fopen()
- posix functions (for the multiprocess update daemon, otherwise not needed)
- GD (for OTP QR code generation, otherwise not needed)
- PostgreSQL or MySQL depending on the database server used
since we’re going to use LAMP stack to serve TT-RSS, the following command can verify if the modules outlined above are present on your system:
# php -m | grep -Ew 'json|mbstring|iconv|curl|posix|gd|mysql|xml'
Download and extract Tiny Tiny RSS
At the time of writing this article, TT-RSS was at version 1.7.9.
# mkdir -p /var/www/html/tt-rss
# cd !$
# wget https://github.com/gothfox/Tiny-Tiny-RSS/archive/1.7.9.tar.gz -O 1.7.9.tar.gz
# tar -zxf 1.7.9.tar.gz
# rm -f 1.7.9.tar.gz
# mv Tiny-Tiny-RSS-1.7.9/* .
# rm -rf Tiny-Tiny-RSS-1.7.9/
# chown apache: -R ../tt-rss/
Create a database for Tiny Tiny RSS
# mysql -u root -p
mysql> create database ttRssDB;
mysql> grant all on ttRssDB.* to ttRssUser@localhost identified by 'SomeSecretPassword';
mysql> flush privileges;
mysql> \q
next, navigate to http://<hostname_ip>/tt-rss/install and set-up your tt-rss installation like: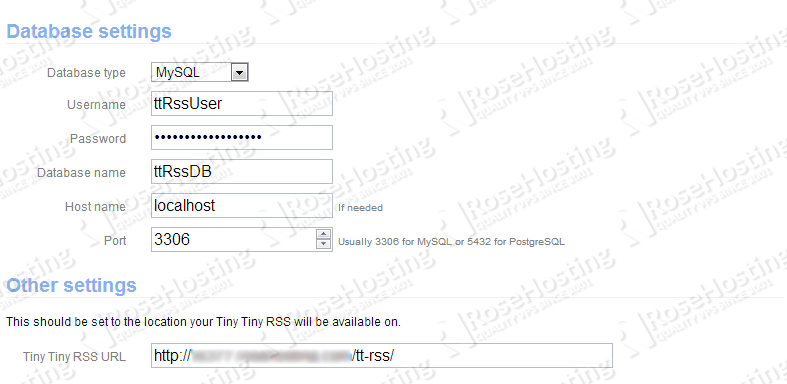
With all that in place click the ‘Test configuration‘ button and once everything is OK proceed with clicking the ‘Initialize database‘ button.
Finally, click the ‘Save configuration‘ button to tell tt-rss to automatically save the configuration file for you. Use the default tt-rss login credentials to login.
username: admin | password: password
The next thing we must set-up is, how tt-rss feeds are going to be updated. We will use the ‘daemon’ method so, let’s start with creating tt-rss’ init script:
# cat > /etc/init.d/reader
#!/bin/bash
## reader daemon
# chkconfig: 345 20 80
# description: reader update daemon
# processname: reader

# Source function library.
. /etc/init.d/functions

# Define some variables
TT_PATH="/var/www/html/tt-rss/"

DAEMON=/usr/bin/php
#DAEMONOPTS="update.php --daemon --feeds"
DAEMONOPTS="update_daemon2.php"

NAME=reader
DESC="reader update daemon"
PIDFILE=/var/run/$NAME.pid
SCRIPTNAME=/etc/init.d/$NAME
USER=apache

case "$1" in
start)
    printf "%-50s" "Starting $NAME..."
    cd $TT_PATH

    if [ ! -f $PIDFILE ]; then

        daemon --user=$USER $DAEMON $DAEMONOPTS > /dev/null 2>&1 &
        sleep 5
        PID=`ps aux|grep -vE 'grep|runuser|bash'|grep -w '/usr/bin/php update_daemon2.php'|awk '{print $2}'`

        if [ -z "$PID" ]; then
            printf "%s\n" "Fail"
        else
            echo $PID > $PIDFILE
            printf "%s\n" "Ok"
        fi
    fi
;;
status)
    printf "%-50s" "Checking $NAME..."
    if [ -f $PIDFILE ]; then
        PID=`cat $PIDFILE`
        if [ -z "`pgrep $PID`" ] && [ "$PID" != "`ps aux|grep -vE 'grep|runuser|bash'|grep -w '/usr/bin/php update_daemon2.php'|awk '{print $2}'`" ]; then
            printf "%s\n" "Process dead but pidfile exists"
        else
            echo "Running"
        fi
    else
        printf "%s\n" "Service not running"
    fi
;;
stop)
    printf "%-50s" "Stopping $NAME"
    if [ -f $PIDFILE ]; then
        PID=`cat $PIDFILE`
        cd $TT_PATH
        kill -HUP $PID 2>/dev/null
        printf "%s\n" "Ok"
        rm -f $PIDFILE
    else
        printf "%s\n" "pidfile not found"
    fi
;;

restart)
    $0 stop
    $0 start
;;

*)
    echo "Usage: $0 {status|start|stop|restart}"
    exit 1
esac
Make it executable by executing:
# yum install php-process
# service httpd restart
# chmod +x /etc/init.d/reader
# chkconfig --levels 235 reader on
# service reader start
Enjoy using your newly installed RSS Reader.
If you are a customer and are already using our Linux VPS Hosting service feel free to contact our admins and they will install tiny-tiny rss for you. This service is included as part of our All-Inclusive VPS Hosting.
PS. If you liked this post please share it with your friends on the social networks using the buttons on the left or simply leave a reply below. Thanks.