
In this tutorial, we are going to explain in step-by-step detail how to setup Apache, PHP, and MongoDB on Ubuntu 20.04
We will install the Apache Web server, the latest PHP version, and the MongoDB database server. The purpose of this post is to explain how can these three different types of services be configured on one server for future development tasks and the building of an amazing application. MongoDB is a free open-source, NoSQL backend database server, which works perfectly with Apache Web server and PHP as a scripting language.
This setup and environment will take up to 15 minutes. Let’s get started!
Table of Contents
Prerequisites
- Fresh install of Ubuntu 20.04
- User privileges: root or non-root user with sudo privileges
Step 1. Update the System
Before the installation of these three different services we are going to update the system packages to the latest versions available:
sudo apt update -y && sudo apt upgrade -y
Step 2. Install Apache Web Server
To install the Apache webserver execute the command below:
sudo apt install apache2
After successfull installation, start and enable the service
sudo systemctl start apache2 && sudo systemctl enable apache2
To check if everything is OK, execute the following command for the status of the Apache2 service:
sudo systemctl status apache2
You should receive the following output:
root@vps:~# sudo systemctl status apache2
● apache2.service - The Apache HTTP Server
     Loaded: loaded (/lib/systemd/system/apache2.service; enabled; vendor preset: enabled)
     Active: active (running) since Thu 2022-04-14 19:54:33 UTC; 40min ago
       Docs: https://httpd.apache.org/docs/2.4/
   Main PID: 675 (apache2)
      Tasks: 6 (limit: 4617)
     Memory: 23.1M
     CGroup: /system.slice/apache2.service
             ├─675 /usr/sbin/apache2 -k start
             ├─925 /usr/sbin/apache2 -k start
             ├─926 /usr/sbin/apache2 -k start
             ├─927 /usr/sbin/apache2 -k start
             ├─928 /usr/sbin/apache2 -k start
             └─930 /usr/sbin/apache2 -k start

Apr 14 19:54:31 test.vps systemd[1]: Starting The Apache HTTP Server...
Step 3. Install PHP 8 with MongoDB Module
First, we need to add the PHP repository and choose Apache from the list. Execute the following command:
sudo apt install software-properties-common

sudo add-apt-repository ppa:ondrej/php
Once, the repo is added, update the system and install the PHP along with other modules including the MongoDB module.
sudo apt install php8.0 libapache2-mod-php8.0 php8.0-cli php8.0-mongodb php8.0-common php8.0-imap php8.0-redis php8.0-snmp php8.0-xml php8.0-zip php8.0-mbstring php8.0-cgi php8.0-curl php8.0-gd -y
Check the installed PHP version with the following command:
php -v
You should receive the following output:
root@vps:~# php -v
PHP 8.0.17 (cli) (built: Mar 20 2022 17:04:09) ( NTS )
Copyright (c) The PHP Group
Zend Engine v4.0.17, Copyright (c) Zend Technologies
    with Zend OPcache v8.0.17, Copyright (c), by Zend Technologies
To check if the MongoDB PHP module is installed successfully execute the command below:
php -m | grep mongodb
You should receive the following output
root@vps:~# php -m | grep mongodb
mongodb
Step 4. Install MongoDB Database Server
First, add the GPG keys:
wget -qO - https://www.mongodb.org/static/pgp/server-4.4.asc | sudo apt-key add -
Then, we need to add the MongoDB repository:
echo "deb [ arch=amd64,arm64 ] https://repo.mongodb.org/apt/ubuntu focal/mongodb-org/4.4 multiverse" | sudo tee /etc/apt/sources.list.d/mongodb-org-4.4.list
Once this is done, update the system and install the MongoDB database server.
sudo apt-get install gnupg
sudo apt update -y
sudo apt upgrade -y

sudo apt-get install mongodb-org=4.4.8 mongodb-org-server=4.4.8 mongodb-org-shell=4.4.8 mongodb-org-mongos=4.4.8 mongodb-org-tools=4.4.8 -y
After this start and enable the MongoDB service:
sudo systemctl start mongod && sudo systemctl enable mongod
To check the status of MongoDB execute the command below:
sudo systemctl status mongod
You should receive the following output:
root@host:~# sudo systemctl status mongod
● mongod.service - MongoDB Database Server
     Loaded: loaded (/lib/systemd/system/mongod.service; enabled; vendor preset: enabled)
     Active: active (running) since Sun 2022-04-17 07:36:21 UTC; 2s ago
       Docs: https://docs.mongodb.org/manual
   Main PID: 81644 (mongod)
     Memory: 57.1M
     CGroup: /system.slice/mongod.service
             └─81644 /usr/bin/mongod --config /etc/mongod.conf

Apr 17 07:36:21 test.vps systemd[1]: Started MongoDB Database Server.
Step 5. Create PHPINFO file
We need to create a PHP info file in the document root of the Apache webserver.
Let’s say that the document root is located at /var/www/html directory on your server.
cd /var/www/html

sudo nano phpinfo.php
Paste the following lines of code.
<?php
phpinfo();
?>
After this restart the apache service again:
sudo systemctl restart apache2
Access the website at http://YourServerIPAddress/phpinfo.php or http://YourDomainName/phpinfo.php
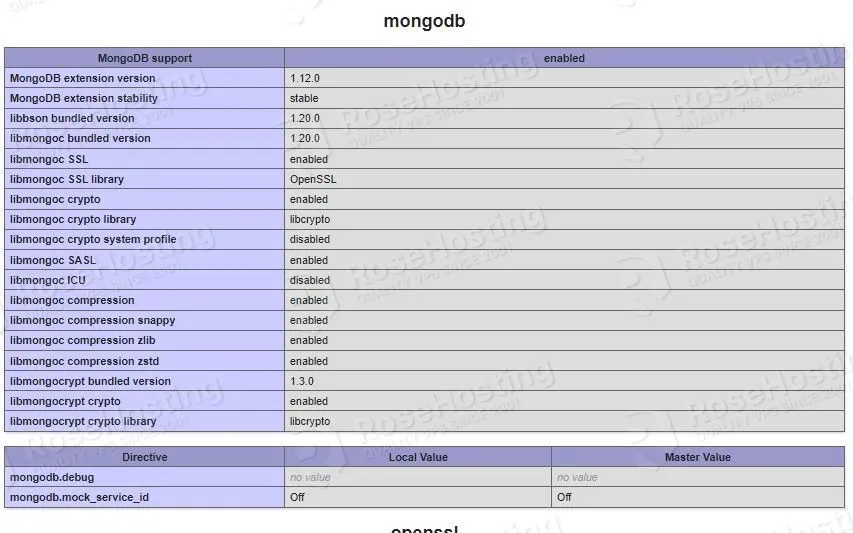
Find the MongoDB extensions with the “CTRL+F” and type “mongodb” in the search area.
That’s it. You successfully installed, Apache2, PHP8.0, and MongoDB on Ubuntu VPS along with the required extensions.
Of course, if you find it difficult to set up such a configuration with many services and modules, you can always contact our technical support and they will do the rest. We are available 24/7 and we will make your server run smoothly in no time.
If you liked this post on how to set up Apache, PHP, and MongoDB on Ubuntu 20.04, please share it with your friends on social networks or simply leave a reply below. Thanks.
You should create a docker instace with all this done, Thanks for the info