
With security becoming increasingly important in today’s modern world of information theft and privacy concerns, keeping your server safe and secure has almost become a necessity. While several methods exist to properly secure your server, from using a long password to two-factor authentication, they can be quite a hassle to set up and use on a day-to-day basis. However, private keys offer a good balance between convenience and security.
In an earlier article, we saw how to generate a private/public key pair. We also saw that we need to use the “puttygen” tool to convert it into a format that’s accepted by a lot of software programs like WinSCP for SFTP access, and so on.
In this article, we’ll show you how to use a private key to allow you to log into a server without the need for typing in a password. This comes with several benefits. In order to set up logging in using a private key on your server, you will have to have done the following first in order for this to work:
- Generated a private/public key pair on your server
- If via the command line, you’ve put your private key into the “authorized_keys” file
- You’ve downloaded your private key
- You’ve converted it to the “PPK” format
This tutorial will be done on a Linux VPS.
Table of Contents
Why Not Use a Password Instead?
When logging in via SSH, you can choose to use a password or a key file. Authentication usually hinges on one or more of three things:
- Something you know
- Something you have
- Something you are
A password belongs to the first category – something you know. And something you know can also be known by other people. Something you know can also be guessed. In general, passwords are slowly being phased out for serious security applications – or at the very least, they’re being combined with other forms of authentication.
Something you have, on the other hand, is a lot more difficult to fake. A private key on your local computer isn’t as vulnerable as a password. Passwords are also susceptible to “man-in-the-middle” attacks, where a hacker can intercept your password in plain text when you connect to the server and then use it whenever they want.
A private key connection, however, doesn’t allow man-in-the-middle attacks. Your private key is never sent over the public network. By working through a complex sequence of cryptographic algorithms, SSH key authentication is completely safe from snooping.
For these reasons, you want to use private key authentication whenever you can.
Step 1: Downloading PuTTY
A prerequisite to using private keys to log in would be that you need to convert the private key you downloaded from your server into a “PPK” file for use with 3rd party programs. One such program is called PuTTY, and it’s something of a standard connection tool in the server world. You can download it from here, and grab the version that suits you best, like this:
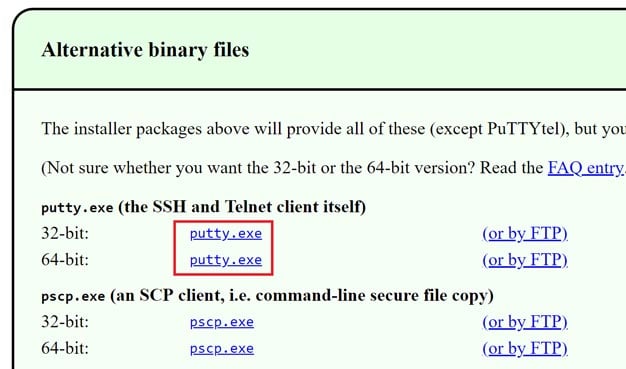
It’s a standalone program and doesn’t require any installation process. So once you download it, you can just run it and get started right away.
Step 2: Configuring Your Credentials with PuTTY
To set up PuTTY, run the executable file and after the interface opens, click the “Sessions” tab on the left (it should be selected by default). Now enter your hostname and the port number. Normally the port number for SSH is 2222, but our test server is set to use a custom port to make it difficult for attackers to randomly make attempts to log in. Just replace 7022 from the screenshot below with the port number used by your server:
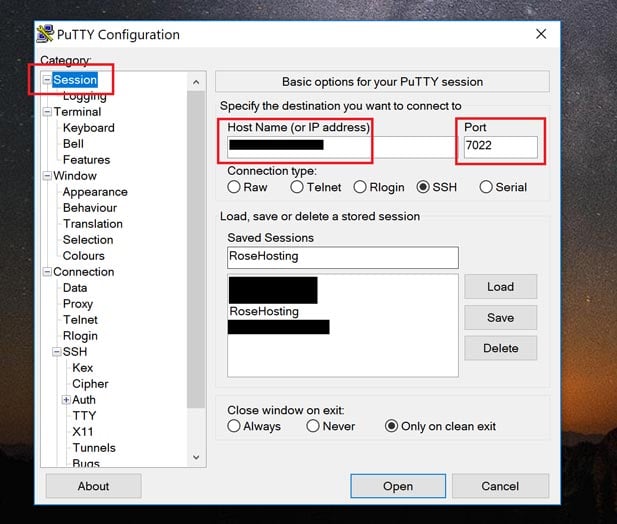
If you’re hosting with a hosting provider that has a custom SSH port, make sure you check with them as to what their port is.
Step 3: Specify the Private Key
Now expand “SSH” on the left-hand side, and click “Auth”, as shown here:
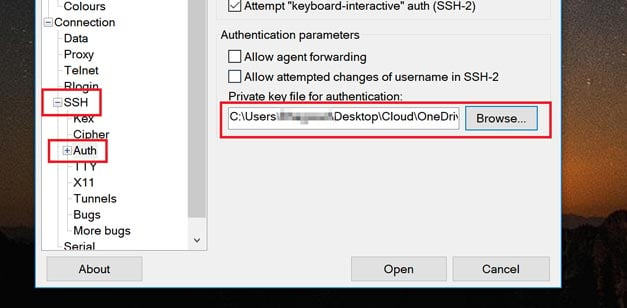
Click “Browse” and navigate to the location of your private key. Select it (it should be in the .PPK format) and you’re done! Click “Open” and an SSH window should open up. Enter the username with which you generated your private key and if all goes well, it should log in like this:
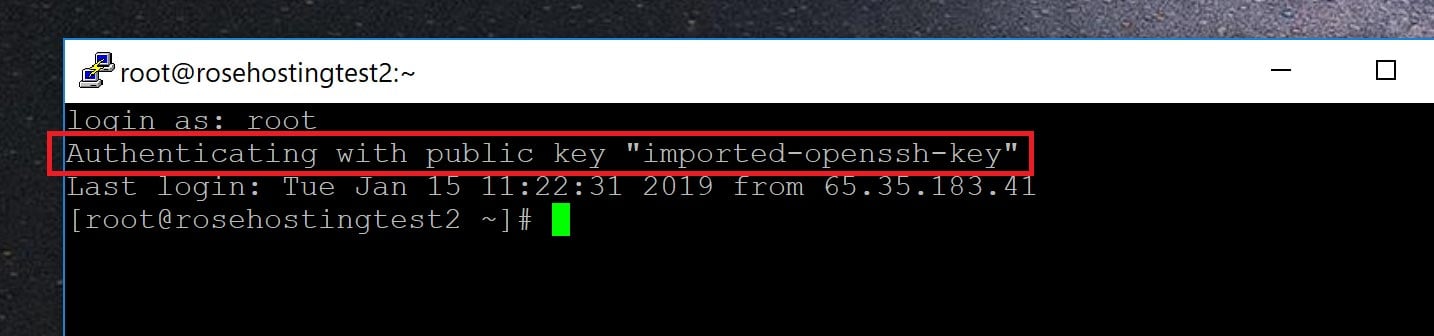
And that’s it – you’ve successfully opened an SSH session with private key authentication using PuTTY.
Of course, you don’t have to create and set up your private and public key pair on your Ubuntu 16.04 VPS if you use one of our Linux VPS Hosting services, in which case you can simply ask our expert Linux admins to set up the SSH keys for you. They are available 24×7 and will take care of your request immediately.
PS. If you liked this post, please share it with your friends on the social networks using the share shortcuts below, or simply leave a comment in the comments section. Thanks.
Hi,
Putty authenticates my key but then immediately crashes. How to resolve this issue?