 In today’s article we will cover the steps on how to install the LAMP (Linux Apache MariaDB and PHP) stack with phpMyAdmin on a Fedora 20 VPS.
LAMP represents a full featured stack containing the most popular web server known as Apache, the database server MariaDB and the most popular open-source web programming language known as PHP.
This tutorial shows how to setup LAMP on Fedora 20, but the procedure is the same for Fedora 21 OS.
REQUIREMENTS
We will be using our SSD 1 Linux VPS Hosting plan for this tutorial.
UPDATE THE SYSTEM
The first thing we need to do is to make sure our system is fully up-to-date. So, executing the command below will install all available updates:
# yum update -y
INSTALL APACHE
Install and enable Apache to start automatically whenever the system boots with the following commands:
# yum install httpd -y

# systemctl enable httpd.service

# systemctl start httpd.service
INSTALL MARIADB
# yum install mariadb mariadb-server -y

# systemctl enable mariadb.service

# systemctl start mariadb.service
Now we need to run the post-installation script ‘mysql_secure_installation’ in order to set a root password.
# mysql_secure_installation
- Set root password? [Y/n] y
- Remove anonymous users? [Y/n] y
- Disallow root login remotely? [Y/n] y
- Remove test database and access to it? [Y/n] y
- Reload privilege tables now? [Y/n] y
INSTALL PHP
Next step is to install PHP as an Apache module (mod_php) so you can run PHP scripts under your Apache web server. To do this execute:
# yum install php -y
After it is installed, create a PHP info page into Apache’s document root (/var/www/html) so you can verify if PHP support is enabled on your system:
# echo -e "<?php\n\tphpinfo();\n?>" > /var/www/html/info.php
once the info.php file is created, restart Apache so the newly installed PHP module can take effect.
# systemctl restart httpd.service
You can call the info.php.file in a browser by navigating to: http://your_ip_address/info.php . This is very useful because it shows all your PHP information like PHP API, PHP Extension, PHP modules etc… As you can see MySQL is not listed which means that you don’t have MySQL support in PHP5 yet. This can be easily fixed.
To get MySQL support in PHP, you can install the php-mysql package. Sometimes you may need other PHP5 modules for your applications. You can search for available PHP5 modules with the command:
# yum search php
And then pick and install the ones you need. In our case we will install:
# yum install php-mysqlnd php-mssql php-opcache -y
Restart Apache for the newly installed modules to take effect.
# systemctl restart httpd.service
INSTALL PHPMYADMIN
A good idea is to install phpMyAdmin so you can easily manage your MySQL databases via a nice frontend written in PHP. So, proceed with installing phpMyAdmin using the following command
# yum install phpmyadmin
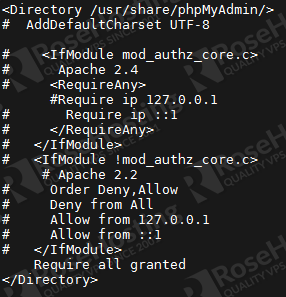
In order to avoid the ‘Forbidden. You don’t have permission to access /phpmyadmin/ on this server.’ error let’s edit the configuration file and comment all the lines in the <Directory /usr/share/phpMyAdmin/> block and add the following line: Require all granted.
# vim /etc/httpd/conf.d/phpMyAdmin.conf
After the modification it should look like this:
Then restart Apache.
# systemctl restart httpd.service
Now open your favorite web browser and navigate to http://your_ip_address/phpmyadmin. You can login using root and the previously set root password.
Congratulations, you have successfully installed a full LAMP stack with Mariadb and phpMyadmin on your Fedora 20 VPS.
Of course you don’t have to do any of this if you use one of our Linux VPS Hosting services, in which case you can simply ask our expert linux admins to install this for you. They are available 24×7 and will take care of your request immediately.
PS. If you liked this post please share it with your friends on the social networks using the buttons on the left or simply leave a reply below. Thanks.