 We’ll teach you how to install Laravel on Ubuntu 16.04. Laravel is a PHP web application framework which is intended for the development of web applications following the model–view–controller (MVC) architectural pattern. It has an expressive, elegant syntax and provides tools needed for large, robust applications. Installing Laravel on Ubuntu 16.04 is an easy task, just follow the steps below and you should have your Laravel installation on Ubuntu 16.04 ready in a few minutes.
To Install Laravel on Ubuntu 16.04, carefully follow the steps below:
Table of Contents
Step 1: Log In to Your Server via SSH
# ssh root@server_ip
You can check whether you have the proper Ubuntu version installed on your server with the following command:
# lsb_release -a
You should get this output:
Distributor ID: Ubuntu
Description:    Ubuntu 16.04.1 LTS
Release:        16.04
Codename:       xenial
Step 2: Update the System
Make sure your server is fully up to date using:
# apt update && apt upgrade
Then install some much-needed dependencies:
# apt install php-mcrypt php-gd php-mbstring
Step 3: Install Composer
Install Composer which is a tool for dependency management in PHP.
# curl -sS https://getcomposer.org/installer | php
Once the Composer is installed, you need to move it so that Composer can be available within your machine path:
# mv composer.phar /usr/local/bin/composer
Make it executable:
# chmod +x /usr/local/bin/composer
Now create a directory where Laravel will be downloaded.
# mkdir /var/www/html/your_website
Of course, replace your_website with your actual domain name or any name for that matter.
Step 4: Download the Latest Laravel Version
Now enter the newly created directory and download the latest Laravel version.
# cd /var/www/html/your_website

# git clone https://github.com/laravel/laravel.git
Move the files and directories from the Github Laravel clone into your current working directory (/var/www/html/your_website/)
# mv laravel/* .

# mv laravel/.* .
Now delete the unnecessary laravel dir:
# rmdir laravel/
Step 5: Start Laravel on Ubuntu 16.04
Start the Laravel installation using Composer:
# composer install
Once the installation is finished, assign the proper ownership over the Laravel files and directories:
# chown www-data: -R /var/www/html/your_website/
Next, set the encryption key needed:
# php artisan key:generate
You will notice the below error when running the command.
[ErrorException]
  file_get_contents(/var/www/html/your_website/.env): failed to open stream: No such file or directory
To solve this you should rename the .env.example file into .env:
# mv .env.example .env
Generate the encryption key again:
# php artisan key:generate
You should get the following output:
Application key [base64:ULQsledeS17HxCAsssA/06qN+aQGbXBPPpXVeZvdRWE=] set successfully.
Of course, the key will be different in your case. Now edit the app.php file and configure the encryption key. Open the file with your favorite text editor. We are using nano.
# nano config/app.php
Locate the ‘key’ => env(‘APP_KEY’ line and add the key next to it. After you are done the directive should look like this:
'key' => env('APP_KEY', 'base64:7fO0S9TxZu8M2NwBWVEQsjPGRi+D1t6Ws8i0Y2yW/vE='),

    'cipher' => 'AES-256-CBC',
Save and close the file.
Step 6: Setup Apache Virtual Host
Create an Apache virtual host file so your domain can serve Laravel. Open a file, for example, your_website.conf:
# nano /etc/apache2/sites-available/your_website.conf
Paste the following:
<VirtualHost *:80>
ServerAdmin admin@your_domain.com
DocumentRoot /var/www/html/your_website/public/
ServerName your_domain.com
ServerAlias www.your_domain.com
<Directory /var/www/html/your_website/>
Options FollowSymLinks
AllowOverride All
Order allow,deny
allow from all
</Directory>
ErrorLog /var/log/apache2/your_domain.com-error_log
CustomLog /var/log/apache2/your_domain.com-access_log common
</VirtualHost>
Enable the site:
# a2ensite your_website.conf
Restart Apache so the changes can take effect:
# service apache2 reload
Now open your favorite web browser and navigate to http://your_domain.com where you will be welcomed by a page as shown in the image below:
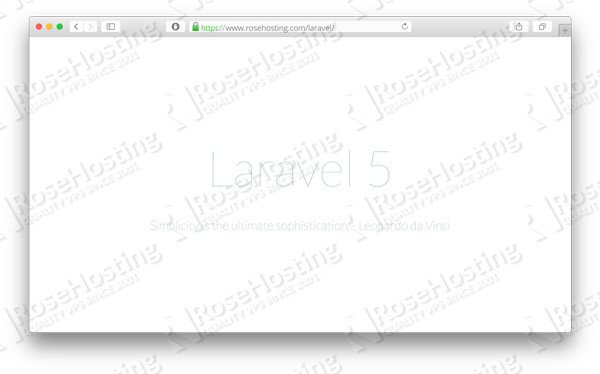
Congratulations, you have successfully installed Laravel on Ubuntu 16.04. For more information about Laravel, you should check their official documentation.
 Of course, you don’t have to install Laravel on Ubuntu 16.04, if you use one of our Laravel VPS Hosting services, in which case you can simply ask our expert Linux admins to install Laravel on Ubuntu 16.04 for you. They are available 24×7 and will take care of your request immediately. For an updated tutorial on how to install Laravel on Ubuntu 20.04, check it on our blog.
PS. If you liked this post, on how to install Laravel on Ubuntu 16.04, please share it with your friends on the social networks using the buttons on the left or simply leave a reply below. Thanks.
Hi,
Got Laravel installed quickly with your tutorial. I managed to get it running on VirtualBox. The official Laravel doc is ok but needs a lot of reading for something so simple.
Thank you.
Best simple install I have read.
Thanks
Thank you for this complete tutorial. Just one question: is there any need to edit /etc/hosts file?
For example adding a line like this:
127.0.0.1
your_domain.comwww.your_domain.comNo need to edit the /etc/hosts file. If you have a domain name you can point it to your server IP address and add it to your Apache virtual host file.
Thanks.
Please help:
I did this: service apache2 reload
and got below error:
Job for apache2.service failed because the control process exited with error code. See “systemctl status apache2.service” and “journalctl -xe” for details.
There is an error in your Apache configuration and you can use
systemctl status apache2.serviceorjournalctl -xeto get more details about the problem.Thanks.
I opened my favorite web browser and navigateed to
http://your_domain.com, but nothing happened. Am i doing something wrong? I did everything written in this post.You should replace `your_domain.com` with your actual domain name.
simple, clear, precise and of course worked; best tutorial
Great Tutorial. My virtual machine on which Ubuntu 16.04 is installed is on Azure cloud. When I type my domain name, I get the following displayed on the browser. What could be the reason here?
*/ define(‘LARAVEL_START’, microtime(true)); /* |————————————————————————– | Register The Auto Loader |————————————————————————– | | Composer provides a convenient, automatically generated class loader for | our application. We just need to utilize it! We’ll simply require it | into the script here so that we don’t have to worry about manual | loading any of our classes later on. It feels great to relax. | */ require __DIR__.’/../vendor/autoload.php’; /* |————————————————————————– | Turn On The Lights |————————————————————————– | | We need to illuminate PHP development, so let us turn on the lights. | This bootstraps the framework and gets it ready for use, then it | will load up this application so that we can run it and send | the responses back to the browser and delight our users. | */ $app = require_once __DIR__.’/../bootstrap/app.php’; /* |————————————————————————– | Run The Application |————————————————————————– | | Once we have the application, we can handle the incoming request | through the kernel, and send the associated response back to | the client’s browser allowing them to enjoy the creative | and wonderful application we have prepared for them. | */ $kernel = $app->make(Illuminate\Contracts\Http\Kernel::class); $response = $kernel->handle( $request = Illuminate\Http\Request::capture() ); $response->send(); $kernel->terminate($request, $response);
Do you have PHP installed on your server? Looks like the web server is failing to execute the PHP files.
Shakti did you manage to solve your problem? I have the same problem and php 7.0.27 is installed.
I got this error only when i point the DocumentRoot to /var/www/html/laravel/public for my virtualhost.
Thank you, it works perfectly. But I can not access my previous project file (.php) anymore, whenever I type localhost it redirect to laravel framework. How to solve this? Please help.
Most likely you have your other project installed in a different directory. Check your web server (Apache/Nginx) settings.
Hi, i follow your step but error when run “php artisan key:generate” :
PHP Warning: require(/var/www/html/web/vendor/autoload.php): failed to open stream: No such file or directory in /var/www/html/web/artisan on line 18
PHP Fatal error: require(): Failed opening required ‘/var/www/html/web/vendor/autoload.php’ (include_path=’.:/usr/share/php’) in /var/www/html/web/artisan on line 18
i dont get vendor folder, any solution ?
Our tutorial is tested and working without a problem. Have you made sure that you’ve followed the instructions correctly?
Please try doing all of the described steps again and be more careful.
Great tutorial to successfully install laraval… but i need info regarding can i use another url for laraval instead localhost..
What exactly do you mean by “can i use another url for laraval instead localhost” ?
Hi,
What should I use instead of your_domain.com??
You should replace `your_domain.com` with your actual domain name.
Fantastic guide so far!
However, when I run “php artisan key:generate” I get:
PHP Fatal error: Uncaught Error: Class ‘Illuminate\Foundation\Application’ not found in /var/www/html/project/bootstrap/app.php:14
Stack trace:
#0 /var/www/html/project/artisan(20): require_once()
#1 {main}
thrown in /var/www/html/project/bootstrap/app.php on line 14
any ideas? I already tried “composer dumpautoload” and that fails also with the same error.
Please check the composer.json file, and check if PHP Mcrypt extension is enabled in PHP.
Then, delete composer.lock and the vendor directory and try again.
You can simply call git clone with a period to save directly into current file;
`git clone https://github.com/laravel/laravel.git .`
I don’t recommend this way, there’s an easier way within 30 seconds… Also it doesn’t work, they didn’t show which php version or dependencies and how to find the missing ones.
Do we need a hosting plan to follow this tutorial? I just want to access my laravel projects from my browser, I’m not interested in deploying my app yet.
Yes, you need to order a VPS and install Laravel on it.
This framework offers developers to conserve time and also assists decrease planning and thinking to constitute the complete website from the scrape. Furthermore, it is an open-source framework of PHP and pursues the MVC (model-view-controller) architectural design. Apart from this, this framework provides a lot of descriptive and explanatory forums, expert’s opinions and blogs for flawless free coding.