In this tutorial, we are going to explain in step-by-step detail how to install CyberPanel with OpenLiteSpeed as a web server on Ubuntu 20.04 OS.
CyberPanel is a control panel powered by OpenLiteSpeed designed with a user-friendly GUI, to make work easier for developers and system administrators. CyberPanel is a control panel that offers some great features such as CSF Firewall, installations scripts for CMSes and it can work on multiple operative systems like Linux, Windows, Mac OS and etc. Openlite speed is an open-source web server that offers security high performance, used for handling huge traffic for the website. CyberPanel with OpenLiteSpeed combination is providing very powerful website performance.
Installing CyberPanel with OpenLiteSpeed is a very easy and straightforward process. Let’s get started!
Table of Contents
Prerequisites
- Fresh install of Ubuntu 20.04
- User privileges: root or non-root user with sudo privileges
- VPS with at least 2GB of RAM (Our NVMe 2 VPS plan)
Step 1.Update the System
Before we start with installing CyberPanel along with OpenLiteSpeed we need to update the system:
sudo apt update -y && sudo apt upgrade -y
Step 2.Remove Unnecessary Intstallations
Since CyberPanel has its own structure and relays on the OpenLiteSpeed server, we need to remove the default web server, database server, the default mail transfer agent, and default IMAP and POP3 server if they are already installed and their services are up and running. First, you need to stop the services before you remove them.
sudo systemctl stop mysql.service
sudo systemctl stop apache2.service
sudo systemctl stop dovecot.service
sudo systemctl stop postfix.service
Once, you stop them, you can remove the installations with the commands below:
sudo apt-get remove -y mysql-server apache2 dovecot-core postfix
After removing the unnecessary installations, reboot the system in order for the changes to take effect.
shutdown -r now
Step 3.Install CyberPanel with OpenLiteSpeed
First, we need to download the installation script.
 cd /opt
wget -O installer.sh https://cyberpanel.net/install.sh
Once, the installations script is downloaded we need to make it executable.
chmod +x installer.sh
Finally, we can run the script with the command below:
sh installer.sh
Once, the installer script is executed, you will need to select the available options while installing the panel:
Select the option Install CyberPanel by entering 1 on the prompt.
root@vps:/opt# sh installer.sh
curl is already the newest version (7.68.0-1ubuntu2.7).
wget is already the newest version (1.20.3-1ubuntu2).
The following packages were automatically installed and are no longer required:
  apache2-data apache2-utils libexttextcat-2.0-0 libexttextcat-data liblua5.3-0 ssl-cert
Use 'apt autoremove' to remove them.
0 upgraded, 0 newly installed, 0 to remove and 4 not upgraded.
Initializing...
Fetching latest data from CyberPanel server...
This may take few seconds...
Branch name fetched...v2.1.2
Checking root privileges...
You are runing as root...
Valid IP detected...
Checking server location...
Desktop OS not detected. Proceeding
System: Ubuntu 20 detected...

Checking virtualization type...
Synchronizing state of named.service with SysV service script with /lib/systemd/systemd-sysv-install.
Executing: /lib/systemd/systemd-sysv-install disable named
Removed /etc/systemd/system/multi-user.target.wants/named.service.
Removed /etc/systemd/system/bind9.service.
Created symlink /etc/systemd/system/named.service → /dev/null.

named process detected, disabling...


Initialized...

CyberPanel Installer v2.1.2

1. Install CyberPanel.

2. Exit.

  Please enter the number[1-2]: 1
On the next step select the Install CyberPanel with OpenLiteSpeed option by entering 1 on the prompt.
CyberPanel Installer v2.1.2

RAM check : 125/3931MB (3.18%)

Disk check : 3/29GB (11%) (Minimal 10GB free space)

1. Install CyberPanel with OpenLiteSpeed.

2. Install Cyberpanel with LiteSpeed Enterprise.

3. Exit.


Please enter the number[1-3]: 1
The next step is to install the Full service for CyberPanel.
Install Full service for CyberPanel? This will include PowerDNS, Postfix and Pure-FTPd.

Full installation [Y/n]: Y
For Remote MySQL, enter N
Do you want to setup Remote MySQL? (This will skip installation of local MySQL)

(Default = No) Remote MySQL [y/N]: N
Press, Enter to select the latest version available.
Press Enter key to continue with latest version or Enter specific version such as: 1.9.4 , 2.0.1 , 2.0.2 ...etc
Enter s to set your own strong password, for the admin user.
Please choose to use default admin password 1234567, randomly generate one (recommended) or specify the admin password?
Choose [d]fault, [r]andom or [s]et password: [d/r/s] s
Please enter your password: YourStrongPassword
Password: Confirm Password: YourStrongPassword
In the next step, select to install the Memcached process.
Do you wish to install Memcached process and its PHP extension?
Please select [Y/n]: Y
After Memcached, select to install the Redis process as well.
Do you wish to install Redis process and its PHP extension?
Please select [Y/n]:Y
Select Yes, to set up a WatchDog. After this step, the installation process of CyberPanel will start automatically, and you will need to allow some time for completion. Usually, it takes up to 30 minutes.
Would you like to set up a WatchDog (beta) for Web service and Database service ?
The watchdog script will be automatically started up after installation and server reboot
If you want to kill the watchdog , run watchdog kill
Please type Yes or no (with capital Y, default Yes): Y
Once, the installation is completed you should receive the following output. After the installation, it is recommended to restart the server.
###################################################################
                CyberPanel Successfully Installed

                Current Disk usage : 8/29GB (31%)

                Current RAM  usage : 325/3931MB (8.27%)

                Installation time  : 0 hrs 49 min 0 sec

                Visit: https://YourServerIpAdress:8090
                Panel username: admin
                Panel password: *****
---------------------------------------------------------------------------------
                Visit: https://YourServerIpAdress:7080
                WebAdmin console username: admin
                WebAdmin console password: qYqJCl7pq58Uh
---------------------------------------------------------------------------------
                Visit: https://YourServerIpAdress:8090/rainloop/?admin
                Rainloop Admin username: admin
                Rainloop Admin password: KviPafcVSCl
---------------------------------------------------------------------------------
             Run cyberpanel help to get FAQ info
             Run cyberpanel upgrade to upgrade it to latest version.
             Run cyberpanel utility to access some handy tools .

              Website : https://www.cyberpanel.net
              Forums  : https://forums.cyberpanel.net
              Wikipage: https://docs.cyberpanel.net
              Docs    : https://cyberpanel.net/docs/

            Enjoy your accelerated Internet by
                CyberPanel & OpenLiteSpeed
###################################################################
If your provider has a network-level firewall
Please make sure you have opened following port for both in/out:
TCP: 8090 for CyberPanel
TCP: 80, TCP: 443 and UDP: 443 for webserver
TCP: 21 and TCP: 40110-40210 for FTP
TCP: 25, TCP: 587, TCP: 465, TCP: 110, TCP: 143 and TCP: 993 for mail service
TCP: 53 and UDP: 53 for DNS service
Would you like to restart your server now? [y/N]: y
Step 4. Access CyberPanel GUI
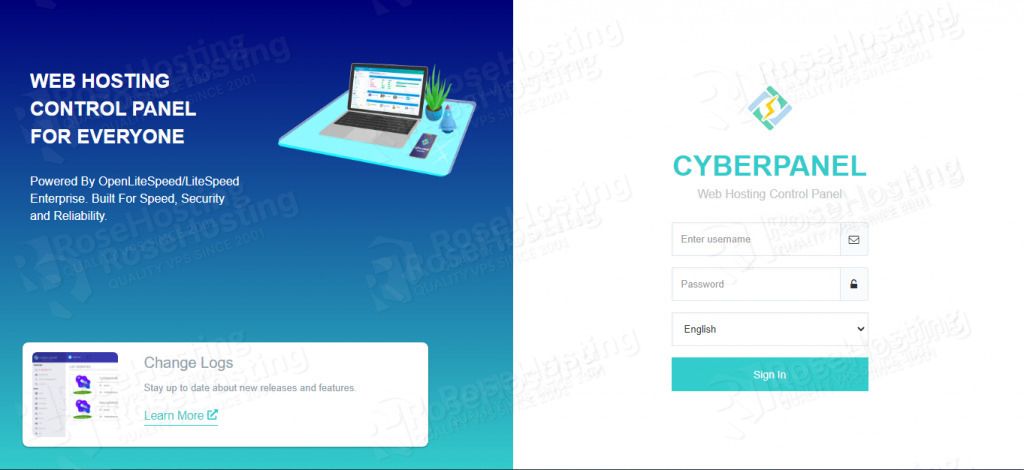
To access the CyberPanel Web Interface visit the following link:
https://YourServerIPAddress:8090/
You should see the following screen:
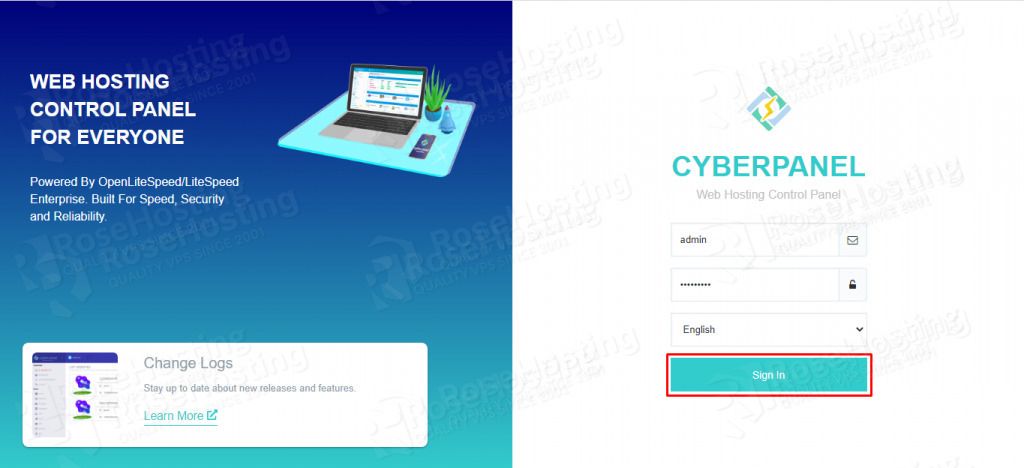
Enter the admin username and the password you set before while installing the CyberPanel. Hit on the blue “Sign In” button.
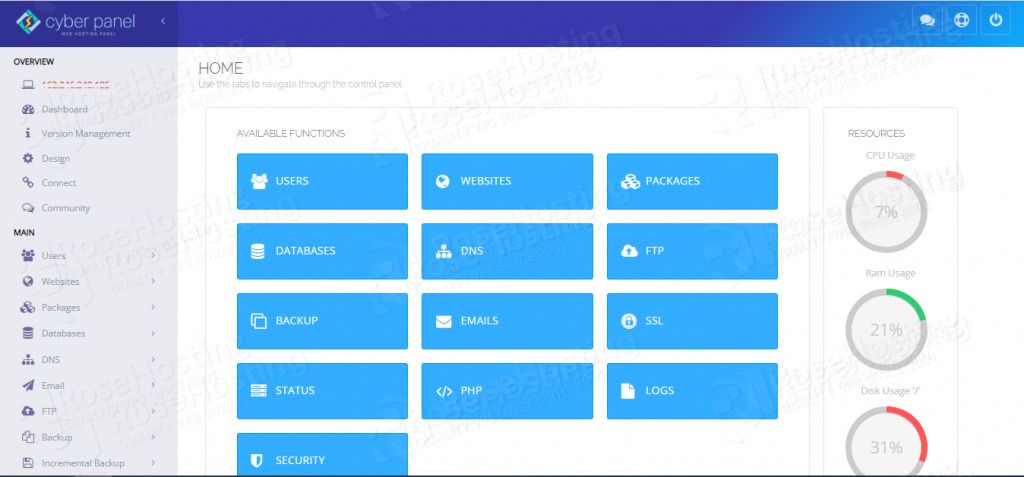
After successful login, you will be redirected to the GUI of the CyberPanel as described in the picture below:
That’s all. You successfully installed CyberPanel with OpenLiteSpeed on Ubuntu 20.04. If for some reason you find it difficult to install, you can always contact our technical support and they will do the rest for you. We are available 24/7.
If you liked this post on how to install CyberPanel with OpenLiteSpeed on Ubuntu VPS, please share it with your friends on social networks or simply leave a reply below. Thanks.
See Related:
- How to Set Up WordPress Multisite with OpenLiteSpeed on Ubuntu 20.04
- How to Install Magento 2.4 With OpenLiteSpeed on Ubuntu 20.04