
In this tutorial, we are going to show you how to set up Elasticsearch Cluster on our cloud platform RoseHosting Cloud. Also, we will explain in more detail the deployment, launching, and connecting the endpoints of Elasticsearch offered by the platform.
Elasticsearch is distributed, free, open-source, and real-time search engine written in Java used to search analyze, and explore your data with an HTTP web interface. It is based on Lucene (free and open-source search engine software library) and provides speed and scalability to index many types of content. Elasticsearch is the most popular search engine according to the DB-Engines rankings and is highly demanded among users.
Installing and setting up the Elasticsearch environment on the RoseHosting Cloud platform should take up to 10 minutes and is very easy in just a few clicks. Let’s get started!
1. Login to RoseHosting Cloud
To start with the setup you need first, to log in to our RoseHosting Cloud Platform using the URL https://app.rosehosting.cloud.

2. Installing the environment
On the top left pane navigate and click on the green “New Environment” button:

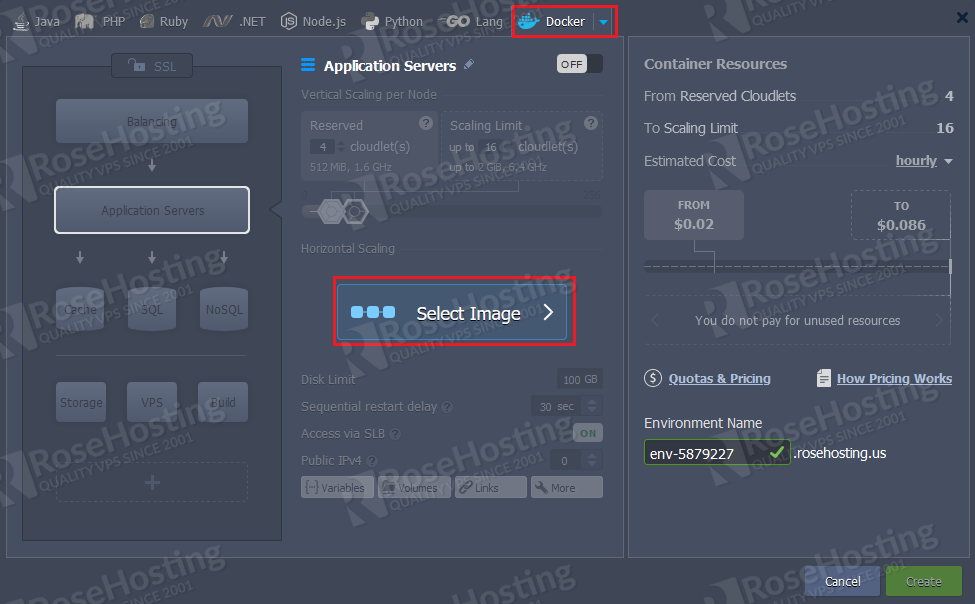
In the newly opened window select the “Docker” tab located on the right and click on “Select Image” as on the picture below:
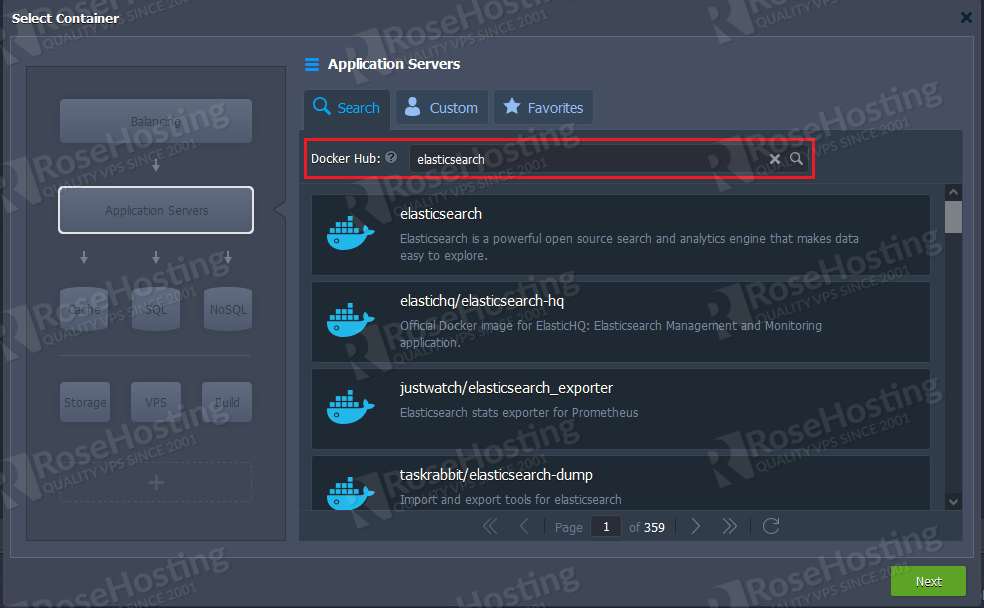
In the “Docker Hub” input field type “elasticsearch” and click on the search icon right of the name.
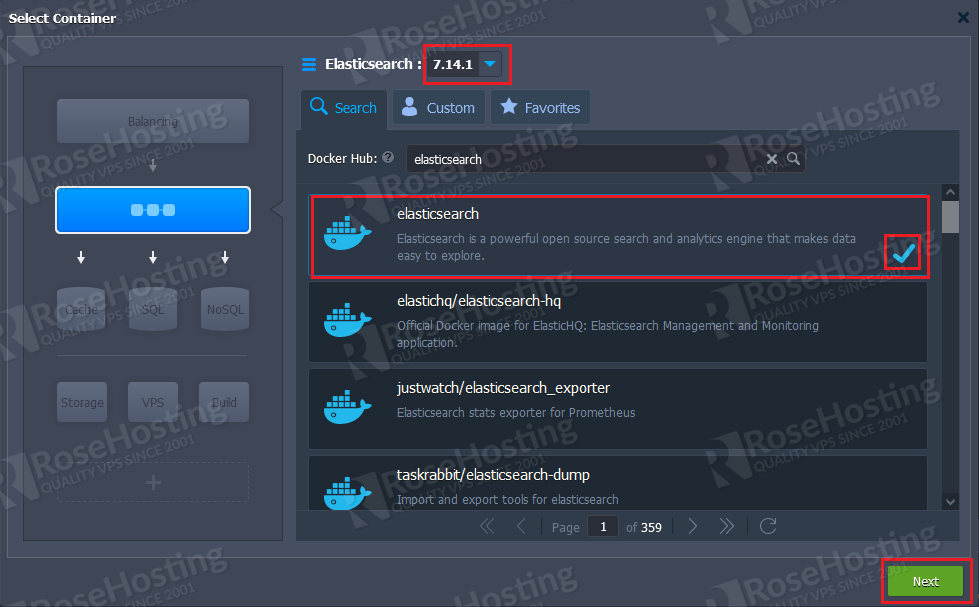
Choose the first image named “elasticsearch” and then select the version you would like to install. In this tutorial, we are going to use the latest version 7.14.1. Once the version is selected click on the green “Next” Button:
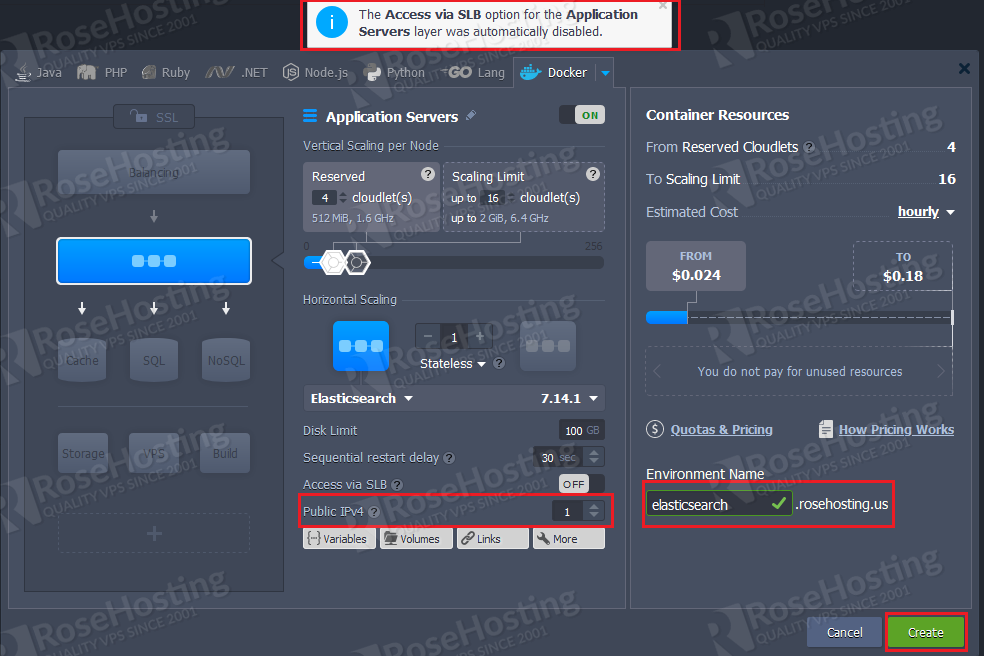
The next window is the place where we can configure the general parameters of our environment such as cloudlets, disk limits, IPv4 addresses, and other variables. We are going to leave the default values and only increase the Public IPv4 address from zero to one and choose a name for our environment. Changing the Public IPv4 address will automatically disable the Access via SLB. Once this is done click on the green “Create” button at the bottom of the window.
These were the steps required for installing the Docker-based Elasticsearch environment on the RoseHosting Cloud platform. Now the environment is up and running and is listed as in the picture below:

After successful installation you will receive login credentials for Elasticsearch on your email account associated with the RoseHosting Cloud Platform:

3. Elasticsearch Configuration
Although the environment is installed we can not access the Elasticsearch in the browser on port 9200 since the Elasticsearch service is not started in the background.
Execute the following command to check that there is no running Elasticsearch service in the background:
ps aux | grep elasticsearch | grep -v grep
Nothing will be displayed on the command prompt:
[root@node1805-elasticsearch ~]# ps aux | grep elasticsearch | grep -v grep
[root@node1805-elasticsearch ~]#
We need to do some configuration through the command line. To access the command line via SSH you need to click on the “Web SSH” button right of the “Application Servers” as shown on the picture below:

The following window should appear at the bottom of the page:

Execute the following command to specify the discovery type
echo "discovery.type: single-node" >> /usr/share/elasticsearch/config/elasticsearch.yml
Check if the discovery type was added successfully:
cat /usr/share/elasticsearch/config/elasticsearch.yml
The following lines should appear in the output:
[root@node1805-elasticsearch ~]# cat /usr/share/elasticsearch/config/elasticsearch.yml
cluster.name: "docker-cluster"
network.host: 0.0.0.0
discovery.type: single-node
Now, the next step is to open the ports 9200 and 9300 in the firewall by executing the following commands:
firewall-cmd --zone=public --permanent --add-port 9200/tcp
firewall-cmd --zone=public --permanent --add-port 9300/tcp
firewall-cmd --reload
The final step of the configuration is to restart the container for the changes to take effectivity:

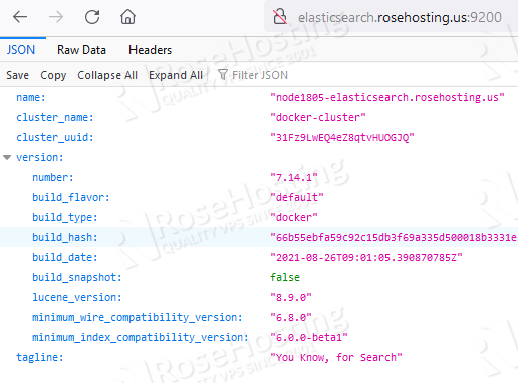
Once the container is restarted we are ready to access the Elasticsearch with the URL of our application and adding the port “:9200” at the end of it. This example may help you: http://elasticsearch.rosehosting.us:9200/
You can also check via SS with the following command about the status of the Elasticsearch:
curl 'http://"enter_your_domain_here":9200/_cluster/health?pretty'
The output should be similar to this:
{
  "cluster_name" : "docker-cluster",
  "status" : "green",
  "timed_out" : false,
  "number_of_nodes" : 1,
  "number_of_data_nodes" : 1,
  "active_primary_shards" : 1,
  "active_shards" : 1,
  "relocating_shards" : 0,
  "initializing_shards" : 0,
  "unassigned_shards" : 0,
  "delayed_unassigned_shards" : 0,
  "number_of_pending_tasks" : 0,
  "number_of_in_flight_fetch" : 0,
  "task_max_waiting_in_queue_millis" : 0,
  "active_shards_percent_as_number" : 100.0
}
Congratulations! You successfully installed and set up the Elasticsearch environment via our RoseHosting Cloud platform without any issues and difficulties. You learned how to use the GUI and the Web SSH access to your server within our platform.
Of course, you can simply subscribe to our managed cloud hosting plans and let our experts set up everything within minutes, completely free of charge. Our support is professional and we are available 24/7.
If you liked this post on how to set up ElasticSearch Cluster on RoseHosting Cloud, please share it with your friends on the social networks using the buttons on the left or simply leave a reply below. Thanks.